(Created page with "AImesh Error Checking by Ballard44 3dsmax scripts referenced are available at the BFMeshView website: http://www.bytehazard.com/bfstuff So here is my typical workflow... To...") Tags: Visual edit apiedit |
No edit summary |
||
| (14 intermediate revisions by one other user not shown) | |||
| Line 1: | Line 1: | ||
| + | Exporting the AImesh in 3dsmax |
||
| − | AImesh Error Checking by Ballard44 |
||
| + | by Dnamro |
||
| − | 3dsmax scripts referenced are available at the |
||
| − | BFMeshView website: |
||
| − | http://www.bytehazard.com/bfstuff |
||
| + | {{Infobox |
||
| − | So here is my typical workflow... |
||
| + | |title = Tools Needed |
||
| + | |first = 3dsmax (V9 is used in this tutorial) |
||
| + | |second = BF2 3dsmax plugin, POE BF2 utilities |
||
| + | |third = A Static object |
||
| + | }} |
||
| + | *[[AImesh Import|AImesh Import 3dsmax]] |
||
| − | To keep this from turning into a novel, let's |
||
| + | *[[Create AI Meshes with 3dsmax9]] |
||
| − | first say that you've found a static that did not work in the navmesh process, |
||
| + | *[[AIMesh Hierarchy Editing]] |
||
| − | so... |
||
| + | *[[AImesh Export 3dsmax]] |
||
| + | *[[How to set up 3dsmax collision mesh schematic]] |
||
| + | *[[Understanding the AImesh (COL3)]] |
||
| + | *[[Troubleshooting the Aimesh]] |
||
| + | *Creating an AImesh from a multi-part object |
||
| + | *[[Creating an AImesh for a Multi-Story Building]] |
||
| + | *[[AImesh_Trick_for_Problem_Stairways]] |
||
| + | *[[BF2142 AImesh Creation Project]] |
||
| − | '''1) Import the collision mesh of the problem |
||
| − | static in Max using the colmeshimp.ms script.''' |
||
| + | ---- |
||
| − | clipboard10b.jpg |
||
| + | <br> |
||
| − | [[File:Clipboard10b.jpg|thumb|684x684px]] |
||
| + | == Troubleshooting the AImesh (WIP) == |
||
| + | Based on a tutorial by Ballard44, edited and expanded by Dnamro |
||
| + | '''Tools:''' |
||
| − | Select the script when the window pops open |
||
| + | * 3ds Max 9 is used, which was the last version for which BF2 plugins are available. |
||
| + | * 3dsmax scripts (colmeshimp.ms and meshcheck.ms) referenced are available at the |
||
| + | BFMeshView website: http://www.bytehazard.com/bfstuff |
||
| + | '''Level:''' Advanced - assumes basic skills with 3ds Max |
||
| − | clipboard11rq.jpg |
||
| − | [[File:Clipboard11rq.jpg|thumb|648x648px]] |
||
| + | This tutorial will explain how to check an AImesh for accuracy, which is the col3 mesh, before exporting. This will explain the checks that should be done to help validate that an AImesh is ready for exporting, however, these will not guarantee a working AImesh, but will help eliminate known issues. Creating AImeshes can be very frustrating because the mesh has to be pristine. It is a matter of cleaning and testing until you get a working AImesh. Unfortunately, the COL3\AImesh is usually based on another collision mesh, which are not required to to follow the strict rules for AImesh development, so a lot of clean up work is normally required. A detailed explanation of the AImesh rules are explained in detail here: |
||
| − | Hit the 'Import' Button at the scale of 10.0 |
||
| + | [[Understanding the AImesh (COL3)]] |
||
| − | clipboard12cc.jpg |
||
| − | [[File:Clipboard12cc.jpg|thumb|648x648px]] |
||
| + | For this tutorial, a building from the Forgotten Hope mod is used. |
||
| − | Search for the collisionmesh file that you are |
||
| + | * Import the collision mesh of the problem static in Max using the colmeshimp.ms script from the website link listed above.'''<nowiki/>''' |
||
| − | looking for to open it up |
||
| + | clipboard10b.jpg<blockquote></blockquote> |
||
| − | Hopefully you have this script for Max |
||
| + | {| class="article-table" |
||
| − | already? I forget where I got it from...maybe Remdul??? |
||
| + | ! |
||
| − | This will import all the cols of the static |
||
| + | [[File:Clipboard10b.jpg|thumb|701x701px]] |
||
| − | into Max. |
||
| + | |} |
||
| − | More importantly, it will tell me if there was |
||
| − | even a col3 for this static. |
||
| + | <blockquote><br></blockquote> |
||
| − | '''2a) If there was a col3 can I fix it so it |
||
| + | * Select the script when the window pops open |
||
| − | will work? Is it salvageable?''' |
||
| − | Hopefully this is the case. |
||
| − | The nice thing about doing FH2 maps is that |
||
| − | many of the statics that were broken navmesh wise actually had a pretty viable |
||
| − | col3 already. |
||
| − | I just needed to fix them which is typically |
||
| − | alot better than creating a new col3 from scratch. |
||
| + | clipboard11rq.jpg<blockquote></blockquote> |
||
| − | '''2b) There was no col3, so I have to use |
||
| + | {| class="article-table" |
||
| − | col2 as the base for creating the col3.''' |
||
| + | ! |
||
| − | This can be time consuming, but necessary. |
||
| + | [[File:Clipboard11rq.jpg|thumb|706x706px]] |
||
| − | Just go to work making sure you follow all the |
||
| + | |} |
||
| − | rules of a viable col3. |
||
| + | <blockquote><br></blockquote> |
||
| − | '''3) Checking to make sure this static will |
||
| + | * Hit the 'Import' Button at the scale of 10.0 |
||
| − | work''' |
||
| − | So you have gone through 2a or 2b and now it's |
||
| − | time to test them '''in Max''' to see if they pass. |
||
| + | clipboard12cc.jpg<blockquote></blockquote> |
||
| − | This is one I just did for FH2. |
||
| + | {| class="article-table" |
||
| + | ! |
||
| + | [[File:Clipboard12cc.jpg|thumb|693x693px]] |
||
| + | |} |
||
| + | <blockquote><br></blockquote> |
||
| − | clipboard31s.jpg |
||
| + | * Search for the collisionmesh file that you are |
||
| − | [[File:Clipboard31s.jpg|thumb|648x648px]] |
||
| + | looking for to open it up |
||
| + | '''Note:''' This will import all the collision meshes for the model |
||
| + | into Max. |
||
| + | More importantly, it will list if there was |
||
| + | even a col3 already created for this static. |
||
| + | '''COL3 mesh exists but does not work''' |
||
| − | I had to do step 2b as the col3 it did have |
||
| − | was just too simple. |
||
| − | I've already given it the _nav extension for |
||
| − | the name. This way it will export with that name. |
||
| + | If there is an existing col3 that is not working it is probably a copy of one of the other collision meshes. If your lucky, it might just need a few adjustments. ''' ''' |
||
| − | '''3a) Start by welding vertices together''' |
||
| − | Switch to 'vertex' selection and select all |
||
| − | your vertices |
||
| − | Under the 'Edit Vertices' box select the box |
||
| − | to the right of the 'Weld' button |
||
| − | This brings up the 'Weld Vertices' options box |
||
| − | as shown |
||
| − | Make sure the threshold is set to 0.01...If |
||
| − | you use anything higher it can weld vertices that you might not want welded |
||
| − | creating issues |
||
| − | Click 'Apply' |
||
| − | In this case they were already welded, but if |
||
| − | they weren't the 'before' number would have been higher than the 'after'. |
||
| + | '''COL3 mesh does not exist''' |
||
| − | clipboard08g.jpg |
||
| − | [[File:Clipboard08g.jpg|thumb|652x652px]] |
||
| + | If there was no col3, use a col2 mesh as the base for creating the col3.'''<nowiki/>''' |
||
| + | This can be time consuming, but necessary. |
||
| + | Just go to work making sure you follow all the |
||
| + | rules of a viable col3. |
||
| + | '''Testing the COL3 in 3dsmax''' |
||
| − | '''3b) Next get rid of any unnecessary |
||
| − | vertices''' |
||
| − | You can see I've selected the 'Remove Isolated |
||
| − | Vertices' box. |
||
| − | After that select the 'Remove Unused Map |
||
| − | Verts' box (directly below and not highlighted in the pic) |
||
| + | '''<nowiki/>''' Now that you have a col3\AImesh, it's |
||
| − | clipboard09gi.jpg |
||
| + | time to test in Max to see if they pass. |
||
| − | [[File:Clipboard09gi.jpg|thumb|652x652px]] |
||
| + | clipboard31s.jpg<blockquote></blockquote> |
||
| + | {| class="article-table" |
||
| + | ![[File:Clipboard31s.jpg|thumb|690x690px]] |
||
| + | |} |
||
| + | <blockquote><br></blockquote> |
||
| − | '''3c) Switch to the 'polygon' selection and |
||
| − | select all the polys''' |
||
| − | Also, make sure they all use ID1 in the |
||
| − | Polygon Properties screen |
||
| − | If they don't, select all the polys and set |
||
| − | them to ID1 using the Set ID box |
||
| + | '''NOTE'''- In this case, the col3 was given a _nav extension for |
||
| − | clipboard01cu.jpg |
||
| + | the name. This way it will export with that name. This is used when the col3 will be used temporarily just to create a navmesh and not added to the main model file to be added into the game. This is common practice since the AImesh is only needed to create the navmesh and not used in game. The new name helps to identify the model as having a completed AImesh. The static will need to be swapped out in the map, but just for navmeshing. |
||
| − | [[File:Clipboard01cu.jpg|thumb|643x643px]] |
||
| + | '''Weld Vertices''' |
||
| + | Start by welding vertices together. This is a good start to cleaning up the mesh. This happens during model development when the a new part of the model is created, but the attachment was not as clean as intended. |
||
| − | '''3d) use the dropdown menu and scrolldown to |
||
| + | * Switch to 'vertex' selection and select all your vertices |
||
| − | select 'STL Check'<nowiki/>''' |
||
| + | * Under the 'Edit Vertices' box select the box to the right of the 'Weld' button This brings up the 'Weld Vertices' options box as shown |
||
| − | clipboard02fy.jpg |
||
| + | Make sure the threshold is set to 0.01...If you use anything higher it can weld vertices that you might not want welded |
||
| − | [[File:Clipboard02fy.jpg|thumb|656x656px]] |
||
| + | creating issues |
||
| + | |||
| + | * Click 'Apply' In this case they were already welded, but if they weren't the 'before' number would have been higher than the 'after'. |
||
| + | clipboard08g.jpg<blockquote></blockquote> |
||
| + | {| class="article-table" |
||
| + | ! |
||
| + | [[File:Clipboard08g.jpg|thumb|689x689px]] |
||
| + | |} |
||
| + | <blockquote><br></blockquote> |
||
| − | '''3e) check the results''' |
||
| − | You first need to 'tick' the 'check' box like |
||
| − | I have. |
||
| − | In this case I have 'No Errors' as the |
||
| − | 'Status' box confirms. |
||
| − | You can also 'tick' the different types of |
||
| − | error that your static has. Currently I have 'Everything' ticked |
||
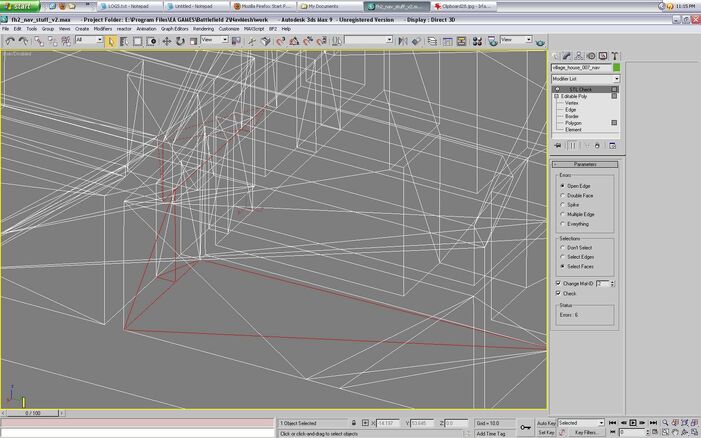
| − | clipboard03pq.jpg |
||
| − | [[File:Clipboard03pq.jpg|thumb|650x650px]] |
||
| + | '''Remove any unnecessary vertices''' |
||
| + | These will be vertices that are not attached to anything. The are usually left during the model development process when parts are deleted. |
||
| − | But what happens if there are errors??? |
||
| + | * Select the 'Remove Isolated Vertices' box. |
||
| − | So I deleted a face and now rerun the STL |
||
| − | Check |
||
| − | It's telling me there are 3 errors now. |
||
| + | * Select the 'Remove Unused Map Verts' box (directly below and not highlighted in the pic) |
||
| − | clipboard05h.jpg |
||
| + | clipboard09gi.jpg<blockquote></blockquote> |
||
| − | [[File:Clipboard05h.jpg|thumb|650x650px]] |
||
| + | {| class="article-table" |
||
| + | ![[File:Clipboard09gi.jpg|thumb|688x688px]] |
||
| + | |} |
||
| + | <blockquote><br></blockquote> |
||
| − | But this is pretty obvious where the error(s) |
||
| + | * Switch to the 'polygon' selection and select all the polys |
||
| − | are. |
||
| + | Also, make sure they all use ID1 in the Polygon Properties screen If they don't, select all the polys and set |
||
| − | Most of the time they are buried deep inside a |
||
| + | them to ID1 using the Set ID box'''<nowiki/>'''<blockquote></blockquote> |
||
| − | static. |
||
| + | {| class="article-table" |
||
| − | You need to be able to see inside the static |
||
| + | ! |
||
| − | and so you switch to 'wireframe' view |
||
| + | [[File:Clipboard01cu.jpg|thumb|691x691px]] |
||
| − | This will highlight the problem area(s) in |
||
| + | |} |
||
| − | red. |
||
| + | <blockquote><br></blockquote> |
||
| − | clipboard06vf.jpg |
||
| − | [[File:Clipboard06vf.jpg|thumb|652x652px]] |
||
| − | Note that every time I move the screen even |
||
| − | slightly, the error(s) 'disappear'. Meaning the errors will not be highlighted |
||
| − | anymore. |
||
| − | You just have to keep reticking the 'Check' |
||
| − | box. |
||
| − | Not sure why it happens, but it does. |
||
| + | <nowiki/>'''<nowiki/>'''<blockquote></blockquote> |
||
| − | I also never correct the errors with the STL |
||
| + | {| class="article-table" |
||
| − | Check 'on'. |
||
| + | ! |
||
| − | I will note where the error is and delete the |
||
| + | [[File:Clipboard02fy.jpg|thumb|702x702px]] |
||
| − | STL Check. I've had problems working with that present, so I don't want that to |
||
| + | |} |
||
| − | remain. |
||
| − | So make sure to right click on the STL check |
||
| − | box and choose delete. |
||
| + | <blockquote><br></blockquote> |
||
| − | clipboard04oe.jpg |
||
| − | [[File:Clipboard04oe.jpg|thumb|638x638px]] |
||
| + | '''Meshcheck Script''' |
||
| + | Now it's time to use the meshcheck.ms script. We will use a different mesh that will show up with errors.'''<nowiki/>''' |
||
| − | So I go about making the corrections that are |
||
| − | needed. |
||
| − | Every time I believe I have corrected a |
||
| − | mistake I start at 3a again. |
||
| − | Rinse and repeat until I have no errors in |
||
| − | 'STL Check' |
||
| + | What you are looking for with this script are faces that are have become edges. Typically this happens when faces that have become so 'broken up' in the creation/editing process that now all that's left are edges. These open edges can keep vertices from welding together and/or faces from being created properly and need to be deleted. |
||
| − | '''3f) Now use the meshcheck.ms script - |
||
| − | <nowiki>*</nowiki>NOTE* I'm going to use a different static for this because the other one had |
||
| − | no errors!''' |
||
| + | Before using this script convert static to 'Editable Mesh' This makes it is easier to correct problems that might arise in this 'mode' |
||
| − | What you typically hope this script finds are |
||
| − | faces that are have become edges. |
||
| − | Faces that have become so 'broken up' in the |
||
| − | creation/editing process that now all that's left are edges. |
||
| − | These open edges can keep vertices from |
||
| − | welding together and/or faces from being created properly |
||
| − | These need to go. |
||
| + | clipboard24h.jpg<blockquote></blockquote> |
||
| − | Before I use this script I will first convert |
||
| + | {| class="article-table" |
||
| − | my static to 'Editable Mesh'...I do this because it is easier to correct |
||
| + | ![[File:Clipboard24h.jpg|thumb|700x700px]] |
||
| − | problems that might arise in this 'mode' |
||
| + | |} |
||
| + | <blockquote><br></blockquote> |
||
| − | clipboard24h.jpg |
||
| − | [[File:Clipboard24h.jpg|thumb|643x643px]] |
||
Find it the same place where you opened the |
Find it the same place where you opened the |
||
| Line 198: | Line 173: | ||
you have no errors |
you have no errors |
||
| − | clipboard30q.jpg |
+ | clipboard30q.jpg<blockquote></blockquote> |
| + | {| class="article-table" |
||
| − | [[File:Clipboard30q.jpg|thumb|643x643px]] |
||
| + | ! |
||
| + | [[File:Clipboard30q.jpg|thumb|694x694px]] |
||
| + | |} |
||
| + | |||
| + | <blockquote><br></blockquote> |
||
If this is the case, you can convert your |
If this is the case, you can convert your |
||
| Line 205: | Line 185: | ||
'''But what happens if it does find errors?''' |
'''But what happens if it does find errors?''' |
||
| + | |||
| − | First, checking it at 0.1 tends to be too much |
||
| − | and might give you 'false negatives' |
+ | First, checking it at 0.1 tends to be too much and might give you 'false negatives' This tends to happen if you have some very |
| − | This tends to happen if you have some very |
||
long and skinny faces. The faces are actually fine (within the col3 |
long and skinny faces. The faces are actually fine (within the col3 |
||
parameters), but they still fall under 0.1 |
parameters), but they still fall under 0.1 |
||
| Line 214: | Line 193: | ||
If they look right, than disregard the error. |
If they look right, than disregard the error. |
||
| − | In this case it found errors at 0.02 |
+ | In this case it found errors at 0.02 You can always tell when there are errors because it '''does not''' give you the no errors messages |
| − | You can always tell when there are errors |
||
| − | because it '''does not''' give you the no errors messages |
||
| − | clipboard26r.jpg |
+ | clipboard26r.jpg<blockquote></blockquote> |
| + | {| class="article-table" |
||
| − | [[File:Clipboard26r.jpg|thumb|649x649px]] |
||
| + | ![[File:Clipboard26r.jpg|thumb|681x681px]] |
||
| + | |} |
||
| + | <blockquote><br></blockquote> |
||
| − | So i now switch to 'wireframe' view and use |
||
| + | |||
| + | So, now switch to 'wireframe' view and use |
||
'Face' selection |
'Face' selection |
||
This script will automatically highlight the |
This script will automatically highlight the |
||
faces in question... |
faces in question... |
||
| − | clipboard27a.jpg |
+ | clipboard27a.jpg<blockquote></blockquote> |
| + | {| class="article-table" |
||
| − | [[File:Clipboard27a.jpg|thumb|646x646px]] |
||
| + | ![[File:Clipboard27a.jpg|thumb|687x687px]] |
||
| + | |} |
||
| + | |||
| + | <blockquote><br></blockquote> |
||
Since the script had already selected the bad |
Since the script had already selected the bad |
||
faces and I've decided that these don't look correct, I can just delete them. |
faces and I've decided that these don't look correct, I can just delete them. |
||
| Line 238: | Line 223: | ||
(triangle) there is a 'doorway' that should have been factored in. |
(triangle) there is a 'doorway' that should have been factored in. |
||
| − | clipboard28u.jpg |
+ | clipboard28u.jpg<blockquote></blockquote> |
| + | {| class="article-table" |
||
| − | [[File:Clipboard28u.jpg|thumb|654x654px]] |
||
| + | ! |
||
| + | [[File:Clipboard28u.jpg|thumb|722x722px]] |
||
| + | |} |
||
| + | |||
| + | <blockquote><br></blockquote> |
||
The meshcheck.ms script has found errors and |
The meshcheck.ms script has found errors and |
||
| Line 248: | Line 238: | ||
you have to... |
you have to... |
||
| − | ''' |
+ | '''Go back and recheck everything again!''' |
You need to do this because deleting errors |
You need to do this because deleting errors |
||
| Line 256: | Line 246: | ||
But when I go back, look what was found... |
But when I go back, look what was found... |
||
| − | clipboard29o.jpg |
+ | clipboard29o.jpg<blockquote></blockquote> |
| + | {| class="article-table" |
||
| − | [[File:Clipboard29o.jpg|thumb|647x647px]] |
||
| + | ![[File:Clipboard29o.jpg|thumb|701x701px]] |
||
| + | |} |
||
| + | |||
| + | <blockquote><br></blockquote> |
||
Not surprising as I knew that the one face |
Not surprising as I knew that the one face |
||
| Line 283: | Line 277: | ||
Before we do |
Before we do |
||
that, there is small step I want to add that can stop headaches in the end. |
that, there is small step I want to add that can stop headaches in the end. |
||
| + | |||
| − | '''5) You need to make sure the pivot of this base mesh is at 0, |
||
| + | '''Check the pivot of this base mesh is at 0, 0, 0''' |
||
| − | 0, 0''' |
||
| + | |||
| − | Hit the 'Hierarchy' button - It's the 4th one from |
||
| + | '''<nowiki/>'''Hit the 'Hierarchy' button - It's the 4th one from the left |
||
| − | the '''left |
||
| − | of the hammer icon |
+ | of the hammer icon that is nearest the top right of the screenshots. Once in, select the 'Affect Pivot Button' and |
| − | Once in, select the 'Affect Pivot Button' and |
||
'Select and Move' button |
'Select and Move' button |
||
| − | If |
+ | If the pivot is off, make sure the the X, Y and Z |
coordinates at the bottom are all 0.0 |
coordinates at the bottom are all 0.0 |
||
| − | clipboard23s.jpg |
+ | clipboard23s.jpg<blockquote></blockquote> |
| + | {| class="article-table" |
||
| − | [[File:Clipboard23s.jpg|thumb|641x641px]] |
||
| + | ! |
||
| + | [[File:Clipboard23s.jpg|thumb|707x707px]] |
||
| + | |} |
||
| + | |||
| + | <blockquote><br></blockquote> |
||
When you goto |
When you goto |
||
'select all' and then 'replace all' in the BF2 Editor, if the coordinates are |
'select all' and then 'replace all' in the BF2 Editor, if the coordinates are |
||
| Line 314: | Line 312: | ||
So, we have already fixed the base mesh to ensure |
So, we have already fixed the base mesh to ensure |
||
that it works when navmeshing. |
that it works when navmeshing. |
||
| + | |||
| − | '''7a) Next, we need to make sure there is no more than 1 'channel' |
||
| + | '''7a) Next, we need to make sure there is no more than 1 'channel'''' |
||
| − | being used on the base mesh''' |
||
| + | being used on the base mesh'''<nowiki/>''' |
||
Select the 'Tools' dropdown menu and go down and |
Select the 'Tools' dropdown menu and go down and |
||
click on 'Channel Info' |
click on 'Channel Info' |
||
| − | clipboard33e.jpg |
+ | clipboard33e.jpg<blockquote></blockquote> |
| + | {| class="article-table" |
||
| − | [[File:Clipboard33e.jpg|thumb|645x645px]] |
||
| + | ![[File:Clipboard33e.jpg|thumb|691x691px]] |
||
| + | |} |
||
| + | |||
| + | <blockquote><br></blockquote> |
||
What you should |
What you should |
||
see is below...Just 1 channel being used |
see is below...Just 1 channel being used |
||
| − | clipboard34.jpg |
+ | clipboard34.jpg<blockquote></blockquote> |
| + | {| class="article-table" |
||
| − | [[File:Clipboard34.jpg|thumb|650x650px]] |
||
| + | ![[File:Clipboard34.jpg|thumb|691x691px]] |
||
| + | |} |
||
| + | |||
| + | <blockquote><br></blockquote> |
||
If there are more |
If there are more |
||
than one channel, delete them...I'll show you how to do this ***below*** |
than one channel, delete them...I'll show you how to do this ***below*** |
||
| Line 340: | Line 347: | ||
go down and click on 'Channel Info'. |
go down and click on 'Channel Info'. |
||
| − | clipboard17o.jpg |
+ | clipboard17o.jpg<blockquote></blockquote> |
| + | {| class="article-table" |
||
| − | [[File:Clipboard17o.jpg|thumb|649x649px]] |
||
| + | ! |
||
| + | [[File:Clipboard17o.jpg|thumb|693x693px]] |
||
| + | |} |
||
| + | |||
| + | <blockquote><br></blockquote> |
||
The info will be |
The info will be |
||
identical to the info we saw with the base mesh. Which makes sense since this |
identical to the info we saw with the base mesh. Which makes sense since this |
||
| Line 348: | Line 360: | ||
it |
it |
||
| − | clipboard19k.jpg |
+ | clipboard19k.jpg<blockquote></blockquote> |
| + | {| class="article-table" |
||
| − | [[File:Clipboard19k.jpg|thumb|653x653px]] |
||
| + | ! |
||
| + | [[File:Clipboard19k.jpg|thumb|686x686px]] |
||
| + | |} |
||
| + | |||
| + | <blockquote><br></blockquote> |
||
Once selected, |
Once selected, |
||
hit the 'Clear' button that is directly above the ID column |
hit the 'Clear' button that is directly above the ID column |
||
| Line 356: | Line 373: | ||
Right click on it and select 'Collapse All' |
Right click on it and select 'Collapse All' |
||
| − | clipboard18n.jpg |
+ | clipboard18n.jpg<blockquote></blockquote> |
| + | {| class="article-table" |
||
| − | [[File:Clipboard18n.jpg|thumb|646x646px]] |
||
| + | ![[File:Clipboard18n.jpg|thumb|687x687px]] |
||
| + | |} |
||
| + | |||
| + | <blockquote><br></blockquote> |
||
Your col0 now has |
Your col0 now has |
||
the correct material and no extra channels. |
the correct material and no extra channels. |
||
| Line 367: | Line 388: | ||
Now on |
Now on |
||
to the next steps.... |
to the next steps.... |
||
| + | |||
| + | [[Using STL Check on a Mesh]] |
||
Latest revision as of 13:13, 15 March 2018
Exporting the AImesh in 3dsmax
by Dnamro
- AImesh Import 3dsmax
- Create AI Meshes with 3dsmax9
- AIMesh Hierarchy Editing
- AImesh Export 3dsmax
- How to set up 3dsmax collision mesh schematic
- Understanding the AImesh (COL3)
- Troubleshooting the Aimesh
- Creating an AImesh from a multi-part object
- Creating an AImesh for a Multi-Story Building
- AImesh_Trick_for_Problem_Stairways
- BF2142 AImesh Creation Project
Troubleshooting the AImesh (WIP)[]
Based on a tutorial by Ballard44, edited and expanded by Dnamro
Tools:
- 3ds Max 9 is used, which was the last version for which BF2 plugins are available.
- 3dsmax scripts (colmeshimp.ms and meshcheck.ms) referenced are available at the
BFMeshView website: http://www.bytehazard.com/bfstuff
Level: Advanced - assumes basic skills with 3ds Max
This tutorial will explain how to check an AImesh for accuracy, which is the col3 mesh, before exporting. This will explain the checks that should be done to help validate that an AImesh is ready for exporting, however, these will not guarantee a working AImesh, but will help eliminate known issues. Creating AImeshes can be very frustrating because the mesh has to be pristine. It is a matter of cleaning and testing until you get a working AImesh. Unfortunately, the COL3\AImesh is usually based on another collision mesh, which are not required to to follow the strict rules for AImesh development, so a lot of clean up work is normally required. A detailed explanation of the AImesh rules are explained in detail here:
Understanding the AImesh (COL3)
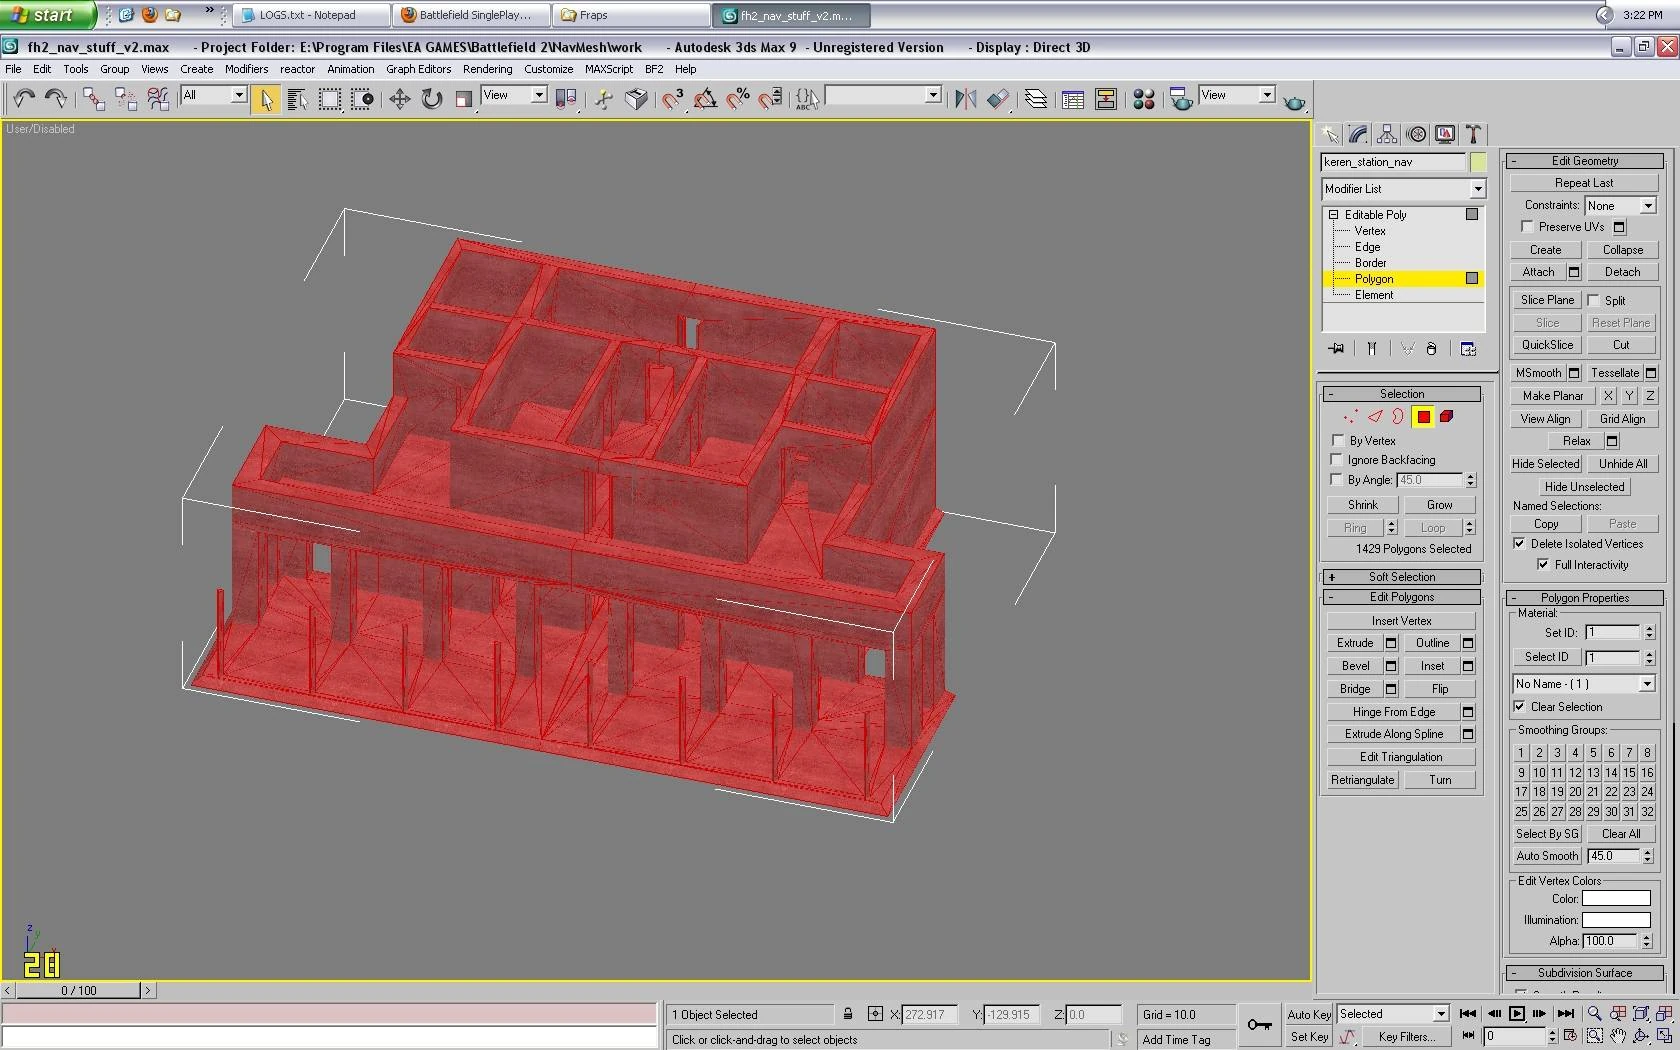
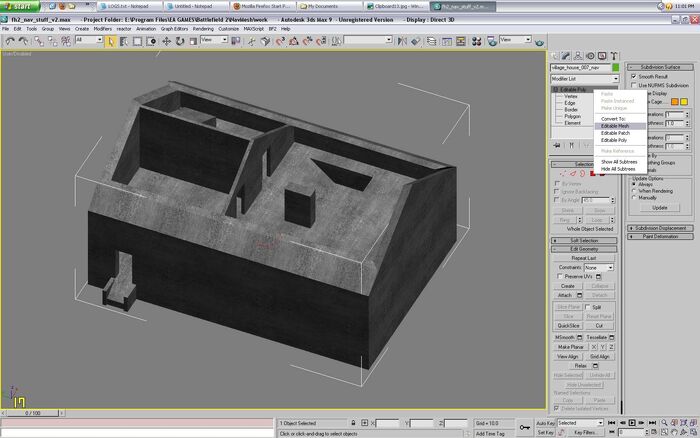
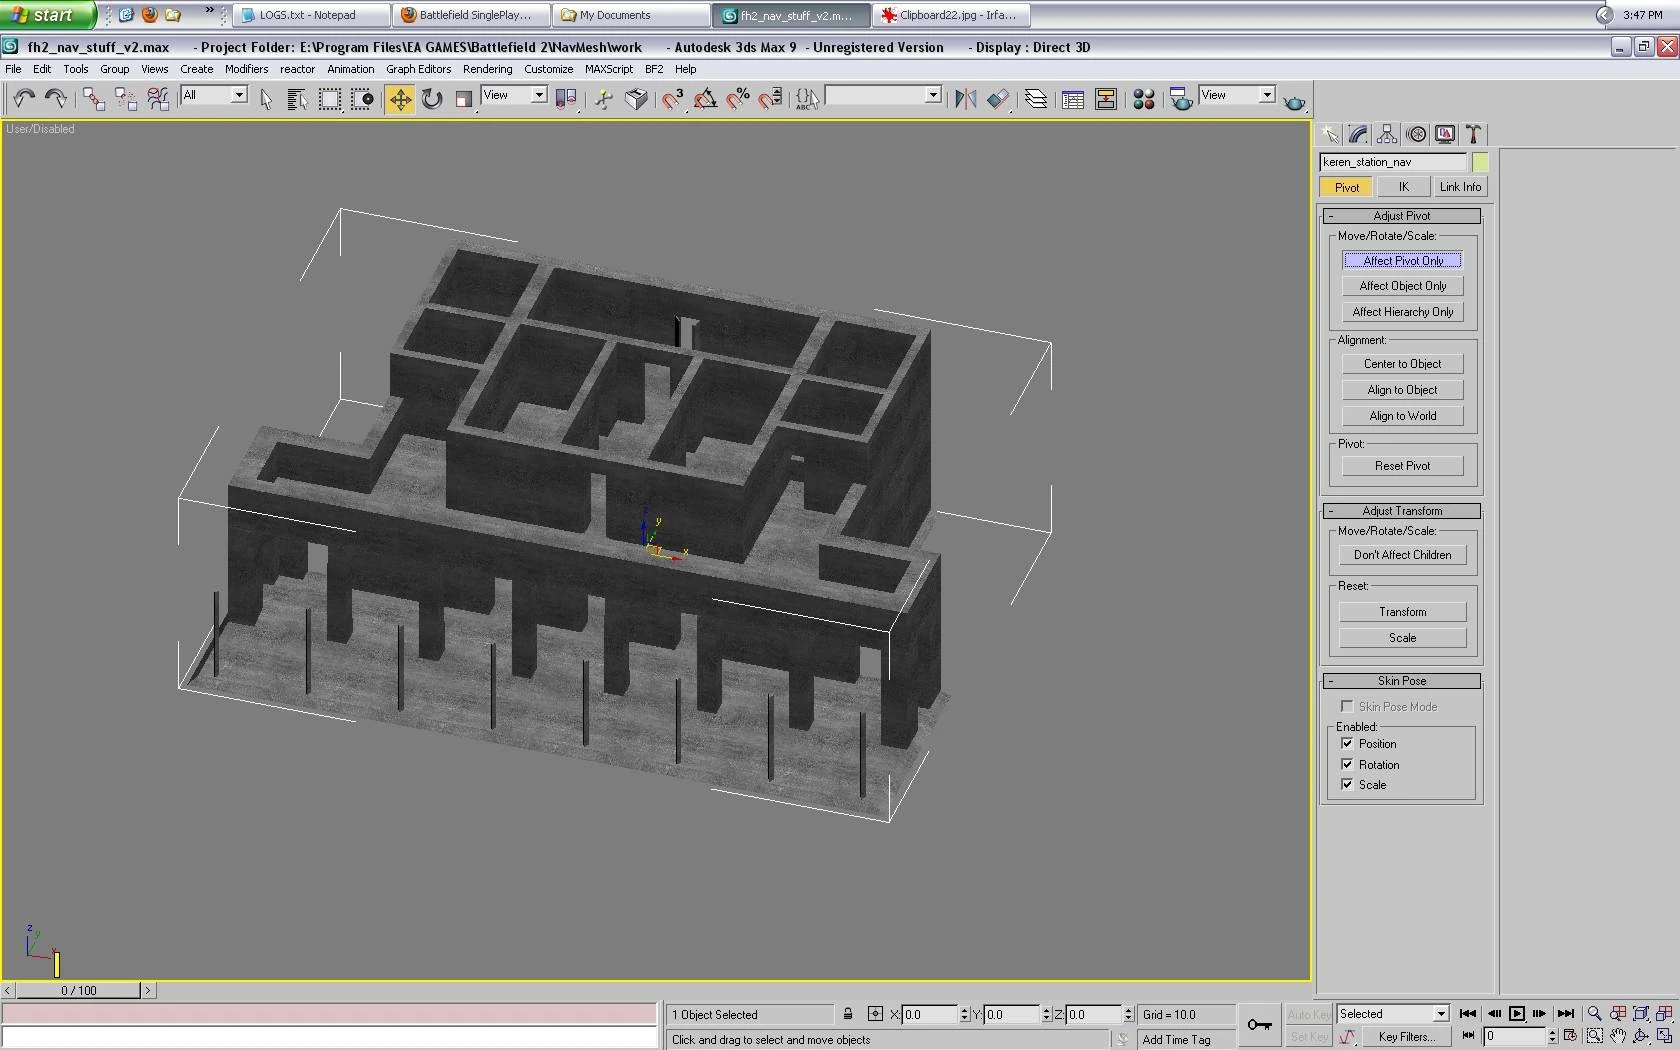
For this tutorial, a building from the Forgotten Hope mod is used.
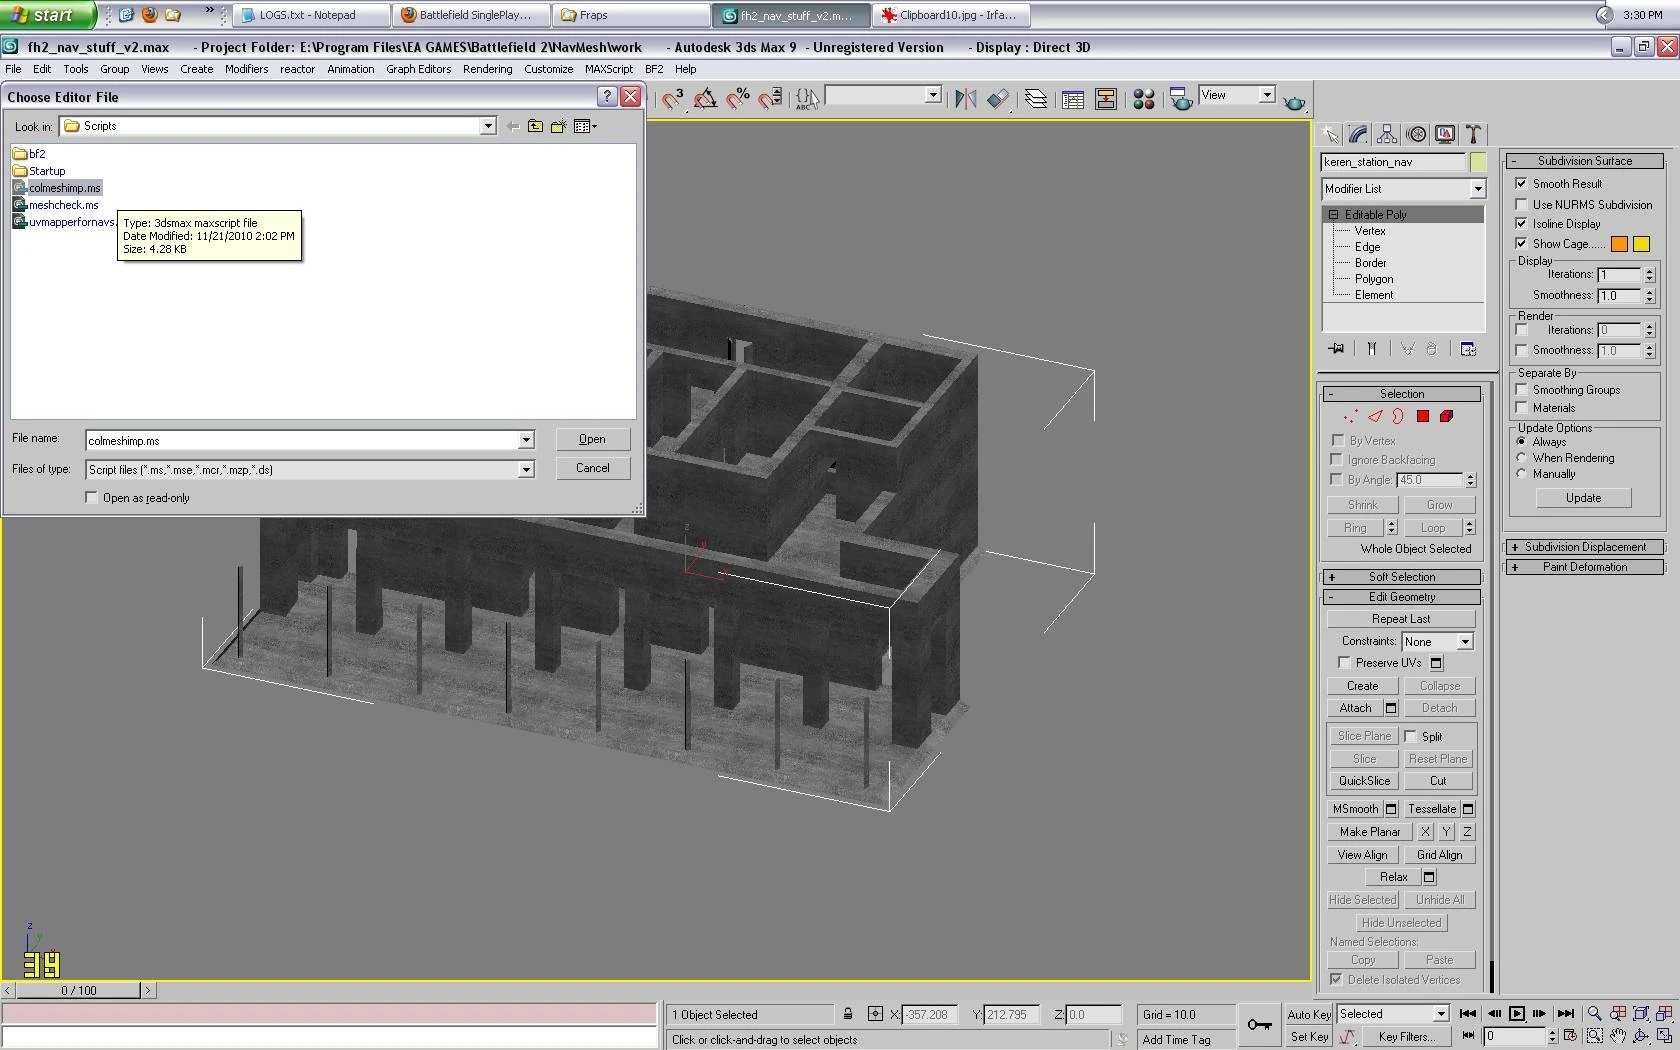
- Import the collision mesh of the problem static in Max using the colmeshimp.ms script from the website link listed above.
clipboard10b.jpg
 |
|---|
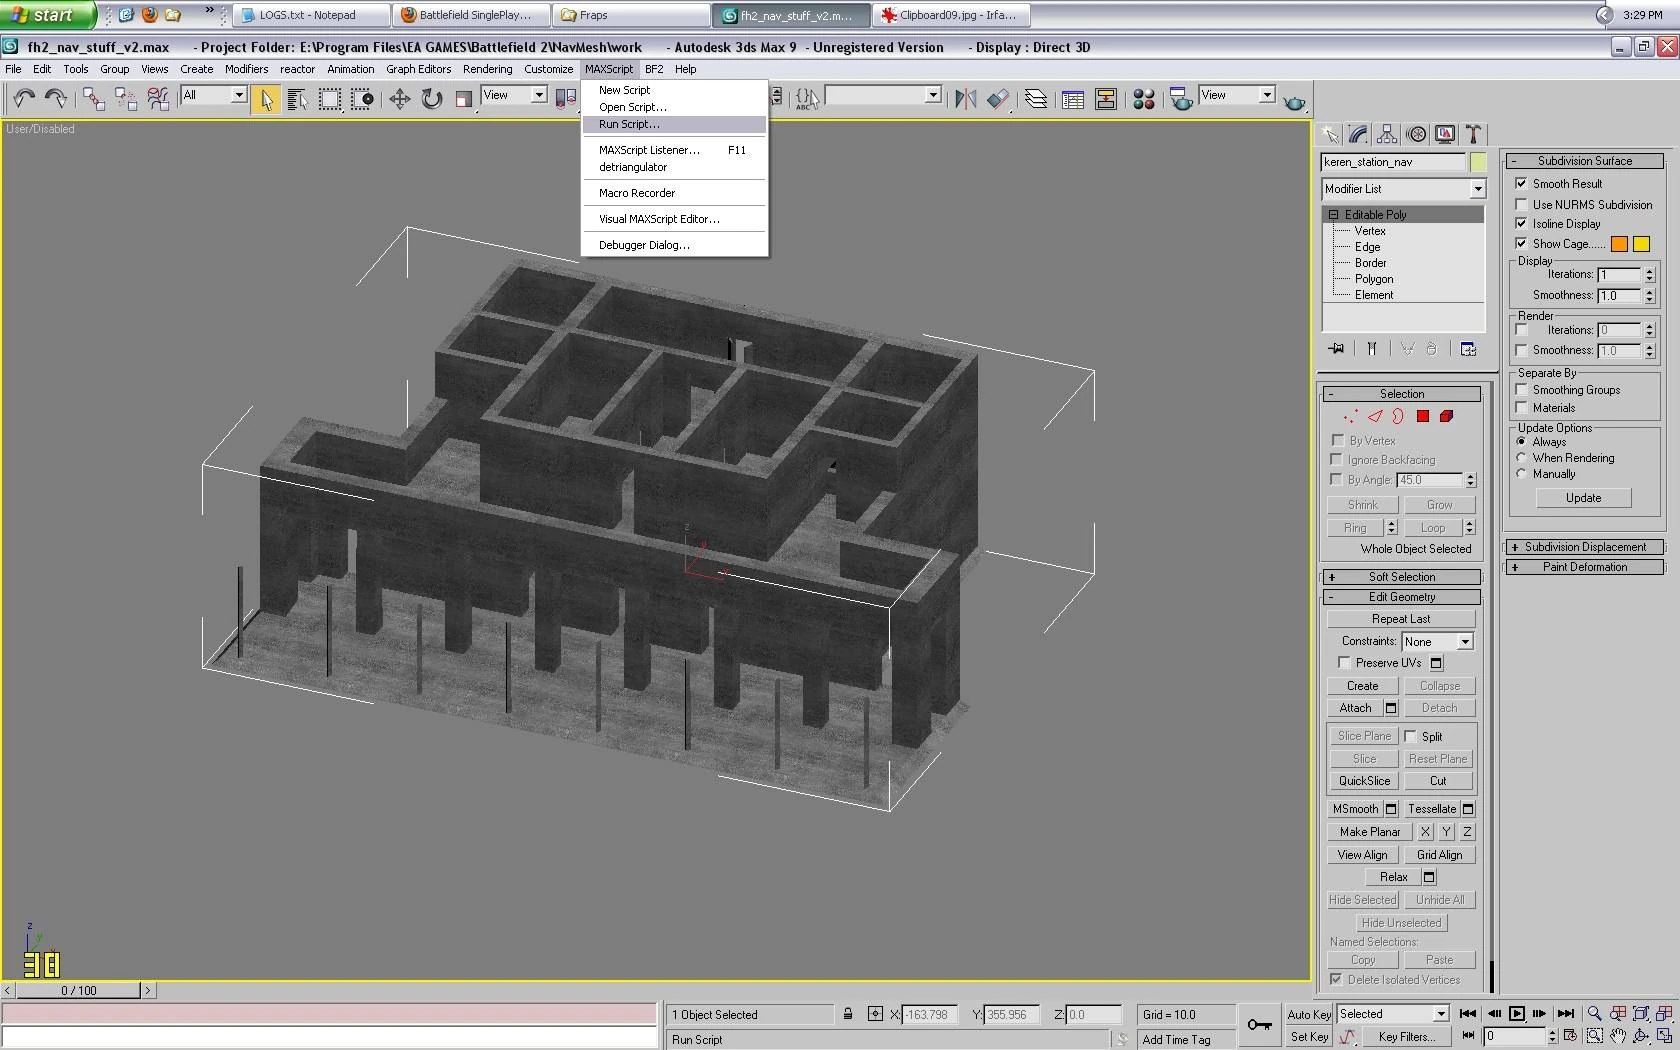
- Select the script when the window pops open
clipboard11rq.jpg
 |
|---|
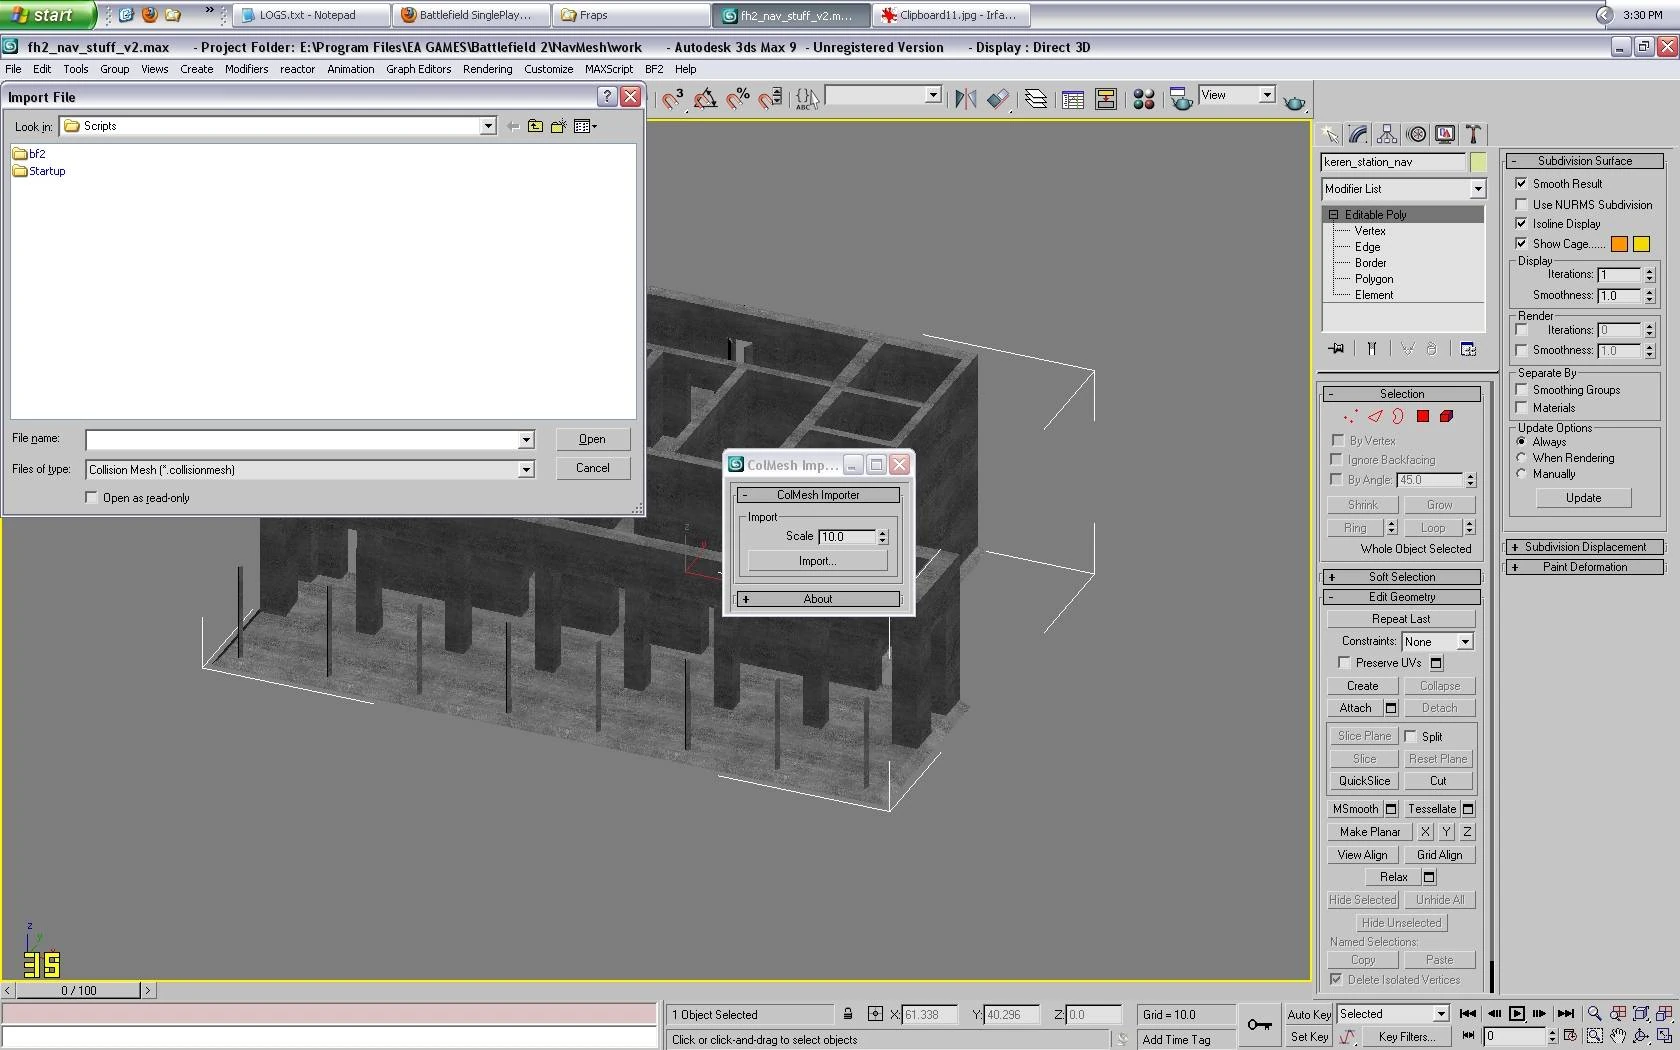
- Hit the 'Import' Button at the scale of 10.0
clipboard12cc.jpg
 |
|---|
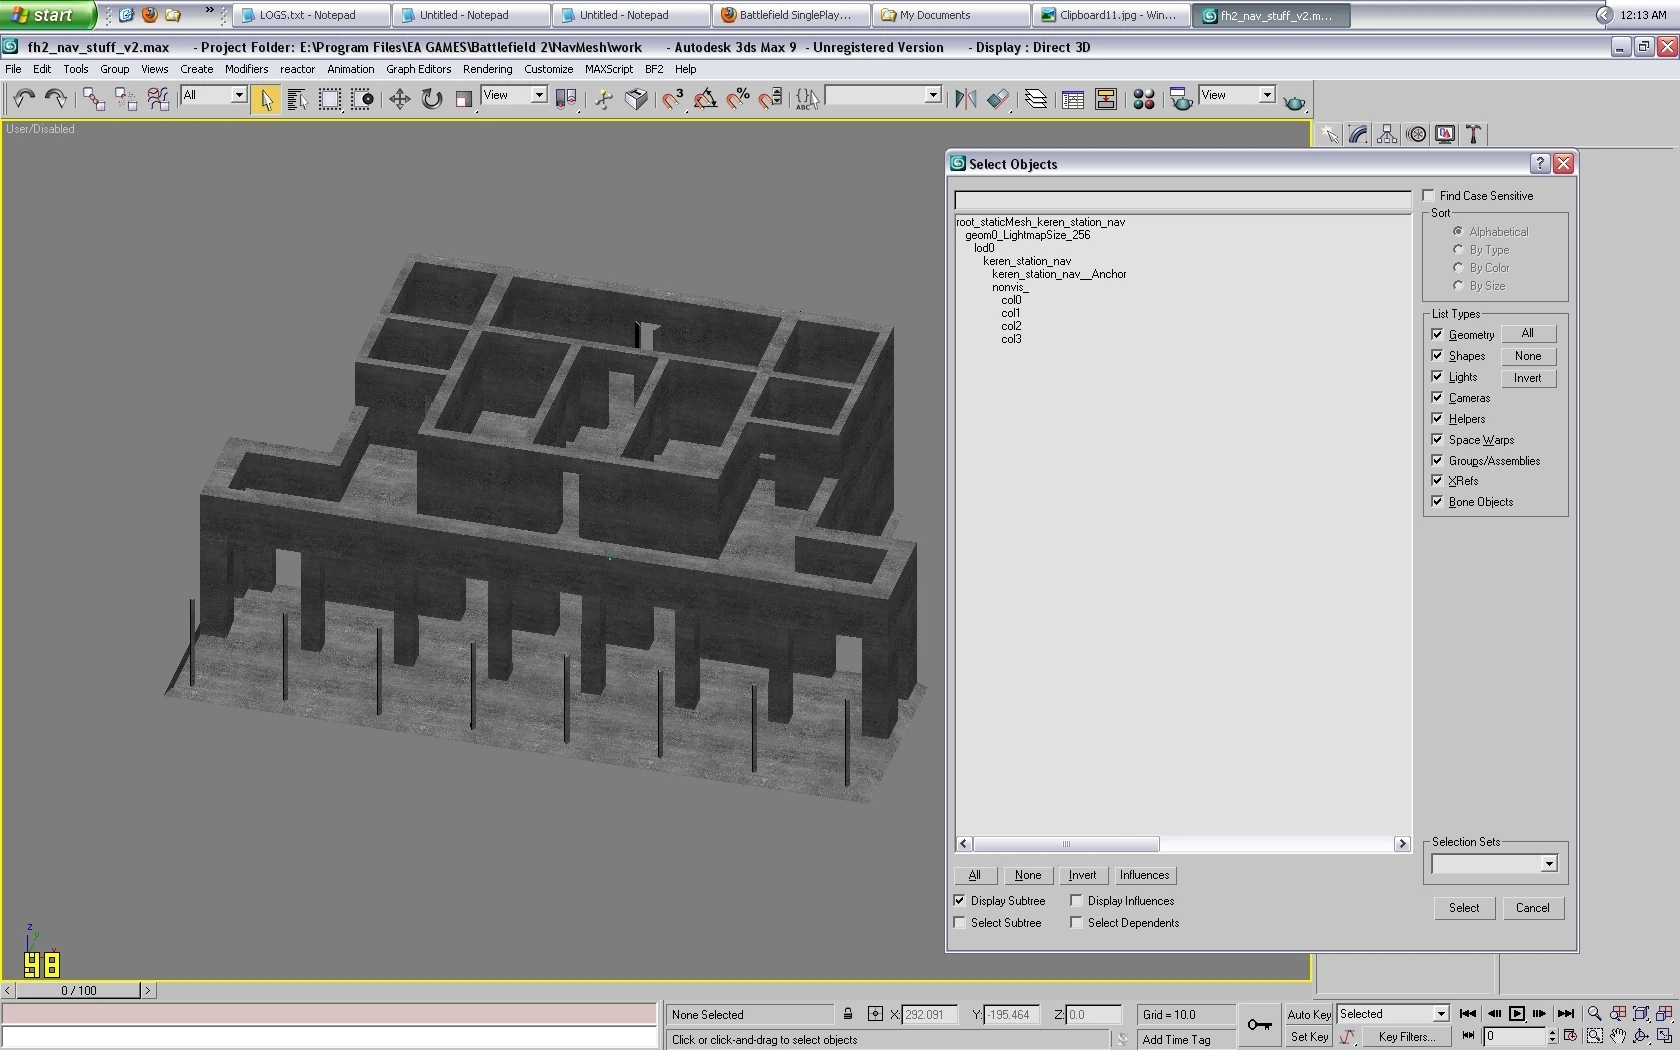
- Search for the collisionmesh file that you are
looking for to open it up Note: This will import all the collision meshes for the model into Max. More importantly, it will list if there was even a col3 already created for this static.
COL3 mesh exists but does not work
If there is an existing col3 that is not working it is probably a copy of one of the other collision meshes. If your lucky, it might just need a few adjustments.
COL3 mesh does not exist
If there was no col3, use a col2 mesh as the base for creating the col3. This can be time consuming, but necessary. Just go to work making sure you follow all the rules of a viable col3.
Testing the COL3 in 3dsmax
Now that you have a col3\AImesh, it's time to test in Max to see if they pass.
clipboard31s.jpg
  |
|---|
NOTE- In this case, the col3 was given a _nav extension for the name. This way it will export with that name. This is used when the col3 will be used temporarily just to create a navmesh and not added to the main model file to be added into the game. This is common practice since the AImesh is only needed to create the navmesh and not used in game. The new name helps to identify the model as having a completed AImesh. The static will need to be swapped out in the map, but just for navmeshing.
Weld Vertices
Start by welding vertices together. This is a good start to cleaning up the mesh. This happens during model development when the a new part of the model is created, but the attachment was not as clean as intended.
- Switch to 'vertex' selection and select all your vertices
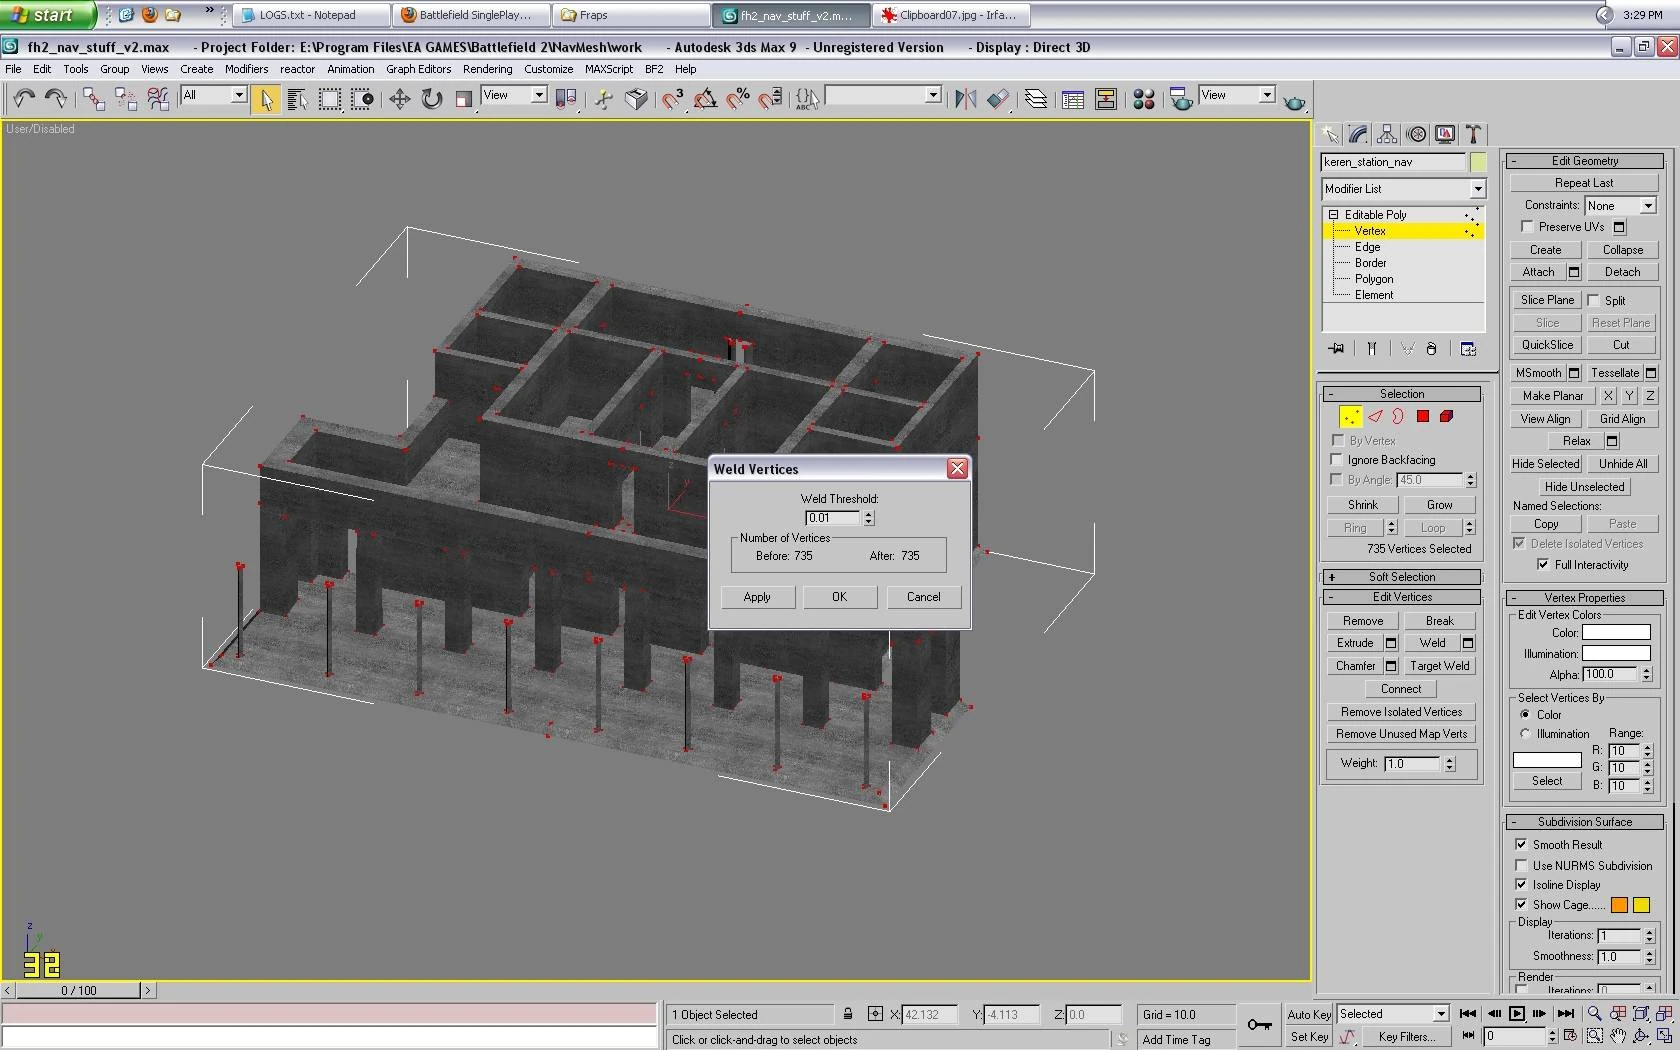
- Under the 'Edit Vertices' box select the box to the right of the 'Weld' button This brings up the 'Weld Vertices' options box as shown
Make sure the threshold is set to 0.01...If you use anything higher it can weld vertices that you might not want welded creating issues
- Click 'Apply' In this case they were already welded, but if they weren't the 'before' number would have been higher than the 'after'.
clipboard08g.jpg
  |
|---|
Remove any unnecessary vertices
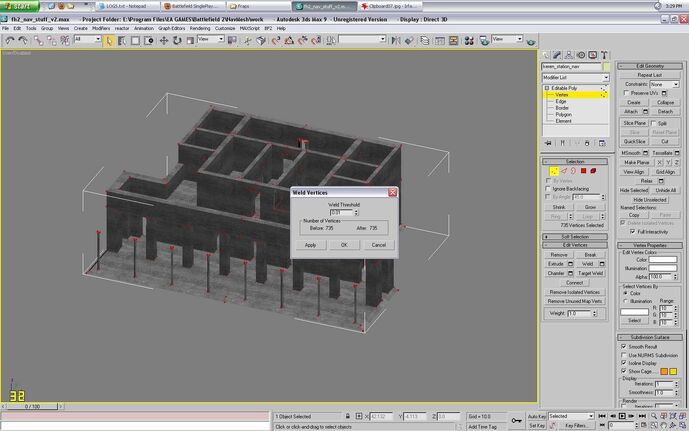
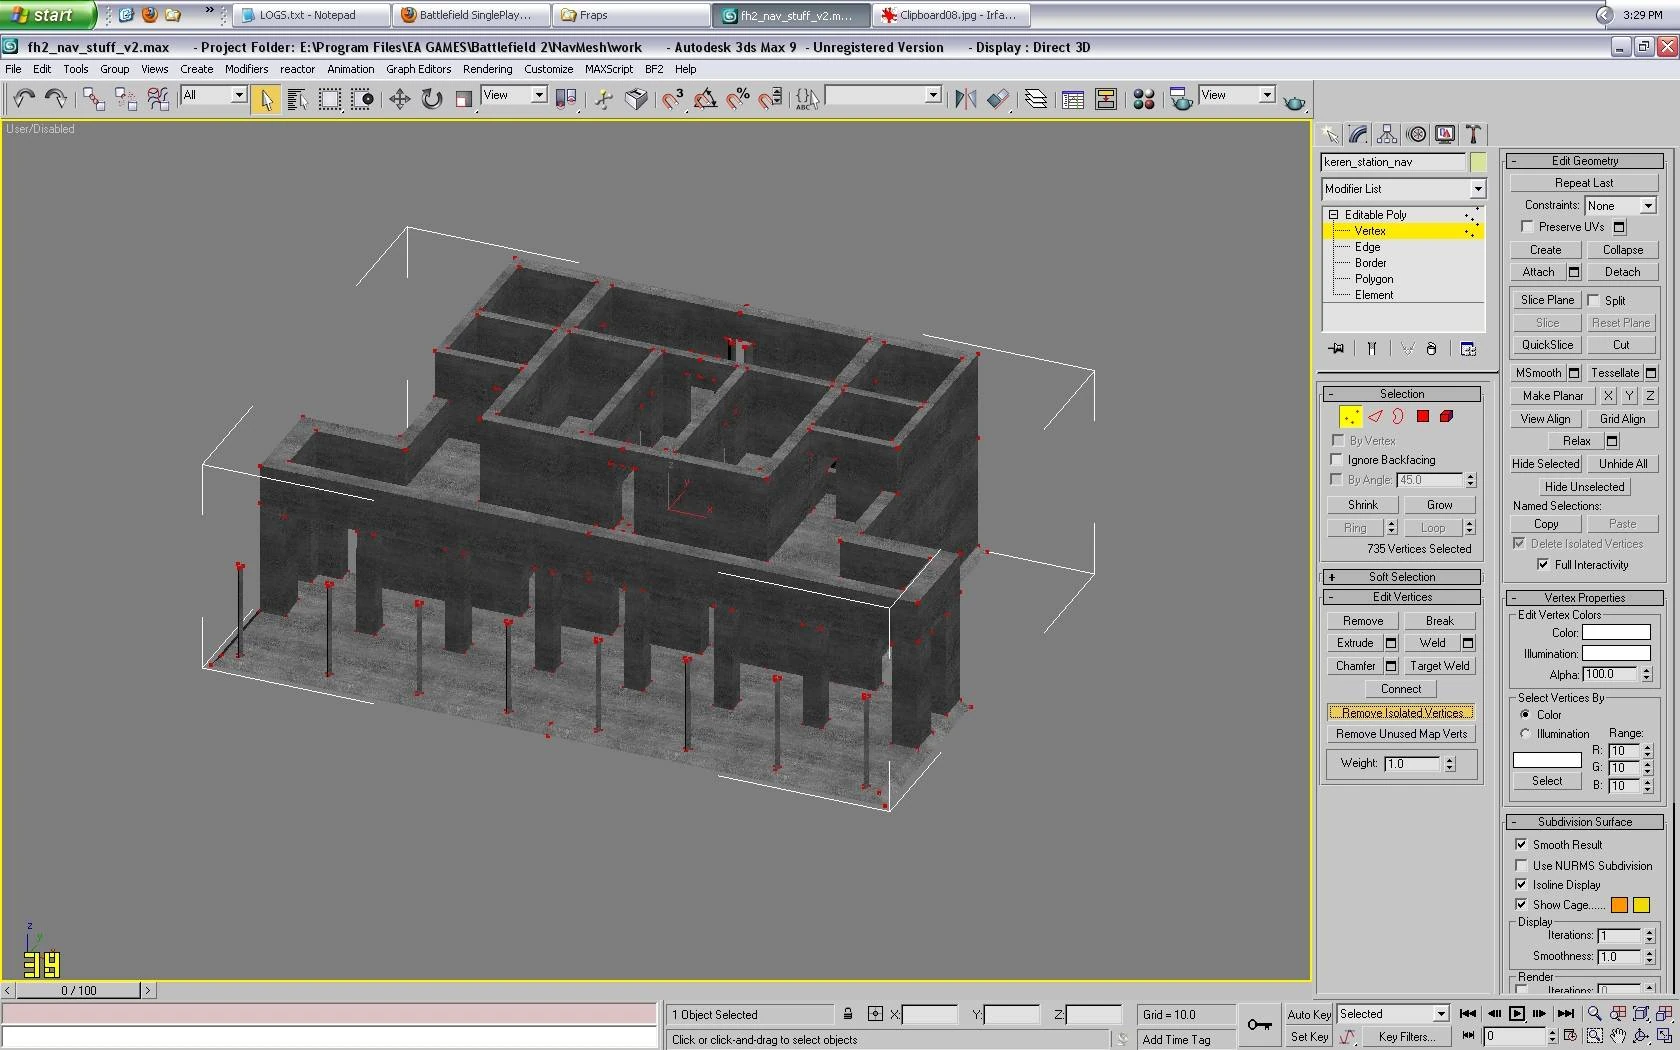
These will be vertices that are not attached to anything. The are usually left during the model development process when parts are deleted.
- Select the 'Remove Isolated Vertices' box.
- Select the 'Remove Unused Map Verts' box (directly below and not highlighted in the pic)
clipboard09gi.jpg
  |
|---|
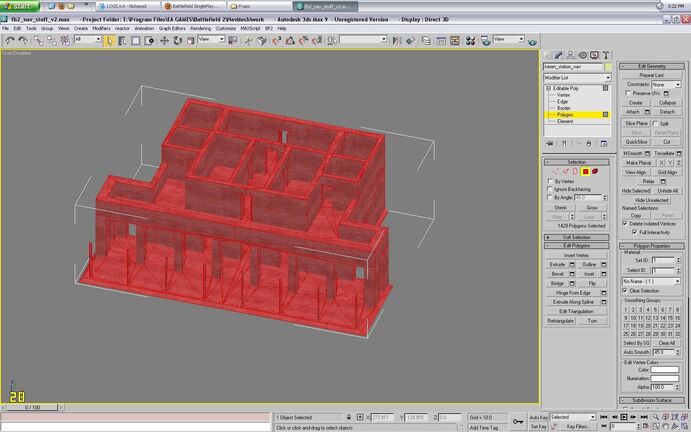
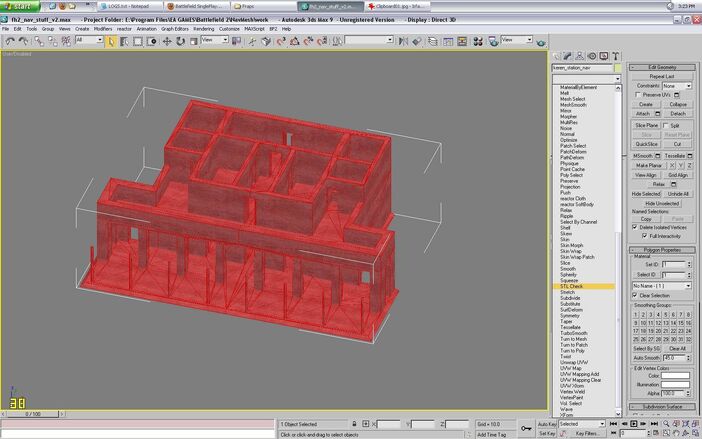
- Switch to the 'polygon' selection and select all the polys
Also, make sure they all use ID1 in the Polygon Properties screen If they don't, select all the polys and set
them to ID1 using the Set ID box
  |
|---|
  |
|---|
Meshcheck Script
Now it's time to use the meshcheck.ms script. We will use a different mesh that will show up with errors.
What you are looking for with this script are faces that are have become edges. Typically this happens when faces that have become so 'broken up' in the creation/editing process that now all that's left are edges. These open edges can keep vertices from welding together and/or faces from being created properly and need to be deleted.
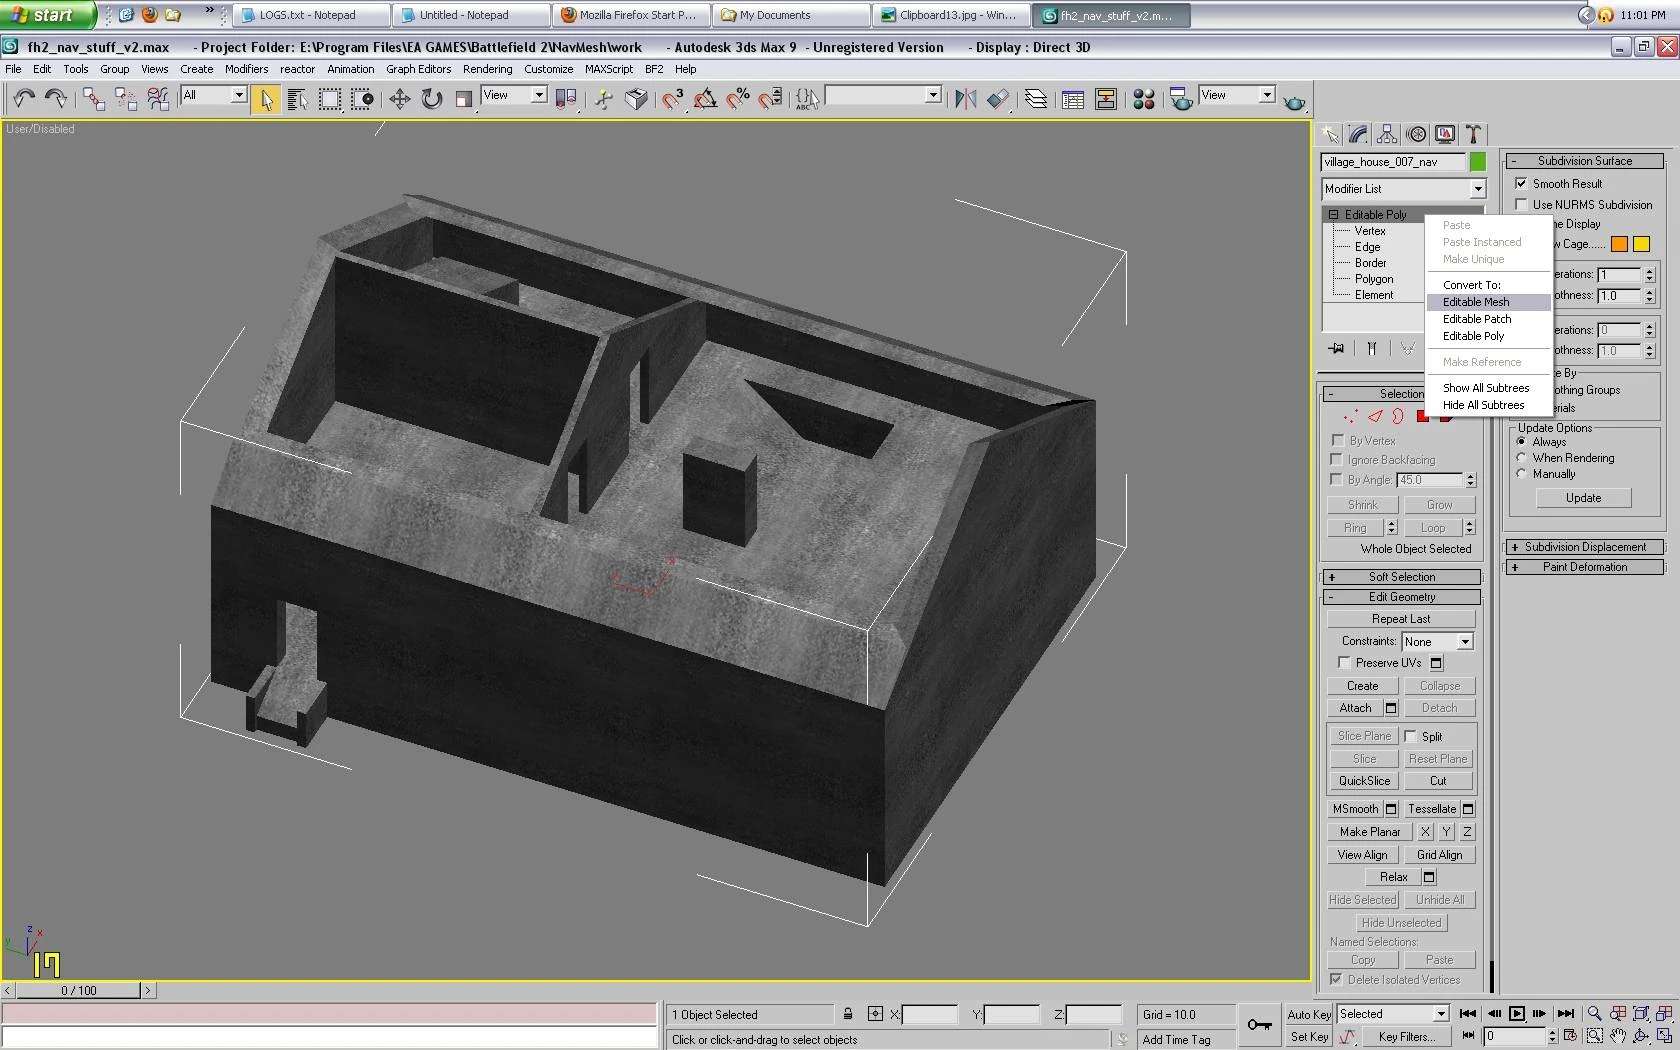
Before using this script convert static to 'Editable Mesh' This makes it is easier to correct problems that might arise in this 'mode'
clipboard24h.jpg
  |
|---|
Find it the same place where you opened the colmeshimp.ms script Open it up and hit 'Check'...You can use the 0.1 Threshold for starters Hopefully you will get this screen that says you have no errors
clipboard30q.jpg
  |
|---|
If this is the case, you can convert your static back to 'Editable Poly'.
But what happens if it does find errors?
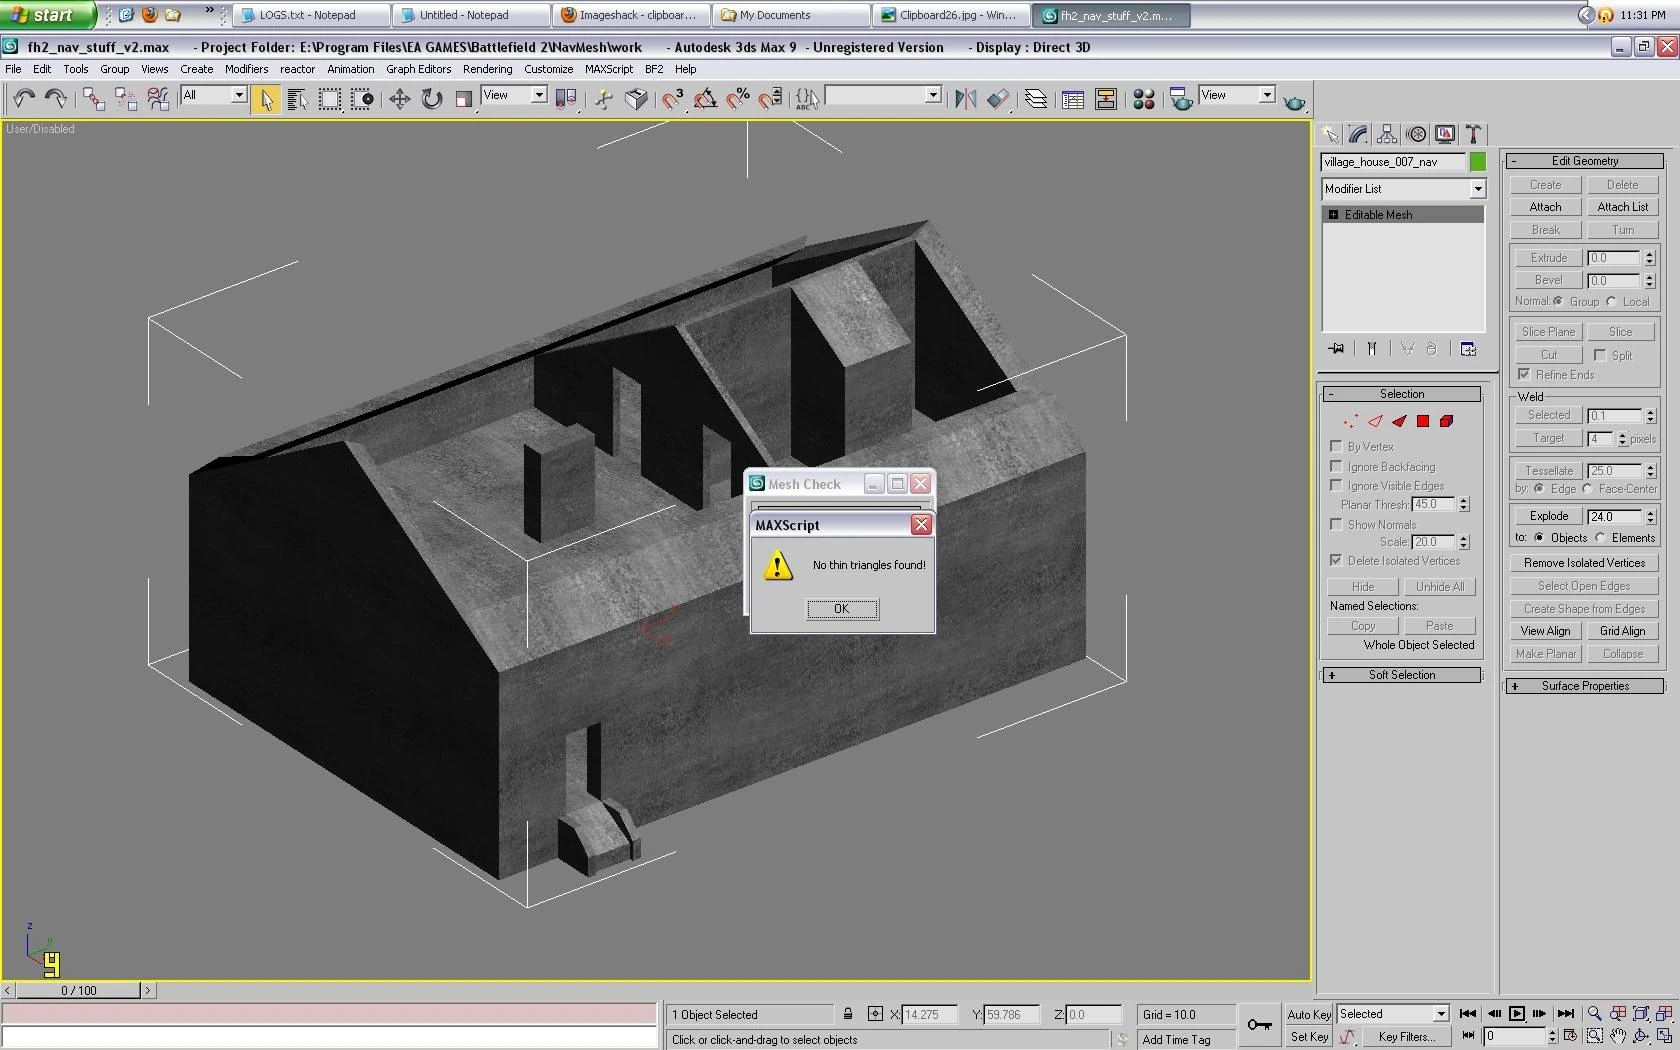
First, checking it at 0.1 tends to be too much and might give you 'false negatives' This tends to happen if you have some very long and skinny faces. The faces are actually fine (within the col3 parameters), but they still fall under 0.1 This is where you need to use your gut and look at to see if checker is 'wrong'. If they look right, than disregard the error.
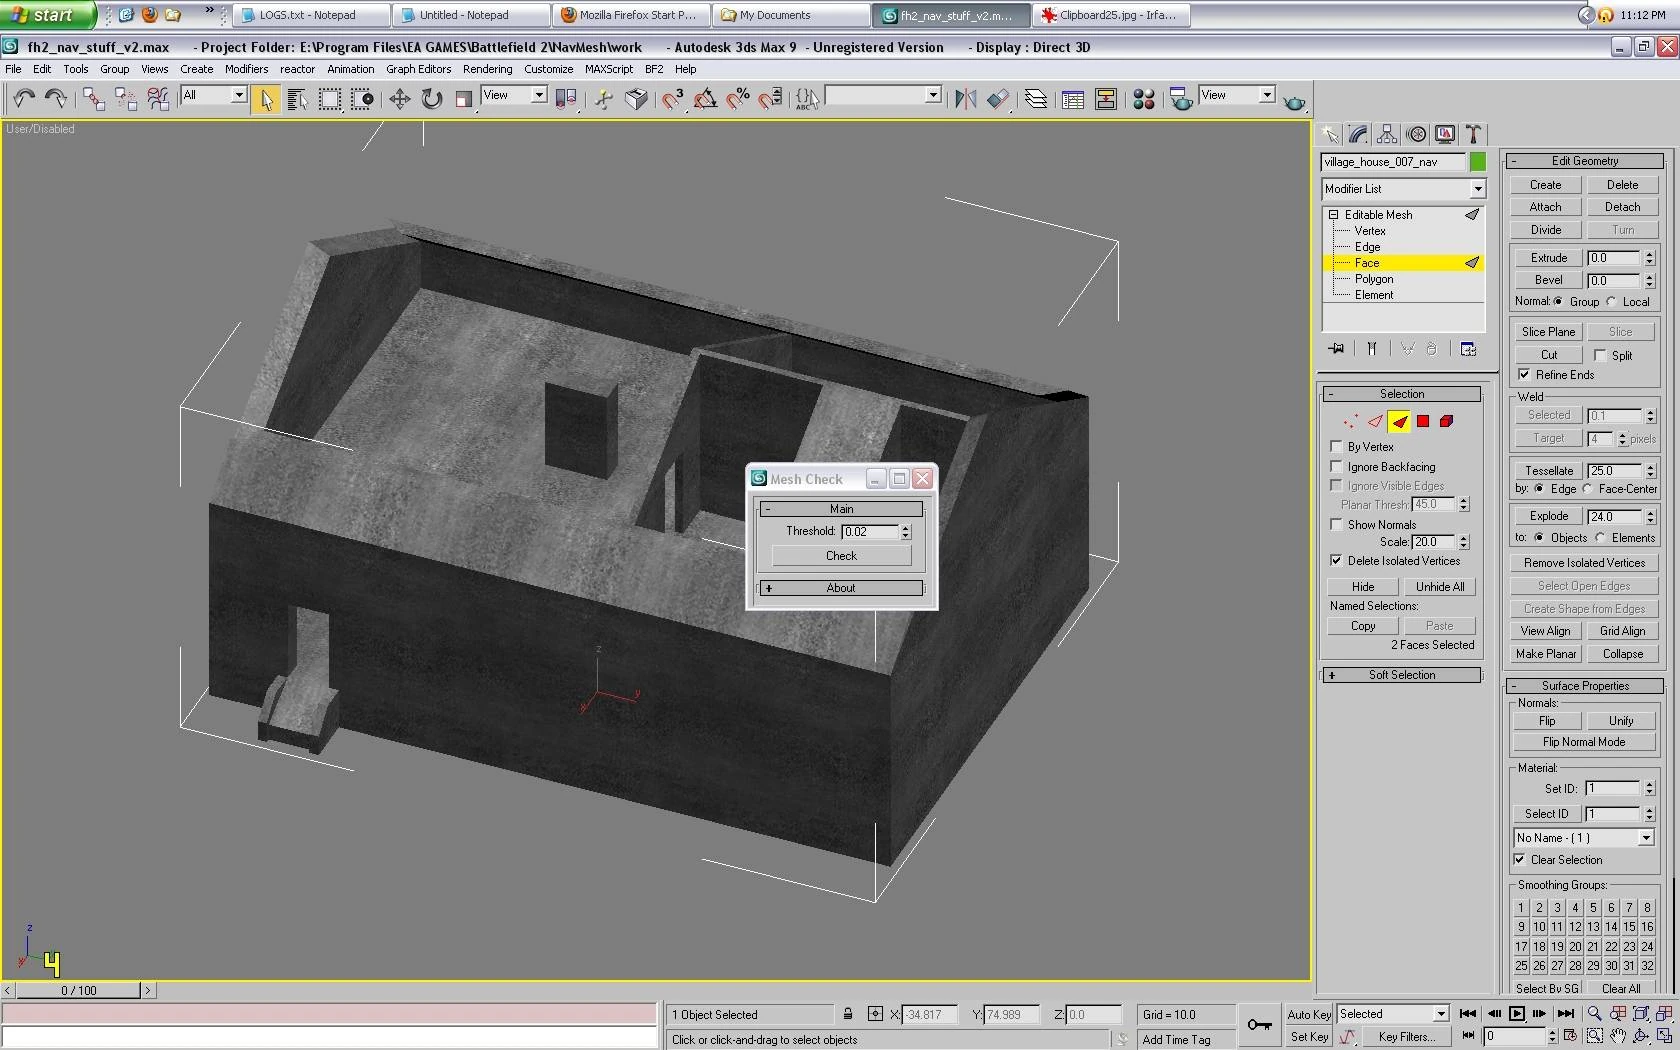
In this case it found errors at 0.02 You can always tell when there are errors because it does not give you the no errors messages
clipboard26r.jpg
  |
|---|
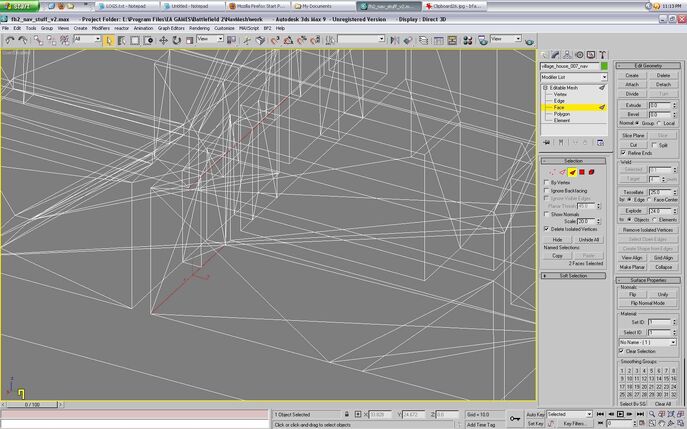
So, now switch to 'wireframe' view and use 'Face' selection This script will automatically highlight the faces in question...
clipboard27a.jpg
  |
|---|
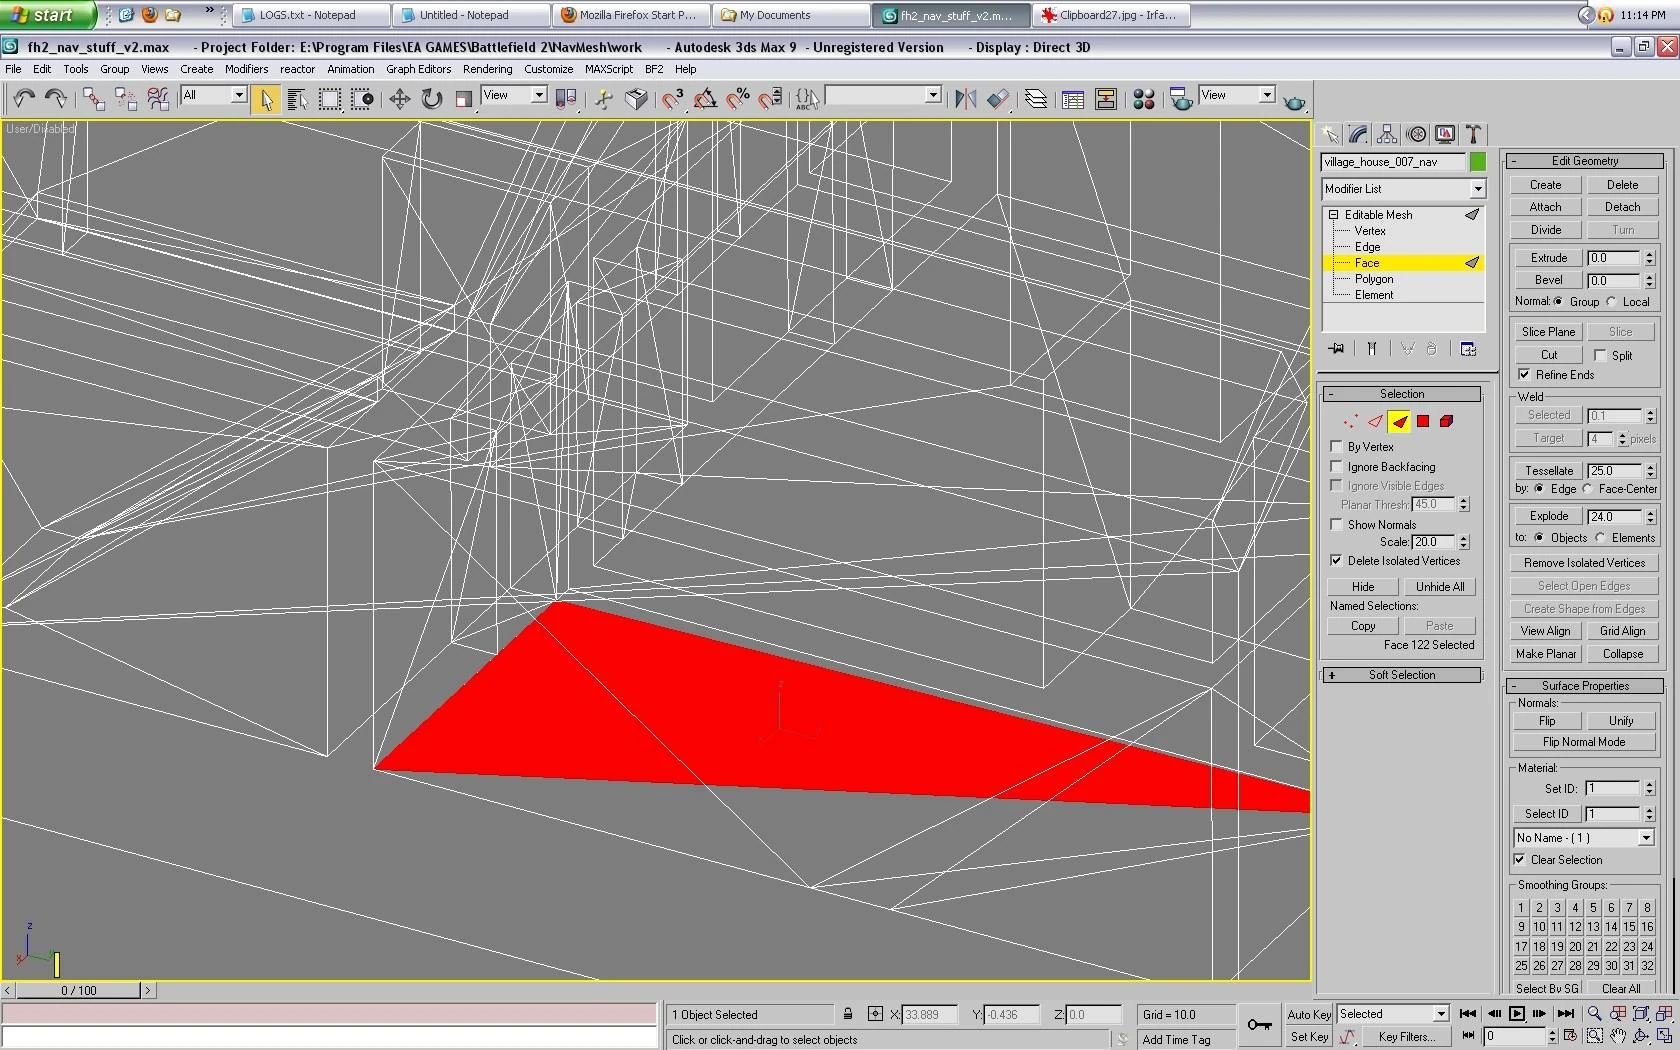
Since the script had already selected the bad faces and I've decided that these don't look correct, I can just delete them.
Once deleted you can also see what other problem they created. When I select the face (#122) that was attached to it, you can see that that single face should have been 2 faces On the shortest side of the highlighted face (triangle) there is a 'doorway' that should have been factored in.
clipboard28u.jpg
  |
|---|
The meshcheck.ms script has found errors and you deleted them. Convert your static back to 'Editable Poly'. Guess what? You're not done!!!
Now that you've found and deleted the errors you have to...
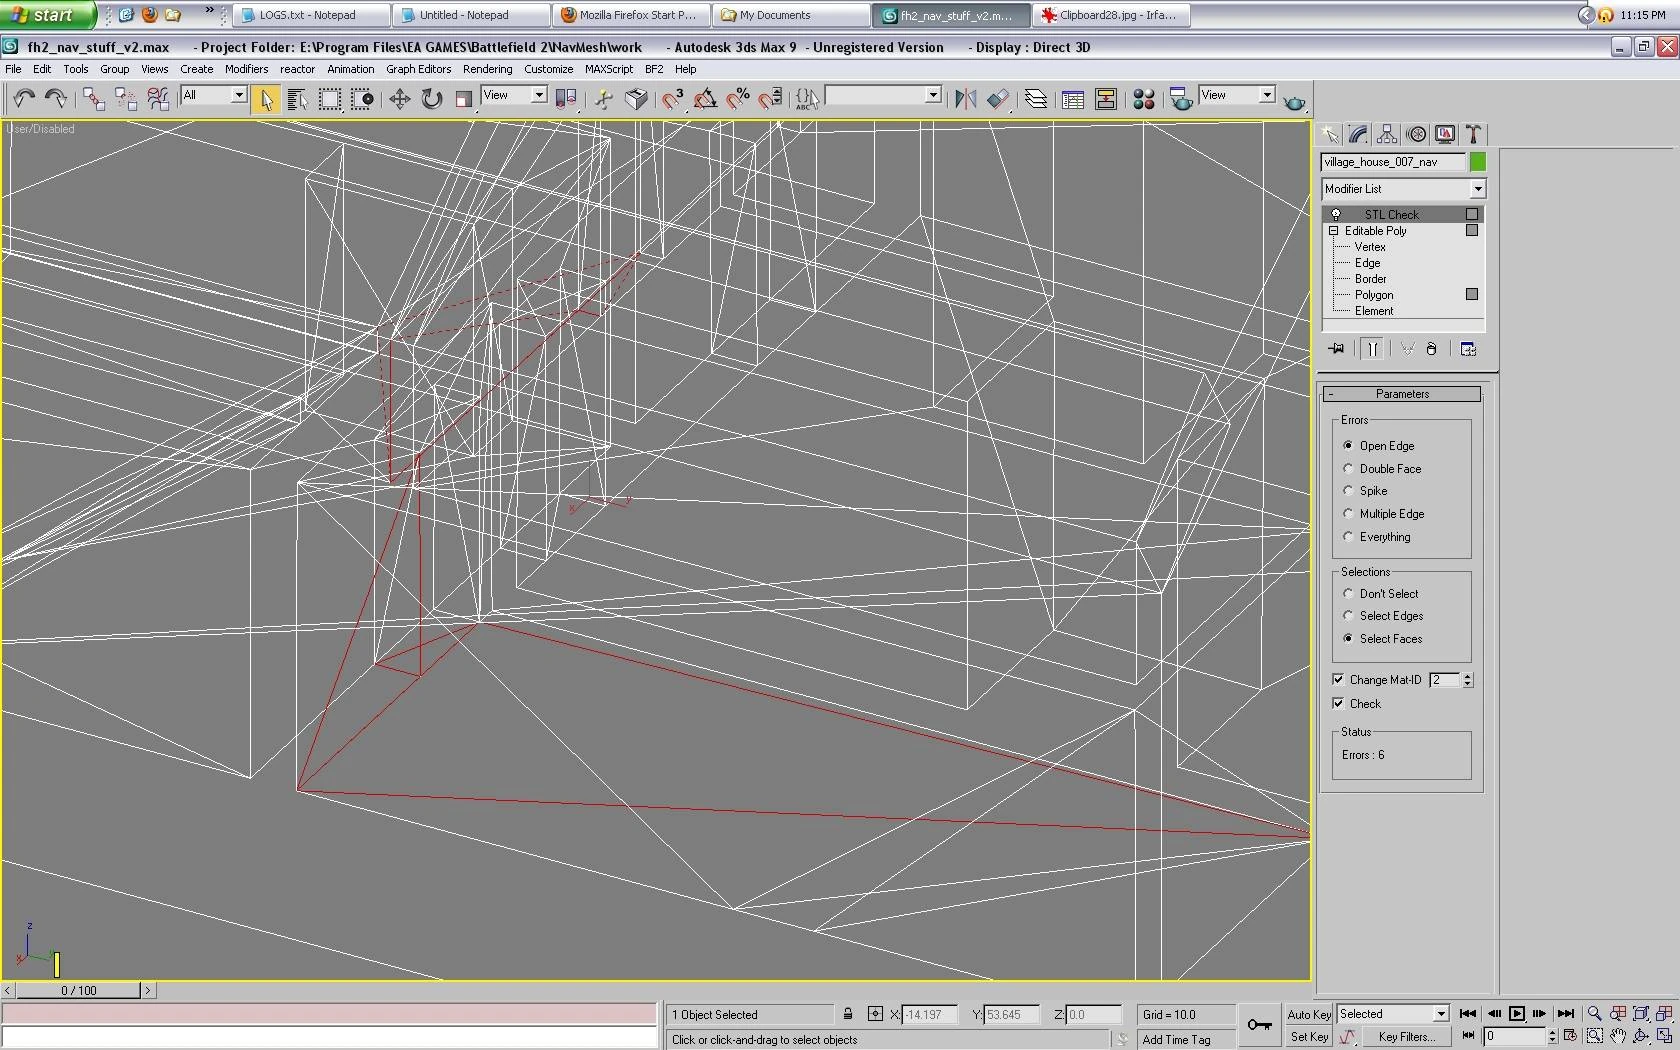
Go back and recheck everything again!
You need to do this because deleting errors with the meshcheck script will usually cause other errors. I don't have a screenshot, but I originally checked this other static with STL Check and it had no errors. But when I go back, look what was found...
clipboard29o.jpg
  |
|---|
Not surprising as I knew that the one face (#122) needed to be 2 faces.
Anyways, you go back and forth solving any and all problems that can arise. Sometimes welding and/or deleting erroneous vertices will be all that's needed. Sometimes deleting a face and recreating it making sure to attach each edge to a vertex is the problem solver. Sometimes there are extra faces that needed to be deleted and were forgotten about.
It just takes practice to solve these!!!!
EDIT - also realize that sometimes you need to run meshcheck before you can correct the mistakes found in STL Check. I've had statics that had errors found with STL Check, but no matter what i did, I couldn't fix them. I had to run meshcheck and delete those errors and that allowed me to fix the errors in STL Check.
Before we do that, there is small step I want to add that can stop headaches in the end.
Check the pivot of this base mesh is at 0, 0, 0
Hit the 'Hierarchy' button - It's the 4th one from the left of the hammer icon that is nearest the top right of the screenshots. Once in, select the 'Affect Pivot Button' and 'Select and Move' button
If the pivot is off, make sure the the X, Y and Z
coordinates at the bottom are all 0.0
clipboard23s.jpg
  |
|---|
When you goto 'select all' and then 'replace all' in the BF2 Editor, if the coordinates are not 0, your replacement statics can be off center of the original static its replacing...That's not what we want!
7) Making sure the base mesh is clean for the cols I'm going to use this base mesh for all my cols. If there are errors in the base mesh, when I clone it to make a col0, those errors will transfer. When I clone my col0 to make my col1, those errors will transfer. And so on and so on. Taking these errors down the line can make the static not work when it navmeshes and/or make it impossible to export the static itself.
So, we have already fixed the base mesh to ensure that it works when navmeshing.
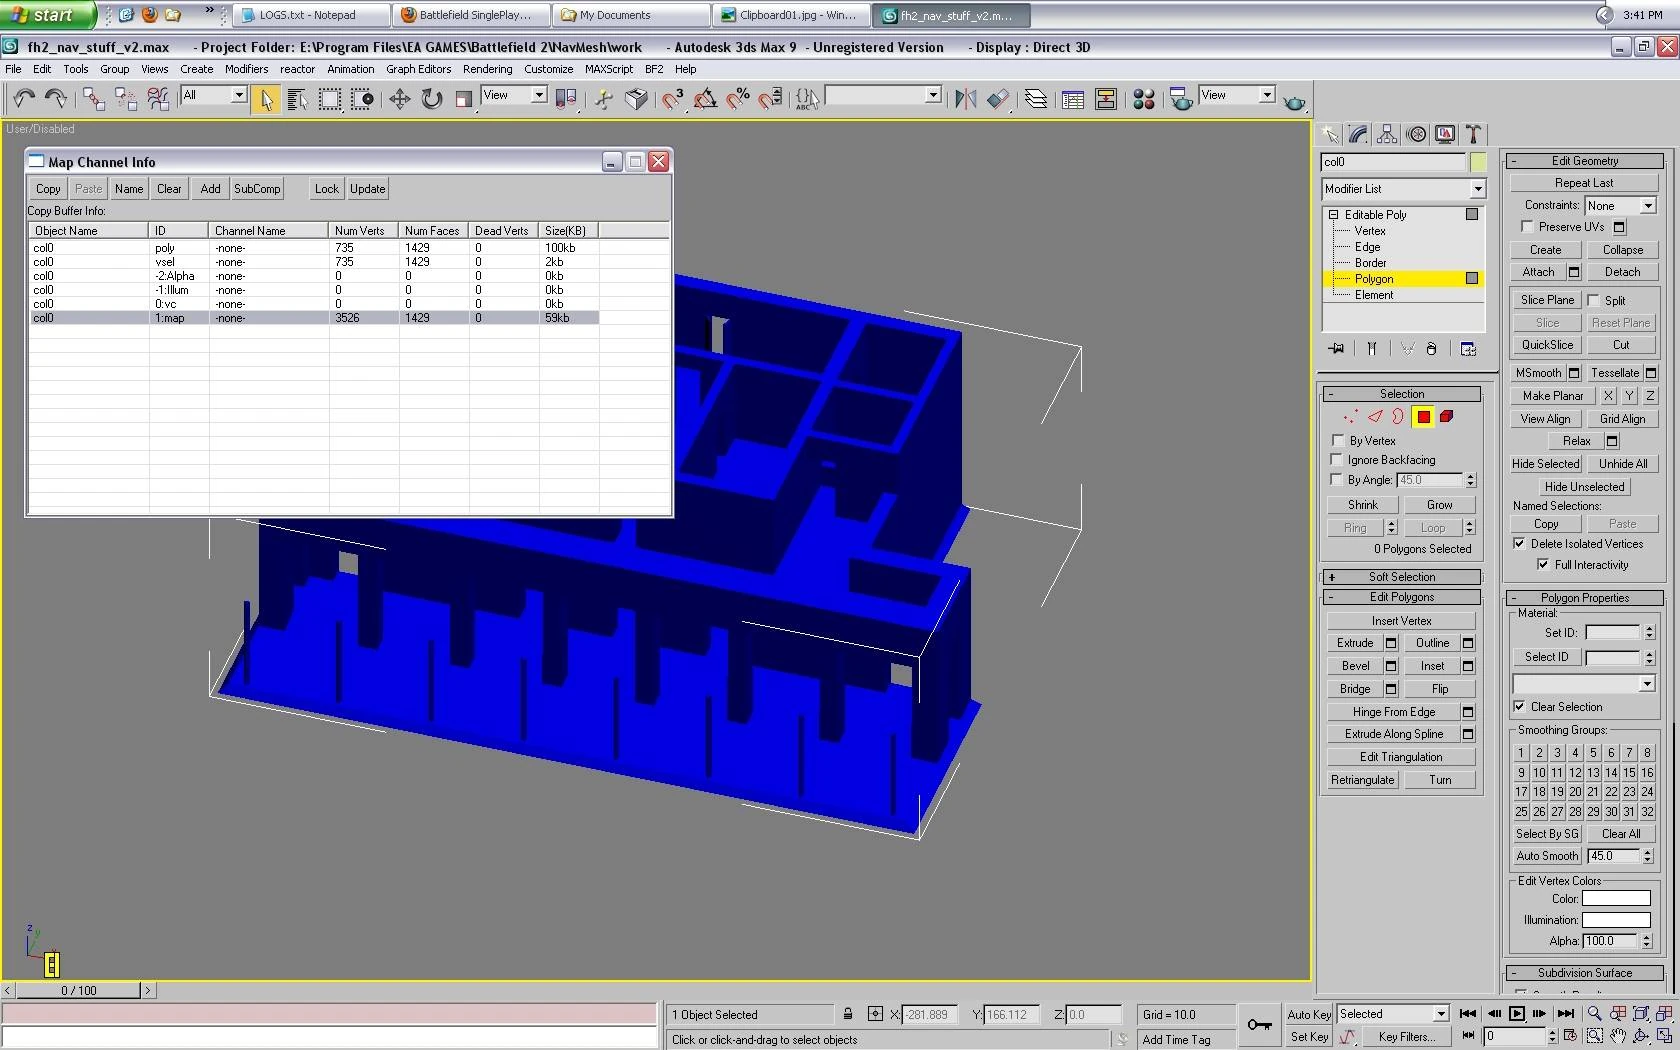
7a) Next, we need to make sure there is no more than 1 'channel' being used on the base mesh Select the 'Tools' dropdown menu and go down and click on 'Channel Info'
clipboard33e.jpg
 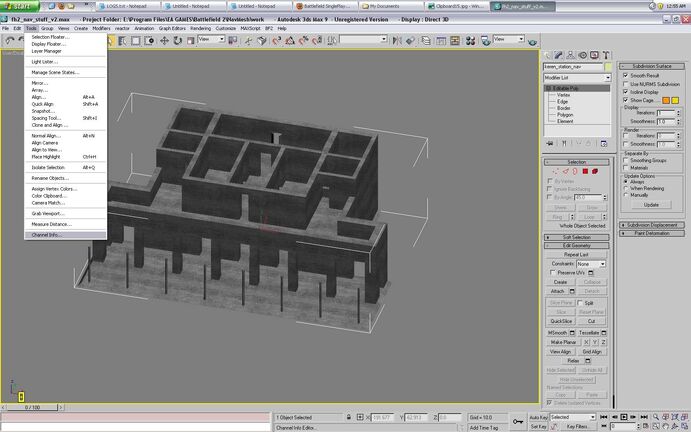 |
|---|
What you should see is below...Just 1 channel being used
clipboard34.jpg
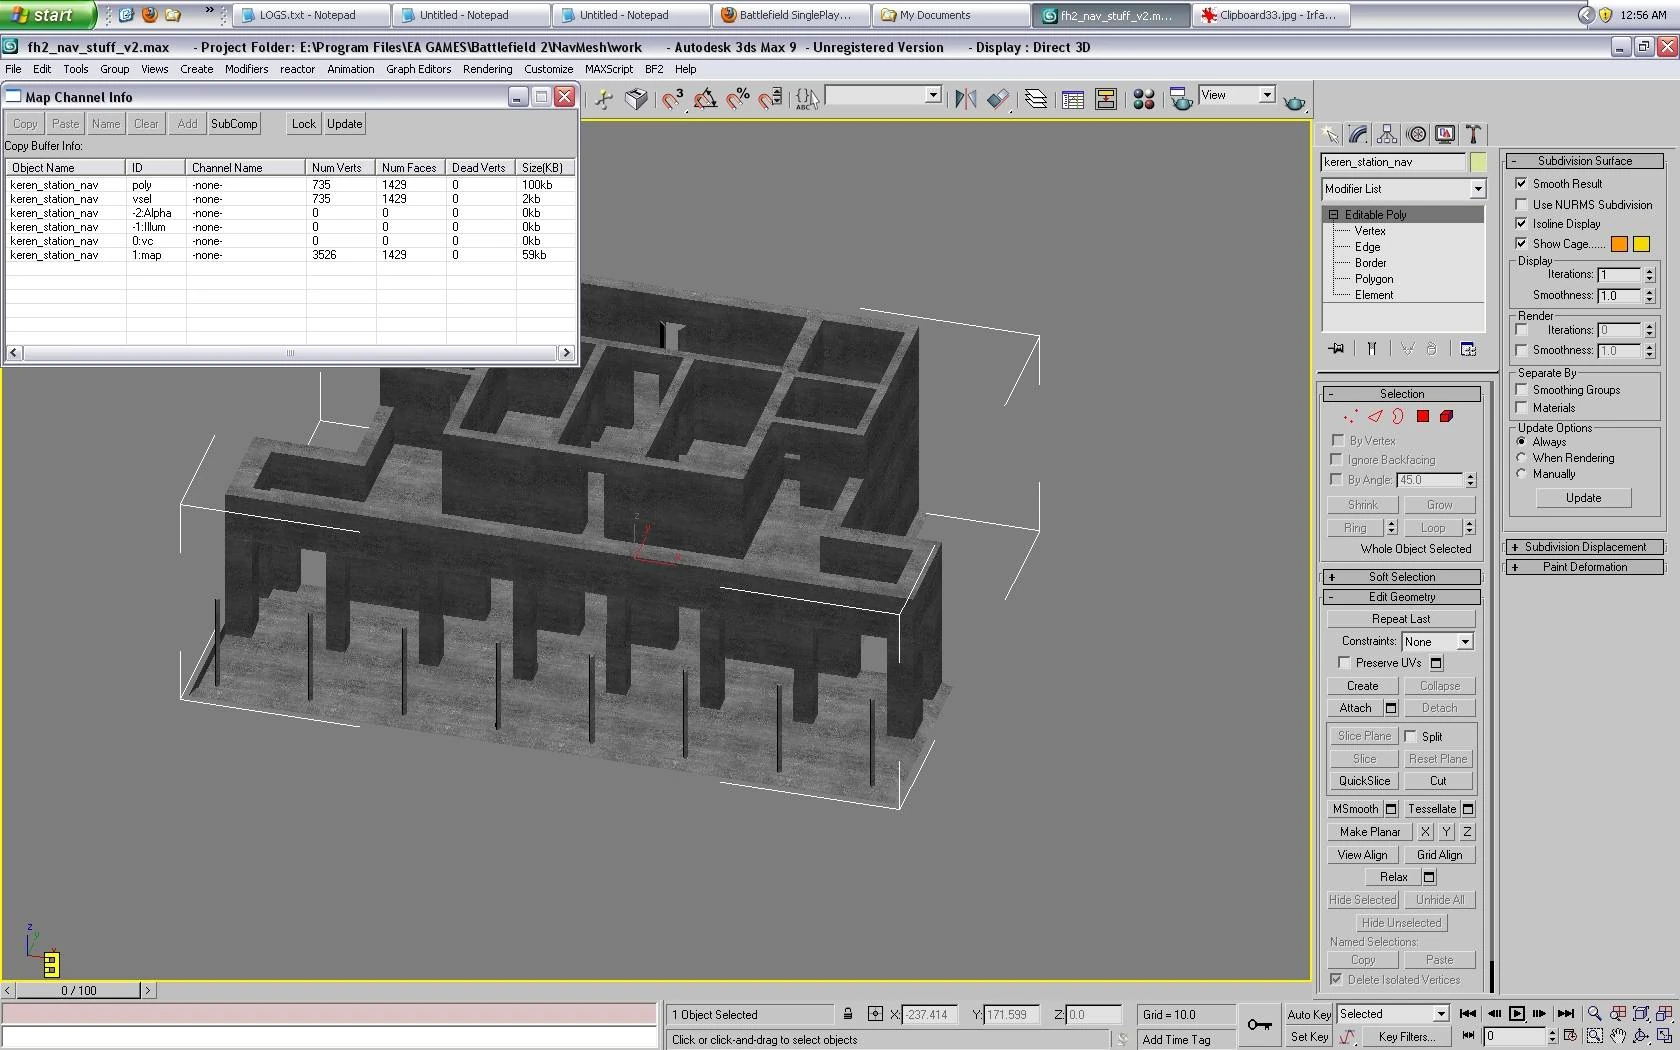  |
|---|
If there are more than one channel, delete them...I'll show you how to do this ***below***
***Here is where I will show you how to delete any extra 'channels' that might have been created*** NOTE - a col can have 1 channel, but having none works just as well. YOU JUST DON"T WANT MORE THAN ONE!!! or the static won't export
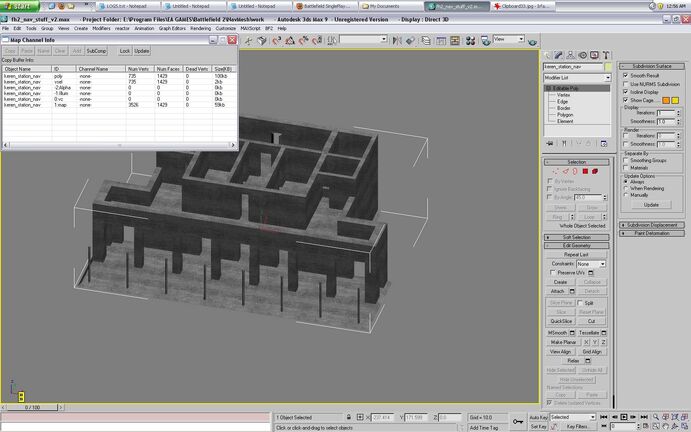
Like before, select the 'Tools' dropdown menu and go down and click on 'Channel Info'.
clipboard17o.jpg
  |
|---|
The info will be identical to the info we saw with the base mesh. Which makes sense since this col0 is its clone. Highlight the line in the pic below by clicking on it
clipboard19k.jpg
  |
|---|
Once selected, hit the 'Clear' button that is directly above the ID column The row will be deleted and a 'UV Mapping Clear' function will appear to the right Right click on it and select 'Collapse All'
clipboard18n.jpg
  |
|---|
Your col0 now has the correct material and no extra channels.
Now on to the next steps....