No edit summary |
No edit summary Tag: Visual edit |
||
| (2 intermediate revisions by the same user not shown) | |||
| Line 1: | Line 1: | ||
| − | == Texture system in |
+ | == Texture system in BF2 (BF2142 uses the same model format) == |
by Fenring |
by Fenring |
||
Based on tutorial posted here: http://forgottenhope.warumdarum.de/tutorials/texturesystem.php |
Based on tutorial posted here: http://forgottenhope.warumdarum.de/tutorials/texturesystem.php |
||
| Line 96: | Line 96: | ||
{| border="0" cellspacing="1" cellpadding="1" style="width:500px;" class="article-table" |
{| border="0" cellspacing="1" cellpadding="1" style="width:500px;" class="article-table" |
||
|- |
|- |
||
| − | ! scope="col"|[[File:lowdetailineditor.jpg|left]] |
+ | ! scope="col" |[[File:lowdetailineditor.jpg|left]] |
|} |
|} |
||
Image File: lowdetailineditor.jpg |
Image File: lowdetailineditor.jpg |
||
| Line 236: | Line 236: | ||
{| border="0" cellspacing="1" cellpadding="1" style="width:500px;" class="article-table" |
{| border="0" cellspacing="1" cellpadding="1" style="width:500px;" class="article-table" |
||
|- |
|- |
||
| − | ! scope="col"|[[File:settings-layer.jpg|left]] |
+ | ! scope="col"|[[File:settings-layer.jpg|left|link=Special:FilePath/Settings-layer.jpg]] |
|} |
|} |
||
Image File: settings-layer.jpg |
Image File: settings-layer.jpg |
||
Latest revision as of 22:53, 18 September 2021
Texture system in BF2 (BF2142 uses the same model format)[]
by Fenring Based on tutorial posted here: http://forgottenhope.warumdarum.de/tutorials/texturesystem.php
In my experiences the most diffcult thing to get a grip of in levelediting in Battlefield 2 is the texturing system and how it works. To get a understanding of the system I had to rely on many diffrent sources and a whole deal of trial and error. I'll now try to assemble the most important information so you can concentrate on creating beautiful terrain for FH2 instead of scratching your heads.
This tutorial presumes that you have read Lawrence Browns basic tutorials to get a grip of the bf2editor.
Relevant links: Nvdia DDS texture tools http://developer.nvidia.com/object/nv_texture_tools.html Index: Colormaps Detailmaps Edit your color- and detailtextures Lowdetailmap Texture settings in bf2editor The surrounding terrain
The default battlefield 2 terrain textures can be found in common_client.zip->terrain/textures/ in your battlefield 2/mods/bf2 directory.
Colormaps[]
The textures in battlefield 2 consists of a color and a detailtexture, the colortexture , as the name suggest, gives the terrain its color in combination with the the level lightsettings. The colormaps also acts as your terrain on longer distances togheter with the lowdetailtexture, how much or how little depends on what graphic settings, if lower you will almost not see your close up detailtexture at all. This can be good to know if one has lower end systems in mind when constructing a map and test on both settings.
Colormaps can be created from:
- Textures you import and paint with the editor. (use the + sign "Add" in top of window where you select your colortexture) These could be created with either Photoshop or Terragen or some other texturing program.
- Default colortextures
- Colorpainting by hand in the editor.
- Complete texture maps made in Terragen,bf2_tpaint, Ecomap or L3DT based on your heightmap, splitted and copied to the yourlevel/editor/colomaps folder. In my opinion this is a must for creating levels with bf2editor since it lacks large scale painting functions. This gives you a whole lot of more flexibility in the texture creating process and you dont have to worry about the somewhat buggy bf2editor which could ruin your work.
 |
|---|
Image File: grass01-color.jpg
Grass01.dds one of the default colortextures in bf2editor
 |
|---|
Image File: colormapselected.jpg
A part of the colormap in one of my maps created with terragen.
 |
|---|
Image File: hintbrush.jpg
Hint! resize your texturebrush with ctrl + mousewheel and brush opacity with shift + mousewheel instead of moving the mouse up to the texturewindow..
 |
|---|
Image File: hintcolors2.jpg
 |
|---|
Image File: hintcolors1.jpg
Paint in pure colors in the bf2editor not only in premade textures. Just select a texture layer in the terrain-texture mode and change the color and apply colormode-color-color in texture settings below your brush settings. This is great for finetuning, creating roads, darkening textures next to the water, road tracks, finetuning roads created with the road tool and much more.
Detailmaps[]
 |
|---|
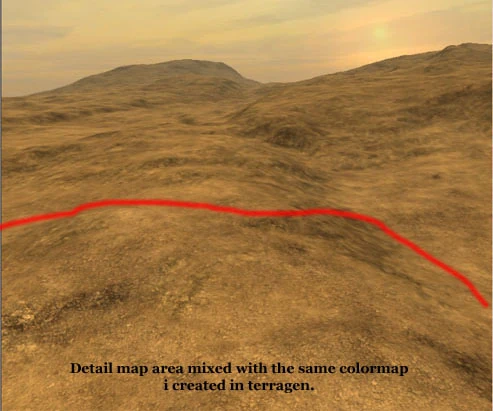
Image File: showdetailarea.jpg
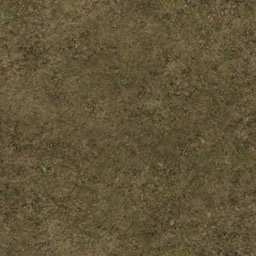
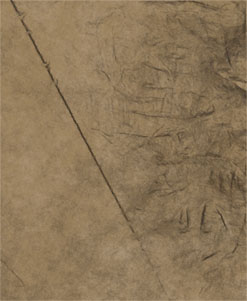
The detailmap is what you see closeup in the terrain. This is most often orthographic greyscale images of grass, rock, sand, gravel,dirt, mud and so on.
You can have a maximum of 6 detailtextures in your map so choose them visely. The official DICE recomendation is to place the following types of detailtextures in the layer number:
- Rock
- Grass
- Sand/Dirt
- Tarmac
- Optional
- Optional
Dont forget to utilize as many different materials as you can to get the most out of the bf2 engine, in Forgotten Hope 2 veichles will behave according to the surface they are traveling on.
Important! If the detailtexture contains color it will override your colormaps and could look ugly, be especially careful when applying some grass in desert with the default detail textures. Detailtextures will also brighten the terrain depending on the individual lightness, you should experiment until you get the result you want. Also switch between lowdetail texture and detail texture mode to check colors.
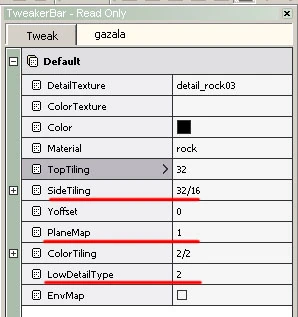
The LowDetailType setting should be as follows:
- 2 for bumpiest surfaces like mountainrock.
- 1 for slightly bumpy surfaces like gravel,sand,dirt and grass.
- 0 for very very fine surfaces like beachsand and tarmac
 |
|---|
Image File: lowdetailineditor.jpg
Also lowdetail 2 (rock) should always have sidetiling enabled (Planemap "1") , otherwise you will get ugly texture transformations when movin towards the mountain. Also dont forget that toptiling has no affect with this setting, set sidetiling to something like 32/16 or 64/32 otherwise your mountain will look very blurred on close distance.
This information is for those who intended to use an external programs to create detailmaps, but could be intresting for those who whish to know how the bf2 texture system works in detail:
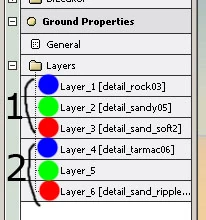
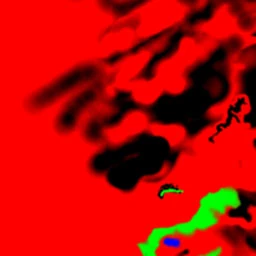
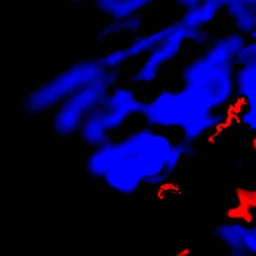
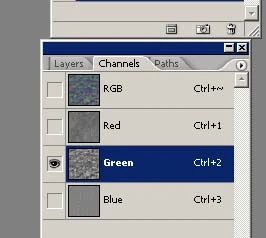
The detail layers are represented in a form of a texture, this texture covers your entire map and is also named detailmap. The 6 detail layers are divided up into two sections and each layer has a color value. Each color then represents a layer you select in the bf2editor. Layer 1, Layer 2, Layer 3, Layer 4, Layer 5 and Layer 6.
Layer 1 has Blue 1-255, Green 1-255 and so on. When at value 255 the texture is a 100% strenght and nothing will show trough, the lower the value the more transperacy between the layers you get. If the color of layer 1 is a pure color value of like Blue 200 Green 55 Red 0 layer 2 will show trough with a opacity value of 55.
The maximum RGB color value must always be a total of 255 Therefore when using external programs like Terragen or Ecomap to generate detailmaps one must always convert to a indexed palette and reconvert to RGB so that all coulours have a maximum value of 255. Otherwise youre detailtextures will become to bright or to dark.
Black color creates a hole for section 2 to fill. Therefore there is always two versions of the same tile _1.dds and _2.dds. Where the color is black the layer above and below will show trough, any pixel deviation between the two textures will cause your detailtextures to be ugly islands of very bright detailtexture that doesnt blend very well.
 |
|---|
Image File: layers.jpg
The layers are divided into two sections.
 |
|---|
Image File: tx02x03_1.jpg
tx02x03_1.dds from gulf of oman notice the black hole to fill in section two on the image to the left.
 |
|---|
Image File: tx02x03_2.jpg
tx02x03_2.dds fills in the gap perfectly.
Edit your color- and detailtextures[]
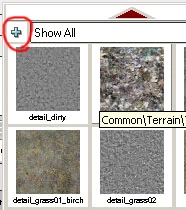
If you want to edit the detail- and colortextures in Photoshop you can find them in /battlefield 2/mods/yourmod/yourlevel/editor/colormaps/.Note you will need Nvdia DDS plugin to open these files. You could also create completely new ones. Cgtextures is a good resource for textures suitable as detailtextures. Use Photoshop, Mapzone or TextureMaker to make them seamless.
Save your modfied texture with some different name like detail_dirt_mymap or your new texture as something that doesn't already exist in the editors list of textures. Save as 512x512 BMP since the editor will automaticly copy and convert these to dds for your mod when you use the importer (+ sign in your detail colortexture selection.
 |
|---|
Image File: editor-plus.jpg
Lowdetailmap[]
For genrerating the editors lowdetailmaps you should create your own lowdetailmap this texture defines how your texture looks on a distance.
Important! and because of this you should always select 3 detailtextures as a base for your map, 2 textures for rocky (horizontal and vertical lowdetailtype 2) and one for the sligtly rudged surfaces like gravel/grass/mud (lowdetailtype 1).
I use a rock texture for my vertical lowdetailtype 2, this should be the same as your detailtexture. For the slightly bumby surfaces (lowdetailtype 1) i choose a sand texture to match my detail that covers most of the map.
Lowdetailtype 0 obviously doesn't have a lowdetailtexture so it's not needed in your lowdetailtexture.
 |
|---|
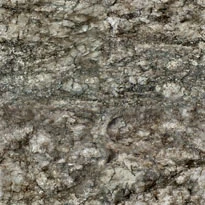
Image File: Detail_Rock03.jpg
Detail_rock03.dds, lowdetailtype: 2 (horizontal), Red alpha channel
|
|---|
Image File: Detail_Rock03.jpg
Detail_rock03.dds, lowdetailtype: 2 (vetical), Green alpha channel
 |
|---|
Image File: Detail_Sand_soft2.jpg
Detail_Sand_soft2.dds, lowdetailtype: 1 (sand,gravel), Blue alpha channel In Photoshop create a new 512x512 picture, open your alpha channels and copy the textures as described above.
 |
|---|
Image File: choose-alpha.jpg
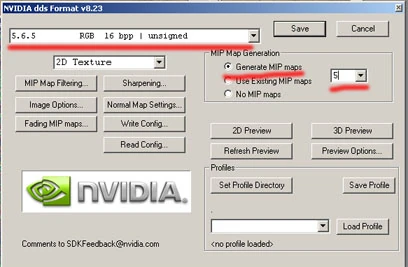
The end result should look something like this: Save this file in /battlefield 2/bf2editor/rawdata/common/terrain/textures/lowdetail/mylevel.dds as a 5.6.5 RGB with 5 MIP maps. If you have succeded the file should be the size of 683kb or the same as defaultlowdetail.dds. Now you can select your file in bf2editor and generate your unique lowdetailmaps. If you get some errors like black terrain youll probably have to many MIP maps, use Nvidia WTV tool to check the exact number of mip maps anything above or below 5 will cause errors with your lowdetailtexture.
 |
|---|
Image File: lowdetailsave.jpg
Some more tips for creating lowdetailtexture:
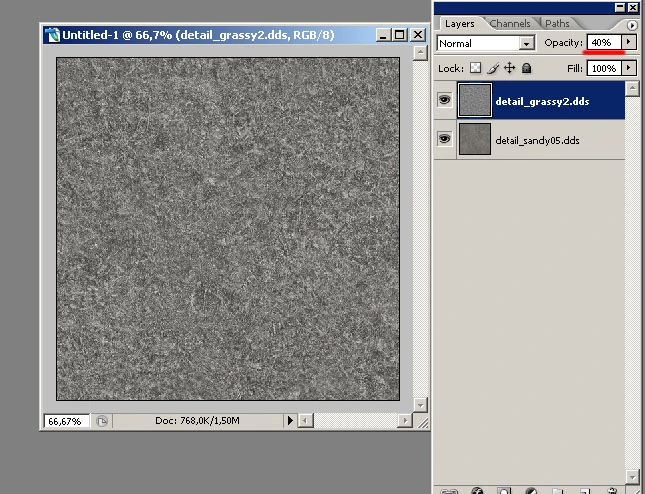
Often you'll have not only one but two major types of lowdetail 1, say 50% gravel and 50% grass and both of these must somehow fit fit just one lowdetailtexture. This means just copying one of the detailtextures wont cut it. Theres however a little trick to make the lowdetail 1 to fit better with two types. Just copy both of your major lowdetail 1 files into a new photoshop file, youll now have three layers, just delete the default background so we have only the two textures left. Set the opacity to the top layer to something like 40%, youll probably have to experiment how much or how less blending will work on your map.
Right click on any layer, flatten image, ctrl+a to select everything. ctrl+c to copy, ctrl+v paste it into your blue alpha channel as described above.
 |
|---|
Image File: lowdetailadvanced.jpg
Texture settings in bf2editor[]
 |
|---|
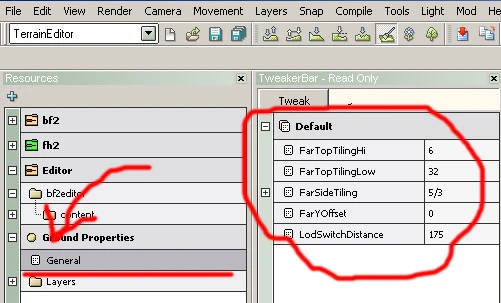
Image File: settings-general.jpg
FarTopTilingHi: This is how your lowdetailtexture type 1 will be tiled, the higher the number the better looking but also more blocky/patchiness if you have large viewdistances and flying veichles or mountains. If you use flying veichles use someting like 6 and if its a infantry/land veichle only citymap with low viewdistance then you can go 16 or maybe even 20.
As viewed in this example from above the terrain:
 |
|---|
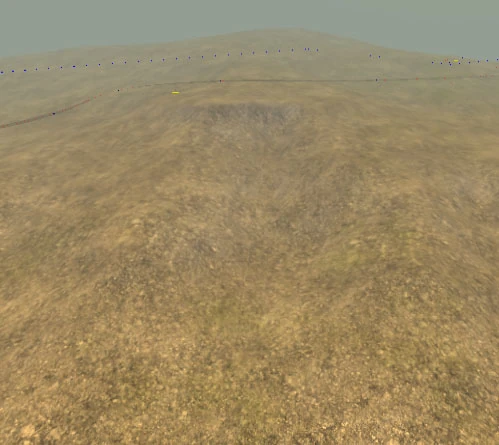
Image File: settings-far16.jpg
FarTopTilingHi: 6 (lower numbers look better from above and less tiled)
 |
|---|
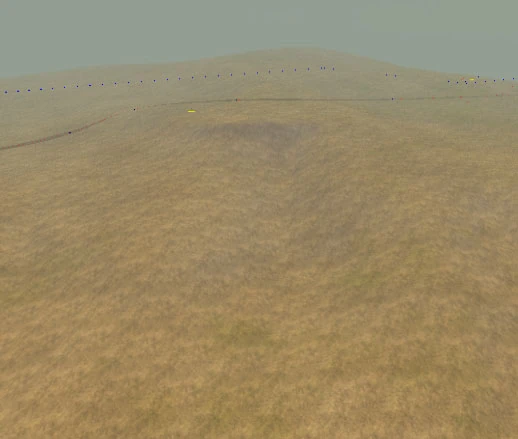
Image File: settings-far32.jpg
FarTopTilingHi: 32 (same resolution as default detailmaps and very annoying tiles from above)
FarTopTilingLow: Your lowdetailtexture is always used as both detailtexture and lowdetailtexture when the client uses lowest graphics settings, therefore this should be kept as 32 in most cases to keep detail closeup for computers with low graphic settings. May need to be increased on maps with water since it seems to affect the "watertiling" to.
FarSideTiling: How lowdetail 2 textures are tiled, for small pieces of
FarYOffset: Im not 100% sure what this one does but according to the DICE guys it could be used to " Offset the side mapped detail vertically"
LodSwitchDistance: Sets the the distance when the terrain should switch to the lowdetailtexture, seems to only affect the editor. A value of 0 is good to see how your detailtextures look and what areas they cover.
The indiviudal layer options:
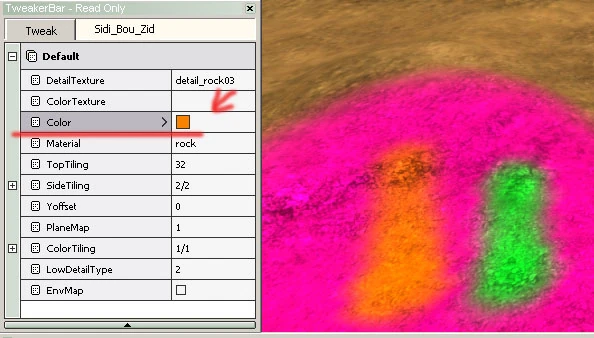
Image File: settings-layer.jpg
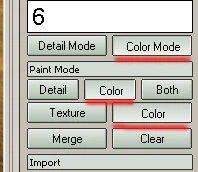
Detailtexture: Which detailtexture to use, remember offical dice recomendation layer 1 rock 2 grass 3 dirt/gravel/sand 4 tarmac 5-6 optional. Colortexture: Which colortexture to use when painting colors in texturemode. Color: Which color to use when you paint with only color instead of texture. Material: Affects veichles handeling, sound effects choose closest match to your detailtexture. TopTiling: Lower values = lower detail, higher values = higher detail but more risk of tiling that looks like a chessboard, use the higher values for textures that dont cover as much surface and the default 32 for textures that cover most of the map to make them blend better with lowdetailtexture. I wouldnt go under 32 in value since the looks of the map will suffer to much. Disabled with planemap. SideTiling: Activated when planemap is set to "1", use sidetiling values like 32/16 or 64/32 Yoffset: "Offsets the side mapped detail vertically" Planemap: Activates the sidetiling (for rocky surfaces) Colortiling: If your colortexture looks like blockish garbage you can set these numbers higher to make the colortexture appear better, works the best with the more detailed colortextures. Also really high numbers can be used on really small brushes to make sure that all of the texture goes to the surface. Lowdetailtype: 0/1/2 Used for a flat/uneven/rocky look. (Far away), results will only appear when you have generated your lowdetailmaps. Envmap: Used for instance in conjunction with material water_puddle to create reflective water puddles, requires that the detail textures has a alpha mask.
Surrounding terrain[]
Most of the rules mentioned above will apply to the surronding terrain but there are some exceptions:
- Surrounding terrain doesnt use detailtextures, only lowdetailtextures
- Therefore when editing the surrounding detailmaps, blue is lowdetail 2, red is 1 and black is 0
- Lightmaps are not stored in a separate texture filed but baked into the colortexture so the surrounding terrain will look very bright until you have generated lightmaps AND saved compiled color/detailmaps. The lightmaps for surrouding terrain is stored in your my_level/editor folder.