The Click Team installer Creator is incredibly easy to use and best of all it is free. The Pro version is the same, but without the Click Team logos.
The Problem is that it can be tricky to get it to use the registry to set up the install path. I am sharing my method for getting it to work to install mods. I am using Windows 10 but this should apply to anything newer than XP.
Background
Let's talk a bit about the difference between XP and newer Windows Operating systems. First of all, XP was a 32 bit operating systems. All Software was installed in the \program files folder. Most newer operating systems support 32 bit and 64 bit applications.
The 32 bit apps are now installed in the \Program files (x86) folder, with the x86 indicating the architeture of the processor common at the time of 32 bit operating systems: 286; 386; 486; etc.
the 64 bit apps now use the \Program files folder.
The Registry Settings
The Registry is the location where Windows keeps up with everything. For Battlefield 2 and 2142 the install locations are different from XP and newer Operating systems. This creates a problem if you want to support XP and newer operating systems with an installer. With a more advanced installer it would be possible to make it possible to make the the installer work on XP and newer operating systems, but with click Team only one registry setting can be read, so either two different installers so another method would be needed for XP. Since I don't have an XP system with Battlefield installed on it to test the installer, I choose to only make an installer for newer operating systems and to zip up the mod for XP and any other case where the installer does not work, such as on a MAC.
For XP the registry install location for Battlefield 2/2142 is :
Root Key: HKEY_LOCAL_MACHINE
KEY: SOFTWARE\Electronic Arts\EA Games\Battlefield 2
For BF2142 the only difference is the Key:
KEY: SOFTWARE\Electronic Arts\EA Games\Battlefield 2142
Subkey: InstallDir
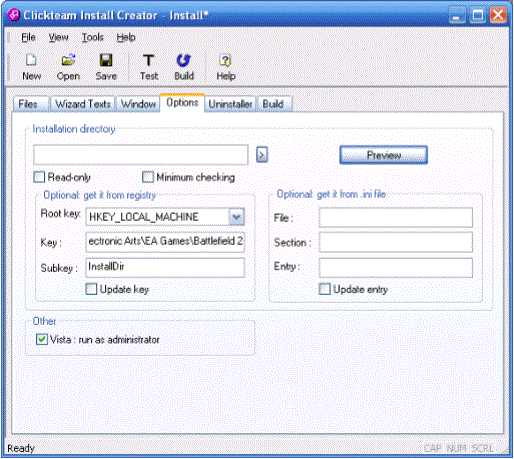
This image shows how it would be input into the Click Team installer:
 |
|---|
Select Preview to validate.
Now on Windows 10, 8, 7, and Vista, these are the settings:
RootKey: HKEY_LOCAL_MACHINE
Key: SOFTWARE\WOW6432Node\Electronic Arts\EA GAMES\Battlefield 2
For 2142, this is the only change:
Key: SOFTWARE\WOW6432Node\Electronic Arts\EA GAMES\Battlefield 2142
Subkey: Installdir
The Install Path Problem
Here is where we come into the tricky part. Since mods need be installed into the mods folder, there is no way to tell the installer to add \mods folder to the install path. Also, when the path to the mod location is being set up Click Team installer is set to the name of your mod, it would only select the files not the mod folder name, which would result in all the files and subfolders being installed into the battlefield 2 or 2142 folder.
Now to avoid this mess, you will need to copy your mod to a temporary location with the mods folder to be used to create the installer as in:
\temp\mods\[Mod Name]
This location can be in your desktop, documents, Program files, where ever is easier to work with. The temp folder can be called anything you want. In my example, I used test instead of temp.
In my example for a First Strike installer, I copied First Strike mod to:
C:\Program Files (x86)\Origin Games\Test\mods\FirstStrike
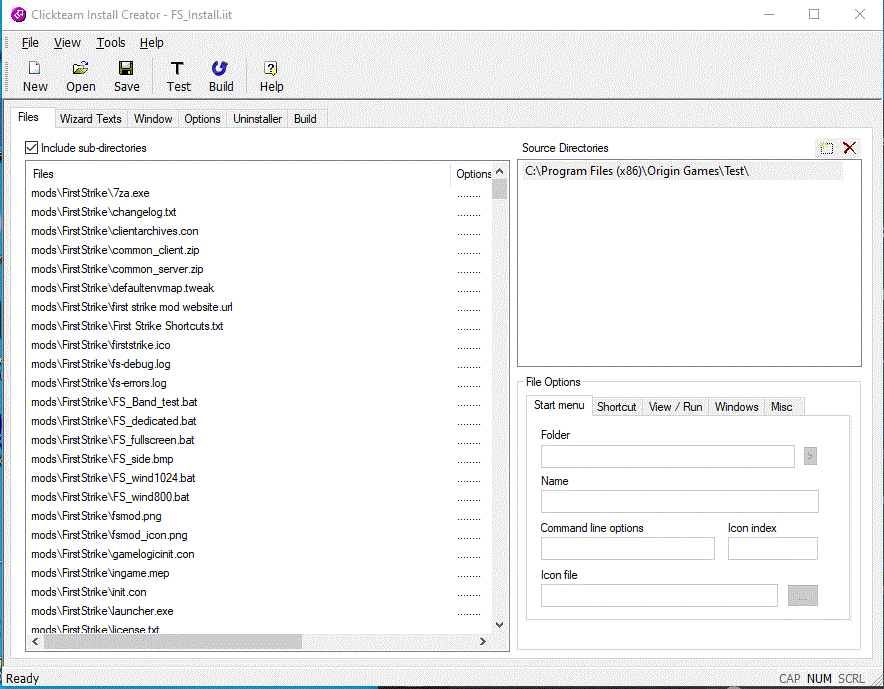
Now with the Click Team Install Creator option to select the source files, I selected:
C:\Program Files (x86)\Origin Games\Test\
This way, the source files include the \mods folder
That way it will install to Battlefield 2142\mods\firststrike as It needs to.
You can see the files in the mod all start with \mods and the source directory in the right collumn points to my \Test folder
 |
|---|
I hope this is helpful. I wrote this mainly for future reference for myself, but I tried to make it understandable for others.