Create New Team Max
Creating a New Team for Battlefield 2 Max Version
by [EA]Lawrence Brown
Download tutorial files
Updated: 10/25/2005
This tutorial will cover all steps necessary to create a new team and get it functional in the game.
This is considered an advanced tutorial and should be attempted only after you have become familiar with how modding BF2 and the Editor work. The process isnt particularly difficult, but there are many steps involved, and missing one or performing a step incorrectly can result in unexpected results or the game crashing. Please try to be patient and double-check your work.
Set-Up[]
- Open up the tutorial files folder you downloaded and locate the Blank_Soldier.max file. Copy this to \Rawdata\Animation\Blank_Soldier.max.
This tutorial assumes that you have created a new player model and textured it. The model should consist of three meshes: the body, the head, and the hands. Note that the hands should be merged together and considered as one mesh.
For the rest of the tutorial, we will be working with the light soldier. All the same steps apply to the heavy soldier, just substitute heavy where appropriate.
The textures for the body and hands should be contained on one 1024x1024 image. The head should be on a separate 512x256 image. You may want to unzip the retail BF2 Objects_client.zip to somewhere on your hard drive (not in the game) and look at the existing textures for reference.
- If you have not created the models for your team, you can use the tutorial files provided. After downloading, place the folder My_ Team in \bf2editor\RawData\Objects\soldiers\My_ Team . Create any folders necessary to create this path. Well deal with the other tutorial files as we go.
Double-Checking your textures and Paths:[]
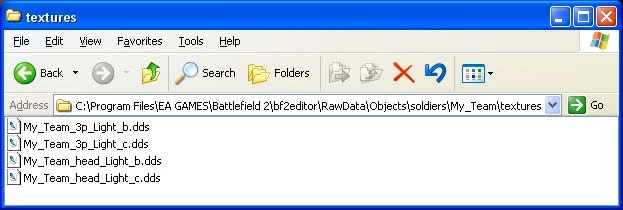
The first thing were going to do is double-check that you have the textures set up right and that everything is in the correct path.
- The path to your work files should be as follows:
C:\\Program Files\EA G ames\Battlefield 2\ bf2editor\RawData\Objects\soldiers\My_ Team .
 |
|---|
Image File: t8image001.jpg
- Inside the My_ Team folder should be the textures folder:
 |
|---|
Image File: t8image002.jpg
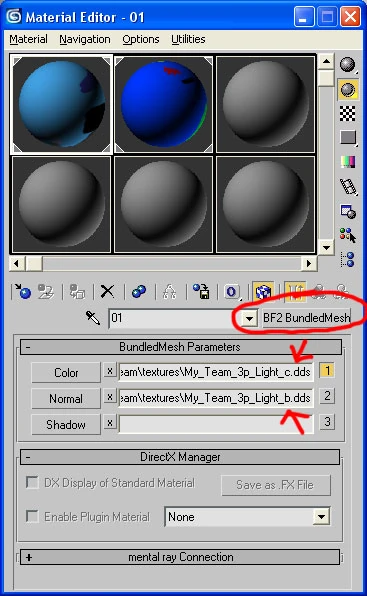
Note that you should have both a color texture and a normal map for both the body and the head. The normal map is what should provide small details such as wrinkles in clothing and so on.
- Open your work file. If you are using the tutorial files, this will be My_ Team _Light_Work.max. I add _Work to the end of the label of my initial file so that I know this is the original. This way it wont be confused with the final version we create. You may want to label your files the same.
- Check to be sure that you are using the BF2 BundledMesh cgFX shader and that you have both the Color and Normal channels hooked up correctly. (There is no SkinnedMesh cgfx shader for Max, so we just use the BundledMesh shader. The exporter will correct this during export.):
 |
|---|
Image File: t8image003.jpg
Note that there are two materials: One for the body and hands, used for both the third- and first-person views, and a second for the head as explained earlier.
Assembling the Files[]
The first thing we have to do is get the meshes into the same file as the skeleton.
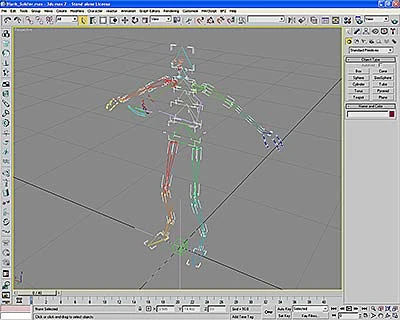
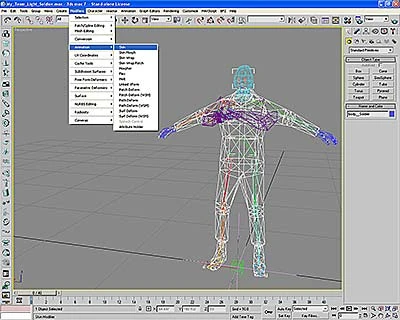
- Open the file Blank_Soldier.max that we placed in the \Rawdata\Animation\ folder earlier. You should now have a third-person skeleton in a classic Davinci pose and a first-person skeleton in the default weapon holding pose:
 |
|---|
Image File: t8image004.jpg
- Using File>Merge from the main menu, select the My_ Team _Light_Work.max file that we looked at previously.
- In the options window that pops up, click on the All button and then Okay to merge the player meshes with the skeleton scene:
 |
|---|
Image File: image005.jpg
- Before we go any further, save your scene as My_ Team _Light_Soldier.max in \RawData\Objects\soldiers\My_ Team \. This is important so that you dont accidentally overwrite any of the original files that you may need again later.
Examining the Player Meshes[]
Take a moment now and examine how the player meshes line up with the skeletons. (If you are trying this with your own meshes, you may want to open the tutorial version as reference.)
Note that the hands in the 3p- and 1p-skeletons are different: In the 3p skeleton, there are only three fingers. The thumb and trigger finger are each skinned to individual bones while the rest of the fingers are all skinned to the pinky. In the 1p skeleton, each finger has its own corresponding set of bones.
When using your own meshes, make sure that the names of your pieces exactly match those in the tutorial file. Well go over them now.
body__Soldier:
This is the body mesh of the 3p player. Note the __Soldier at the end of the name. It begins with two underscores and Soldier is capitalized. The name must match exactly.
handsMesh:
These are the hands for the 3p player. Note that both hands are part of the same mesh. The name can be anything you want, though its best to follow this naming convention.
headMesh:
This is the 3p player head. The name can be anything but head, since this is the name of one of the bones. Naming both the same will confuse the exporter. Once again its best to stick with the recommended naming convention.
right_arm__Soldier:
This is the right arm of the 1p player. This name again ends with __Soldier and must be named exactly as shown or the exporter may not work right.
left_arm:
The left arm of the 1p player. The name doesnt need to match exactly, but like the others, its best to stick with the recommended naming convention.
Note: The two arms for the 1p player can be made by duplicating the 3p player body mesh, deleting polygons and reshaping to fit the 1p skeleton. You may have to change the dimensions of certain parts of the arms or hands because the 1p camera view is different than the 3p camera view.
Also note that each arm consists of the arm and the hand attached together as one mesh. This will be important later when skinning.
Skinning the Meshes[]
With the player meshes merged into the skeleton scene, its time to skin them.
- Select the mesh that comprises the 3p body and select Modifiers>Animation>Skin:
 |
|---|
Image File: t8image006.jpg
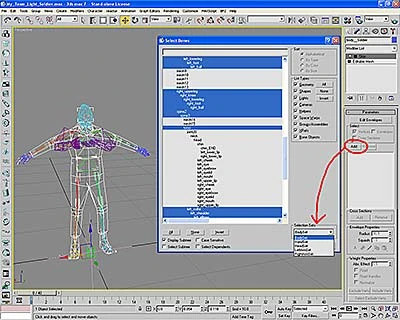
- Make sure that the body mesh is still selected, and in the Skin Modifier rollout, click on the Add button in the parameters section.
- In the window labeled Select Bones that pops up, click on the drop-down menu labeled Selection Sets in the bottom-right and choose the set labeled BodySet:
 |
|---|
Image File: t8image007.jpg
This will automatically add the correct bones to the body mesh.
- Repeat steps 11-13 for all the remaining meshes, both third- and first-person. There is a selection set for each piece. LeftArmSet and RightArmSet are for the 1p meshes, and the others for the 3p meshes.
Weighting the skin[]
Now that youve skinned your meshes, youll have to adjust the weights.
It is beyond the scope of this tutorial to teach the weighting of vertices. There are many different techniques, and you should use the one that works best for you.
There are two basic rules for skinning/weighting:
- A maximum of 26 bones can be assigned per mesh.
- A maximum of 2 bones can influence each vertex.
Note: You do not have to get the weights perfect now. It may be preferable to wait until we get to viewing your player skin with animations in the editor and in-game, then come back and fix the trouble spots.
Additional LODs[]
Note: This is an optional step that you may want to put off until after you have successfully imported your first team.
When you get to the point where you would like to create additional LODs, follow this procedure:
- Create your additional geometries however you want and name them as follows:
lod1_body
lod2_body
lod1_head
lod2_head
lod1_hands
You want 3 LODs total. The meshes you previously skinned are considered lod0. Notice that there is an lod1_hands, but not an lod2_hands. This is because at the distance these would switch in, you wouldnt see them anyway, so they arent necessary.
- Once you have created the additional LODs, skin them exactly the same way you did the other meshes. If you want to add the LODs that go with the tutorial, merge the pieces from My_ Team _LODs.max into your scene file:
 |
|---|
Image File: t8image008.jpg
Notice that Ive created some pretty whacky meshes here. The reason is because this is a test and this way I can see from a distance when the LODs change.
Also remember that there wouldnt be any additional LODs for the first-person meshes because only the player will see them and the distance to the camera never changes.
Setting up the Hierarchy[]
The Blank_Soldier.max file already has most of the hierarchy set up correctly for export. The only thing we have to do is add the meshes.
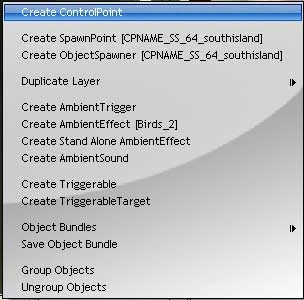
- Open up a schematic view by choosing G raph Editors>New Schematic View from the main menu.
- In the schematic view, choose Edit>Connect from the menu (or click on the Connect icon).
- Connect the hands and headMesh pieces under the body__Soldier piece.
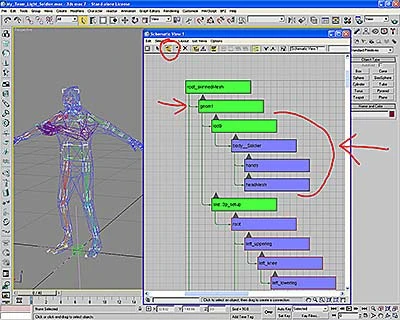
- Connect the body__Soldier piece under the lod0 node at the top of the hierarchy.
Important: There are two lod0 nodes in the hierarchy. For this operation you want the one that is under the geom1 node. When you are done, your hierarchy should look like this:
 |
|---|
Image File: t8image009.jpg
Note that in the screenshot, Ive switched the schematic view to Hierarchy mode rather than the default References mode. Your schematic view may be slightly different.
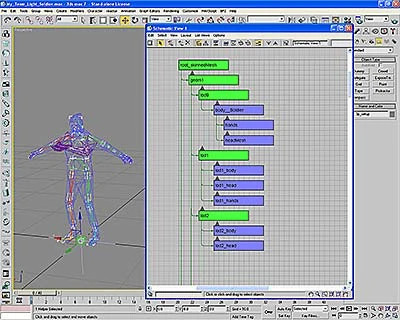
- Scroll down in the schematic view until you find the geom0 node. Underneath this will be the second lod0 node.
- Again using the connection tool, connect the left_arm and right_arm_Soldier pieces under this lod0 node:
 |
|---|
Image File: t8image010.jpg
Remember that geom0 always contains the first-person meshes and geom1 contains the third-person meshes.
Adding the Additional LODs[]
Note: These steps are optional and only required if you have skinned the additional LODs. To add the LODs to the hierarchy we will have to make more lod nodes.
Dummy Node Steps:
- Close the schematic view or move it out of the way and zoom in to the origin of the grid.
- In the create tab on the right of the screen, select the helpers icon. (the one that looks like a tape measure)
- Under Object Type, click on the button labeled Dummy.
- Click on the grid near the origin, and with the mouse button held down, drag the cursor out a little bit to create the dummy object. It will look like a cube. The actual size doesnt matter. Just keep it about the same size as the others.
- With the dummy still selected, change the name to lod1.
- Finally, before deselecting, right-click on the Select and Move icon to bring up the Move Transform Type-In window and change all the numbers so they read zero. Refer to the following screenshot for all the above steps:
- Repeat the Dummy Node Steps to make another dummy node. This time label it lod2.
- Using the previous connection method, connect lod1_body, lod1_head, and lod1_hands under lod1.
- Do the same thing connecting lod2_body and lod2_head under lod2.
- And lastly connect lod1 and lod2 under geom1. Your geom1 hierarchy should now look like this:
 |
|---|
Image File: t8image012.jpg
Remember that you have to skin the additional lod meshes the same way as the original for this to work.
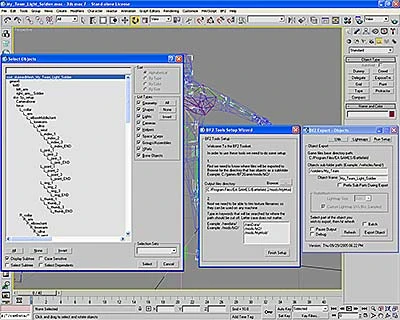
Exporting the Soldier[]
We have now completed the soldier scene file. The next step is to export.
- Save your work again if you havent done so already. We want to make sure we dont lose any of the work weve done.
- Select BF2>BF2 Exporter from the main menu.
- In the BF2 Exporter window, click on the Run Setup button.
- In the BF2 Tools Setup Wizard window that opens up, make sure that the output path is set to the correct mod. Click on the Finish Setup when you are done to return to the exporter window.
- In the exporter window, set the Objects sub-folder path to /soldiers/My_ Team . Substitute the name of your mod if necessary.
- Set the Object Name to My_ Team _Light_Soldier. Again, substitute the name of your team if necessary.
- With the exporter window still open, select the root node of the hierarchy. I recommend using the Select by Name window.
- With the root node selected, click the Export Object button in the export window. In the following screenshot, Ive combined all the options windows into one. Use this for reference. Note that when you type in the name of the team in the export window, it appends this to the root_skinnedMesh node. Dont let this confuse you:
 |
|---|
Image File: t8image013.jpg
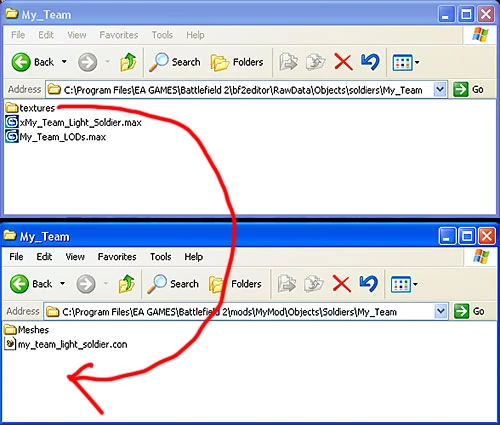
Post-Export File Set-up[]
You have now exported your new team, but before we can use it, we have to do some file management and editing.
- Open up the folder \RawData\Objects\soldiers\My_ Team and copy the textures folder to \mods\MyMod\Objects\Soldiers\My_ Team . We have to do this manually because the exporter doesnt know how to do this:
 |
|---|
Image File: t8image014.jpg
- Locate the us_light_soldier.tweak file that came with the tutorial files and copy this also to \mods\MyMod\Objects\Soldiers\My_ Team . This file is from the Objects_Client.zip file of the retail game and has had the read only option turned off so you can edit it.
- Change the name of the file to my_team_light_soldier.tweak so that it matches the .con file. Your folder should now look like this:
 |
|---|
Image File: t8image015.jpg
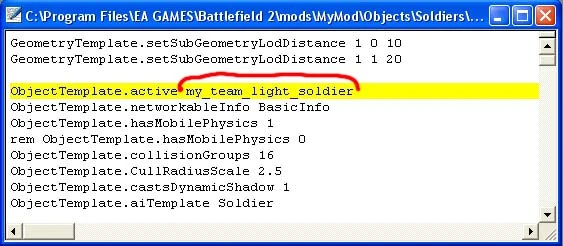
- Open the my_team_light_soldier.tweak file in your text editor.
- Near the top will be a line that reads ObjectTemplate.active us_light_soldier. Change the name of the team to match whats in the .con file. Again, in our case it would be ObjectTemplate.active my_team_light_soldier:
 |
|---|
Image File: t8image016.jpg
- Save the file and close it.
Remember: If you have copied this file from the unzipped Objects zip archive, it will be Read-Only until you change it in its properties box. Ive already done this to the one included with the tutorial files.
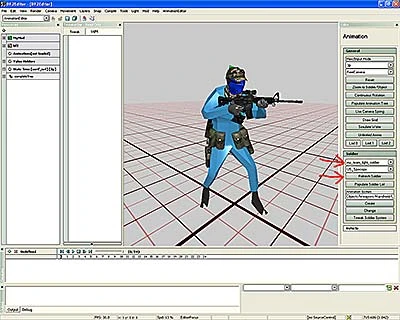
Viewing Your Soldier in the Animation Editor[]
We are now finally ready to view our new soldier in action in the editor.
- Launch the editor (selecting the correct mod at start-up) and switch to Animation.
- On the right side, in the section labeled Soldier, click on the drop-down list and select my_team_light_soldier.
- To load your soldier into the view window, you now have to click on the Refresh Soldier button:
 |
|---|
Image File: t8image017.jpg
You should now be able to use all the normal animation window controls to view your new soldier in action with various kits and animations.
Getting Your New Team Into Your Maps[]
There are several more things we have to do before we can actually place the team in a map and play. The first is to edit one of the editor files.
- Quit the editor again. We will need to restart once we finish so that the editor loads the updated files correctly.
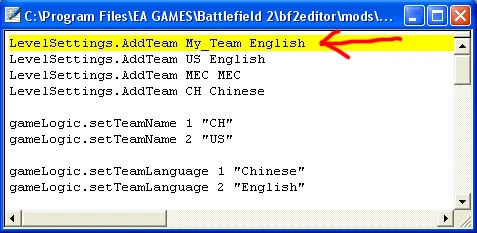
- Locate the file \Battlefield 2\bf2editor\mods\MyMod\LevelEditor\LevelSettings.con and open it.
- Insert a line at the very top with the text LevelSettings.Add Team My_ Team English. (You can copy and paste an existing line and just change the team name):
 |
|---|
Image File: t8image018.jpg
Note: Do not change any of the other text in this file. It will currently be incorrect, but you can ignore this because the editor changes this each time you work on a level.
- Save this file and launch the editor yet again.
- Switch to the Level editor and load up the level you want to insert your new team into.
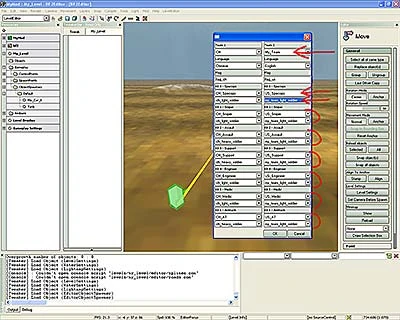
- On the right side of the editor, click on the Level Settings button.
- Click on the drop-down box directly under Team 1 or Team 2 and select My_ Team . Notice that the fields below change.
- Manually select what you want in each slot below the team you changed. If you leave any blank, the game may crash. For each of the kits, you will have to use a kit from an existing team (US_Specops, etc.). In the soldier class listing under each of the kits, for now just use my_team_light_soldier. Later if you make a heavy soldier, you can switch these where appropriate:
 |
|---|
Image File: t8image019.jpg
- Click Okay to apply the changes.
- Add control points, spawn points, and whatever else you want as usual and save your map.
Editing the MemeAtlas.tai File[]
Because of the way the game is structured, when you add a new team, the game automatically looks for certain minimap icons associated with the team. This is good in that you dont have to do a lot of custom coding to get your new icons in. Its not so good in that if you dont account for this now, the game will crash.
There are two ways to fix this: we can create new custom icons, create a new texture atlas, and edit the MemeAtlas.tai file to find these new icons, or we can just edit the .tai file to use existing icons with the new team. We are going to use the second option in this case because it will get us up and running faster.
One limitation of the game is that it will only recognize one MemeAtlas.tai file, so we have to edit the existing file and then make sure the game loads our custom version first.
- Close the editor if you havent already. As usual, this is to be sure that once we have finished editing the files, the editor loads the updated versions correctly.
- Find the MemeAtlas.tai file that was included with this tutorial and copy it to \mods\MyMod\Menu\Atlas\. (If the Atlas folder doesnt exist inside the Menu folder, you will have to create it.)
- Once you have copied this file over, open it with a text editor and scroll to the very bottom to find this section:
 |
|---|
Image File: t8image020.jpg
A texture atlas is simply one huge image into which a whole bunch of smaller images have been placed. Texture atlases are used for optimizing the game. Its a lot faster for the video card to load one big image than a whole bunch of tiny ones.
A .tai file is just a text file that tells the game where inside the huge texture atlas each original tiny image was placed. .tai stands for Texture Atlas Index.
In the .tai file youll notice two columns: the one on the left lists the image that was added to the texture atlas, and the one on the right gives the coordinates and size of the image inside the texture atlas.
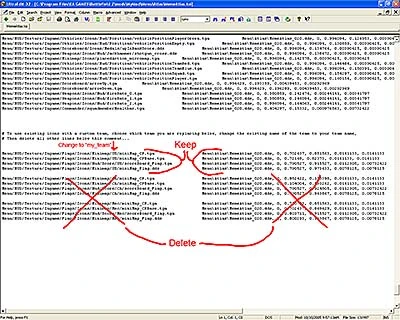
- In the section highlighted above, find the group, either US, Chinese, or MEC, that you want to replace with your team. (Remember, this only affects the flag icons, nothing else.)
- In this tutorial, we are going to replace the US side, so in each line where it says US, replace the text with my_team. You have to do this in each of the four lines of the group. Note that I have this highlighted in the screenshot above.
- Once you are done replacing the text, delete the lines in this section for the two teams you are not using. If you dont, the game may crash. You should now have this:
 |
|---|
Image File: t8image021.jpg
- Save and close the file.
Placing the Nametag Folder[]
There are a few icons we have to copy manually to the Menu folder because the .tai file doesnt look for them.
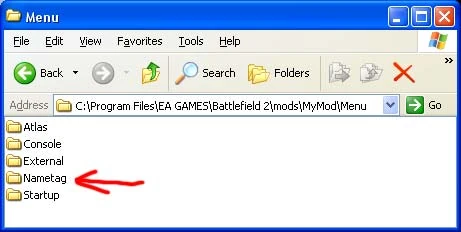
- Locate the folder labeled Nametag that is included with the tutorial files.
- Copy this to the \MyMod\Menu\ folder in your mod directory:
 |
|---|
Image File: t8image022.jpg
Note: the contents of your Menu folder may or may not include all the folders seen here. Some are empty but may have been created if you have previously used the packager.
Correcting the .con File Loading Order[]
As mentioned above, the game only permits one MemeAtlas.tai file, so if it finds the one in retail BF2 first, it will ignore the changes we made in the mod. We will correct this now by telling the game which order to load things in.
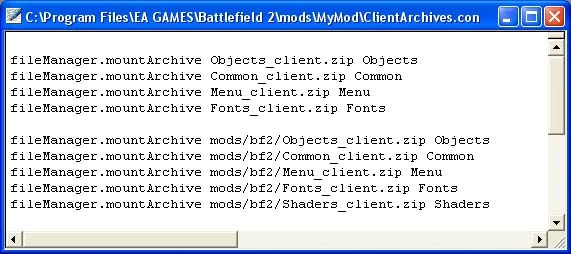
- In the root folder of your mod, find the two files we need to edit: ClientArchives.con and ServerArchives.con:
 |
|---|
Image File: t8image023.jpg
- Open ClientArchives.con in your text editor.
In this .con file, you will see two sets of text. They all start with fileManager.Archive. The first set then has a path that starts with mods/bf2/ and ends with Objects_client.zip Objects and so on. The second set doesnt have a path. All we need to do is change the order.
- Rearrange the lines so that the set without the path to bf2 comes first. When youre done, your file should look like this:
 |
|---|
Image File: t8image024.jpg
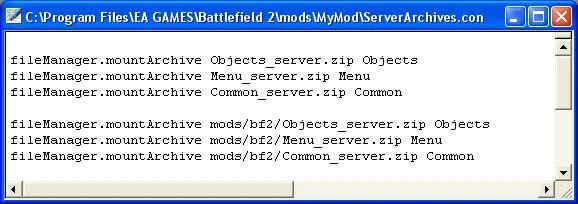
- Save the file and do the same to ServerArchives.con. When youre done, it should look like this:
 |
|---|
Image File: t8image025.jpg
- Make sure this file is also saved and close your text editor. The game will now look for the mod files first and then load anything additional it needs from the retail BF2 archives. This way our custom MemeAtlas.tai file will be loaded instead of the original.
Packaging for Testing[]
Because of the particular files we have added, we have to package the mod before the changes will show up. This is a good habit to get into anyway.
- Launch the editor and choose MyMod or whichever mod you are working with from the start-up screen.
- Switch to the Level Editor and load up the map that you added the new team to.
- With the level loaded, select Mod>Package Mod from the main menu.
- In the options window that pops up, make sure that both Package this level: and Package the active MOD: are checked and click OK.
This makes sure that all changes weve made to both the level and the mod get added to the zip files.
Every time you want to test, you should get in the habit of doing a Save All from the file menu and then packaging. This is the best way to be sure you are testing the most recent changes.
Correcting File Placement After Packaging
We have now done everything we need to get our new team in. Unfortunately, the packager puts the MemeAtlas.tai file in the wrong place. We must correct this now.
- Close the editor one last time. We are done with it now.
- In your root mod folder, find the Menu_client.zip file and open it with with an archiving program such as WinRar.
Note: we are not extracting the file, just opening the archive so we can edit it. Here Im using WinRar, but you can use any archiver that works for you:
 |
|---|
Image File: t8image026.jpg
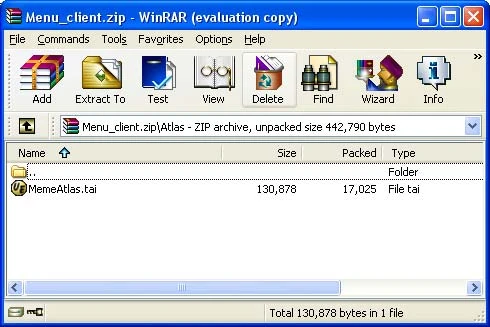
- open the Atlas folder so that you can see the MemeAtlas.tai file:
 |
|---|
Image File: t8image027.jpg
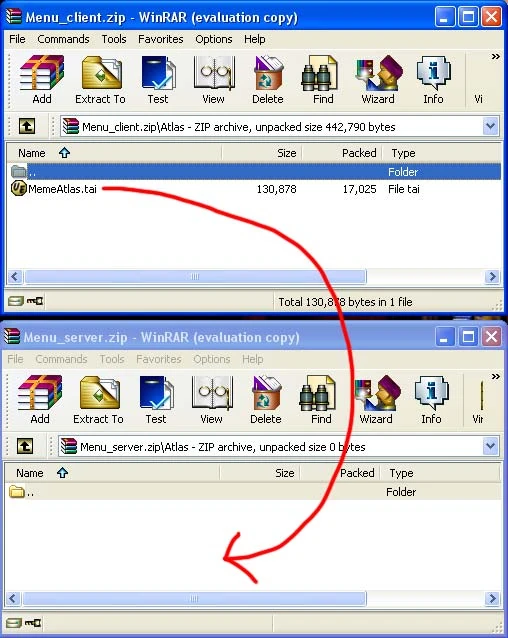
- Leave this open and with a second instance of your archiver, open the Menu_server.zip file. Depending on what else you have done in your mod, this may or may not be completely empty.
- In the Menu_server.zip file, you will need to create an Atlas folder if one doesnt already exist.
- With both the Menu_client.zip and Menu_server.zip archives open, copy MemeAtlas.tai from the Menu_client\Atlas directory to the Menu_server\Atlas directory of the server zip:
 |
|---|
Image File: t8image028.jpg
Note: This method works with WinRar. If you are using a different archiver, you may need to use a different method. Just be sure that the path is Menu_server.zip\Atlas\MemeAtlas.tai. Placing this file anywhere else may cause the game to crash.
Also note: If the only file in the Menu_client\Atlas directory is MemeAtlas.tai, as it is here, you can just copy the Atlas folder to the Menu_server zip archive instead of creating a new Atlas folder inside it.
- After you have copied the MemeAtlas.tai file to the proper place in the server zip, delete it from the client zip. If you leave it in both places, it may cause problems. (Deleting the MemeAtlas.tai file may also delete the Atlas folder if its empty. Its okay either way as long as the MemeAtlas.tai file is deleted from the client zip.)
Note: Unfortunately, until the packager is fixed, you will have to move this file using the above method every time you repackage the game or the game will crash. (You do not have to do this if you only repackage a level. This applies only when you repackage the game itself, such as when you add new content.)
Close these archives. You are now ready to test locally.
Important! The files are now ready for you to test by yourself on a local server. If you want to test with others or over the internet, there are some additional changes you need to make to the packaged files. Please see the Internet Mod Testing Procedure tutorial for details.
 |
|---|
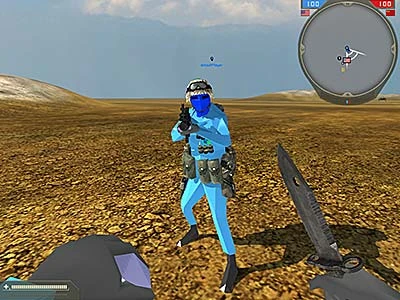
Image File: t8image029.jpg
My_ Team in-game
Congratulations. You have just inserted your first custom team into the game.