Creating New Kits
Battlefield 2 Modding Tutorial 9
by [EA]Lawrence Brown
Note: This is considered an advanced tutorial. It coversMaya workflow. Where differences occur in terminology but are essentially the same operation, I will be defaulting to Maya terms and putting the Max equivalent in Parenthesis. For instance: Import (merge). Importing is what you would do in Maya, and merging is what you would do in Max. Where there is an actual difference in workflow, I will create separate sections and label each accordingly. Skip over whichever one is not applicable to you.
It also may help to read through this entire tutorial first before beginning actual work. The most important steps are at the end where you will skin the kit pieces, set up a hierarchy, and export. The creation steps dont need to be as rigidly followed as long as you end up with the pieces that are needed.
Set-up[]
Inside the Tutorial Files folder that came with this tutorial, locate the folder labeled My_ Team . Copy this folder to RawData\Objects\kits\My_ Team . (You may or may not have to also create the kits folder to make this path correct.)
Note: Do not confuse this folder with the My_ Team folder in your soldier directory. They are labeled the same, but are not the same thing.
Creating the Geometry[]
The first step in creating a new set of kits is to create the individual pieces. All pieces should be created at the same time because of the export requirements. This will be explained more later.
Start by creating a new scene and importing your soldier mesh as reference. If you are using variations such as Light or Heavy, you can import both if you like and hide whichever one you are not using. If you are following these tutorials in order, you can start by opening up My_ Team _Soldier_Ref, which can be found in the My_ Team Kits folder along with the other files.
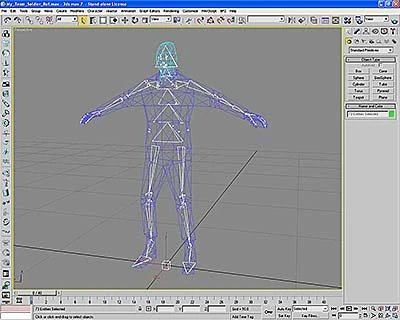
Import your 3rd-person soldier skeleton into this scene. Normally this would be the 3p_setup file found in RawData\Animation\Setup\3p. Note that we are actually importing the skeleton this time, unlike when setting up a new soldier mesh where we referenced it. You should end up with something that looks like this:
- Save this file as My_ Team _Kits. (Note that it is important that _Kits be at the end of the name.)
 |
|---|
Image File: t9image002.jpg
- Save this file as My_ Team _Kits. (Note that it is important that _Kits be at the end of the name.)
Note: whatever you use for your soldier reference doesn't need to be textured. Its just there as a guideline for modeling your kits. Whats important is that the 3rd-person skeleton that you are using in the game be there.
- Model and texture all your kit pieces using the following texture notes. Each piece, such as the various packs, helmets, and so on, should be a separate mesh. The names arent that important, but should be something meaningful so that you can easily pick out the various pieces from a list later.
Note: If a particular piece is going to be used for several kits, you only have to create one for now. We will make the duplicates later.
Dont forget to create the pilot kits and drop kits at this time. Note that none of these pieces need any collision meshes, not even the drop kits. There should just be a single visible mesh for each piece.
Texture Notes[]
There is no actual restriction on how the textures are set up, but it is strongly recommended that you stick to the following texture sheets and sizes unless you have a specific reason for adding more. Just remember that more textures or bigger textures may affect game performance, so be sure to test if you attempt a different set-up.
The following are the default sizes used in the retail game:
- Kits 2048x2048
This is the texture sheet used by all of the basic kit pieces of one team. These are the pieces that appear on your player when you choose a class.
- Pilots 1024x512
This sheet is used by the “pilot” kits that the player gets when they enter a vehicle. The vehicle classes that use these are “_tanker”, “_fighter”, and “_heli”.
- Drop kits – 512x512
This sheet is applied to the drop kits that are left behind after a player dies.
Notes:
These textures should all be saved as DXT 5 .dds textures with mipmaps, but no alpha. Kits and Pilots each also have a corresponding normal map, but Drop kits do not. Additional textures can be created where necessary for special cases. For instance: if you unzip the Objects_client.zip of the retail game and look at the textures for the US team, you will also see a set for specops, the ghilliesuit, and also a woodlands variation. It is possible to have an alpha channel with the kit textures. See the ghuilliesuit for an example of this. The names of all shaders, whether Maya or Max, should end with _Tangent. This prevents the conversion of the normal maps to object space when importing/exporting, which is what we want in this case.
If you want to use the kit pieces that I created for the tutorial, import (merge) the file My_ Team _Kit_Pieces into your scene. Note: you will then already have the duplicates necessary for the next step.
Creating the duplicates[]
Eventually we will be placing all the pieces for an individual kit under 1 node of a hierarchy the same way we do with everything else, so we now need to make any necessary duplicate pieces. The best way to do this and stay organized is to do something like the following:
- Select each mesh that you just created and move it off to the right side. Spread them out so that you can see each individual piece.
- One at a time, select each mesh piece for the first kit, duplicate it, and move the duplicate to the correct place on the soldier reference. (This does not include the drop kits)
- Select all the pieces that make up this kit and assign them to a new layer (Maya). Rename the Layer or Set to match the corresponding kit.
Note: For this operation, there should be a kit for each class, and a kit for each Pilot kit you are making. For example, if you are creating the kits for My_ Team , you would have the following sets:
- My_ Team _SpecOp
- My_ Team _Medic
- My_ Team _Engineer
- My_ Team _AT_AA
- My_ Team _Heavy_Inf
- My_ Team _Light_Inf
- My_ Team _Sniper
- My_ Team _tanker
- My_ Team _fighter
- My_ Team _heli
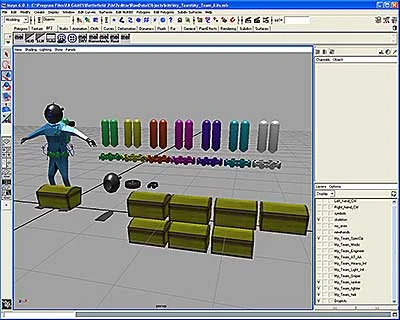
When your done, you should have something that is similar to this:
 |
|---|
Image File: t9image003.jpg
Note that for simplicity, the kits for my various classes are basically just the same meshes mapped to different color areas of the texture sheet. In this case the drop kits are also all the same. Yours will be different.
Note that you may also wish to assign pieces to various layers , which you can hide and show individually in order to stay organized. This is purely optional, but will help later once we begin skinning so that you can hide all but the pieces you are skinning.
Setting up the Hierarchy[]
Now that we've created all the pieces, its time to organize them in the hierarchy. Skip to the section labeled for the modeling package that you are using.
- Create an empty node and rename it root_skinnedMesh.
- Create a second empty node and rename it G eom0_My_ Team _SpecOp.
- Parent the second node under root_skinnedMesh.
- Create a third empty node and rename it Lod0.
- Parent this node under G eom0_My_ Team _SpecOp.
- Select all the mesh pieces that belong to this kit. Make sure that their pivot points have all been moved to the origin and all transforms reset, then parent them to Lod0. (This is where the layers come in handy.)
- Repeat this for all the other class kits, pilot kits, and drop kits. Note that the drop kits just sit at the origin. (Dont forget to reset their transforms, too.)
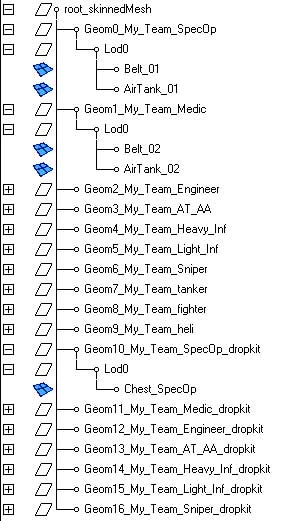
When you are done, your hierarchy should look like the following. Notice that Ive expanded the first two class kits and one of the drop kits:
 |
|---|
Image File: t9image004.jpg
The important things to note here are that each set of meshes is grouped under a node named Lod0, which is in turn grouped under a node that starts with G eom0, G eom1, and so on. The actual name that comes at the end of those labels isnt that important, though its best if you label everything correctly to avoid confusion.
Once we get to editing the kit .con files, you will see that the game references the G eom number. It is important that these be in order, that the first one be G eom0, and that no numbers are skipped. You can actually add more if you like, but well get into that more later.
Note: you can name the helper with just G eom0, but its helpful to add the name of the kit to the end. G eom and the number of the kit is what the exporter is actually looking for.
- Parent the G eom0 node under root_skinnedMesh_My_ Team _Kits.
- Create a second dummy helper and rename it Lod0.
- Parent this dummy under G eom0_ SpecOp.
- Select all the mesh pieces that belong to this kit. Make sure that their pivot points have all been moved to the origin and all transforms frozen, then parent them to Lod0 (This is where the sets come in handy.)
- Repeat this for all the other class kits, pilot kits, and drop kits. Note that the drop kits just sit at the origin. (Dont forget to freeze their transforms, too.)
- At this time, you will also have to rename each of the drop kit pieces (and any other pieces that wont get skinned to a bone) so that they end with __SimpleObject. For instance: Sniper_dropkit__SimpleObject. Note the usual double-underscore. If you dont use this label, the export wont work right.
- Lastly, parent ske:root_skeleton under root_skinnedmesh_My_ Team _Kits.
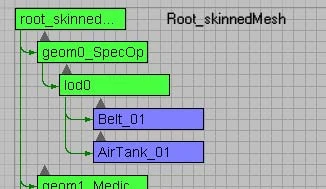
When you are all done, your hierarchy should look like the following. Click on the image for the full screenshot:
 |
|---|
Image File: t9image005.jpg
Note that I've labeled the names that were cut off by the schematic view.
Also note that I've only expanded the first class kit and the first drop kit. The important things here are that each set of meshes is grouped under a node named Lod0, which is in turn grouped under a node that starts with G eom0, G eom1, and so on. The actual name that comes at the end of those labels isn't that important, though its best if you label everything correctly to avoid confusion.
Once we get to editing the kit .con files, you will see that the game references the G eom number. It is important that these be in order, that the first one be G eom0, and that no numbers are skipped. You can actually add more if you like, but well get into that more later.
Skinning the kit pieces
We have all the pieces connected in the hierarchy, but we still need to skin them to the skeleton.
- Save your work again if you havent already so that you dont have to repeat the last steps over again should anything go wrong.
- Starting with the first kit, skin the pieces to the appropriate bones.
The skinning process is the same as when creating a new team, so Im not going to go over the whole thing again. Just remember the following:
- Any single mesh can be skinned to up to 24 bones. It doesn't matter which set or sets the bones belong to. The ghuilliesuit is a good example of this. It covers most of the body, including the head, but because of the bone limit, only certain bones from the body, head, and hands were included in the skinning of the main piece.
- In many cases, a kit piece may only be attached to one bone, but for larger pieces that need to deform, you can still skin across multiple bones, just like the player skin. Just make sure that a maximum of only 2 bones influence each vertex.
- Drop kits don't get skinned to anything. They just sit at the origin. Just make sure they are connected in their proper places in the hierarchy so that they get exported.
- We are only exporting the kit pieces! Do not skin the body, head, or hand pieces form the soldier mesh that you imported as reference! Doing so would cause problems.
- Once you have skinned all the kit pieces, make sure they all deform correctly by moving the bones around. (Don't forget to return all the bones to their original position. You may want to save the scene, move the bones around for a final check, then reopen the scene to be sure none of them have moved.)
- When you are satisfied that everything is working correctly, make sure you have unhidden everything and do a final save.
Importing/Exporting the Kits[]
It is now time to get the kits into the editor.
- (Optional) With the scene still open, you may wish to delete the body, head, and hands meshes that you imported as reference just to be sure they don't export. Alternatively, just make sure that they are NOT skinned to the skeleton or included in any hierarchy.
- Once you are satisfied, make sure the scene is saved as My_ Team _Kits and quit Maya.
- Open up the editor and select My_Mod in the Startup MOD window.
- Switch to the Object editor and import the My_ Team _Kits.mb scene you just finished.
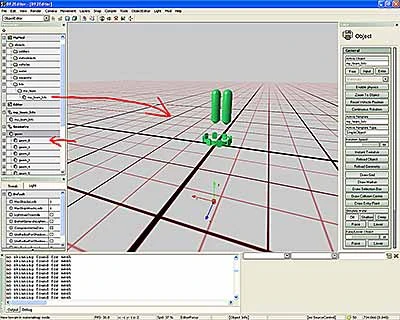
Note: In the output window you will see a bunch of lines that read no skinning found for mesh. This is from the dropkits. As long as the editor doesn't crash, its safe to ignore it if an error message comes up. If you now drag the kit to the main window, you should see something like this:
 |
|---|
Note that you can expand the geometry section at the bottom of the tweak bar and click on each of the geometries to see the various kits.
- Open up the editor and select My_Mod in the Startup MOD window.
- Switch to the Object editor. You should now see My_ Team _Kits listed in the tweaker bar. If you drag the new kit to the main window, you should see something like this:
|
|---|
Image File: t9image006.jpg
Note that you can expand the geometry section at the bottom of the tweak bar and click on each of the geometries to see the various kits.
Editing the .Con Files[]
Before we can actually get our team to use the new kits, we need to edit several .con files by hand.
- Close the editor since we will have to re-launch it to get it to see the new files.
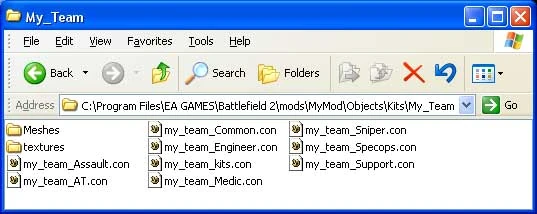
- In the tutorial files that came with this tutorial, locate all the .con files that are for the kits, like my_team_Specops.con and so on. (This should also include my_team_common.con)
- Copy these files to mods\MyMod\Objects\kits\My_ Team . (This is your mod directory, not the RawData directory!) Your folder should now look like this:
 |
|---|
Image File: t9image008.jpg
If you are following this tutorial using the my_team files, then these will already be set up for you. Lets go through one anyway to see what changes you will have to make for your own custom team.
- Copy the file my_team_Support.con and rename the new file my_team_Frogman.con.
- Open my_team_Frogman.con in your text editor.
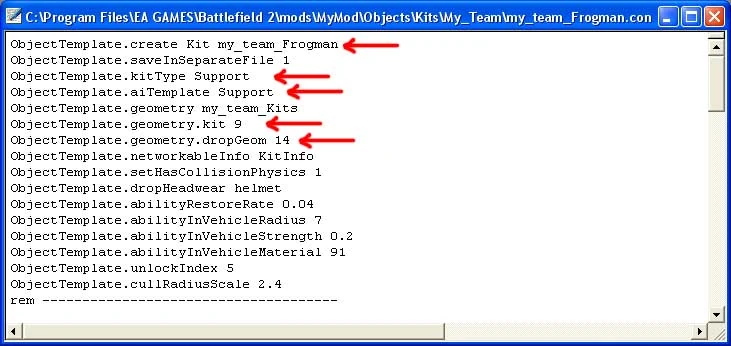
- Change the first line so that it reads ObjectTemplate.create Kit my_team_Frogman.
- In the third line, note where it says kitType Support.
In the next line, note where it says aiTemplate Support.
Note: You don't have to actually make any changes in steps 49 and 50. I just wanted you to see where you change these lines.
- Two lines below this is the line which ends with geometry.kit 4. This is the number that corresponds to the geom notes that we set up in the scene file. Change the number to 9. Now our frogman will use the helicopter pilot kit.
- The next line ends with geometry.drop G eom 14 and of course is where you set which drop kit to use. You would change this number to whichever was appropriate in your scene file just like the other kits. In this case it wont really matter because all our drop kits are the same.
If you look further down in the file, you will see that this is where you set up which weapons, icons, and so on that this class will use. Don't change any of this for now. When you are done, the beginning of the file should look like this:
 |
|---|
Image File: t9image009.jpg
This is an example of how you can make extra kits, assign them an additional sequential geom Number in your scene file, export, then set up a new .con file that calls the new kit.
Using Your New Kits in the Editor[]
We've now done everything necessary to get our new kits in the game, so lets do that now.
- Launch the editor again, selecting the appropriate mod from the start-up window.
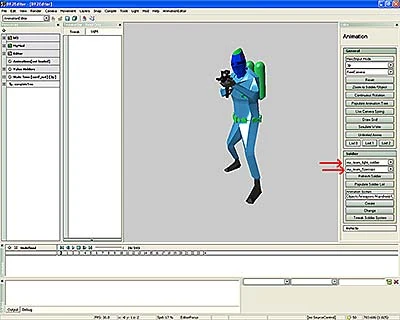
- Once the editor is open, switch to the Animation Editor section.
- In the Soldier section on the right side, select My_team_light_soldier or whatever custom soldier you are using. (Note that the custom kits may not show up on the retail soldiers.)
- Next select my_team_Specops or whichever kit you would like to view and press the Refresh Soldier button. You should now be able to see your custom kit in action:
 |
|---|
Image File: t9image010.jpg
The last thing you need to know is how to get the kits into your maps.
- Switch to the Level Editor and load My_Level or whichever level you would like to use.
- After the level loads, click on the Level Settings button on the right side of the screen.
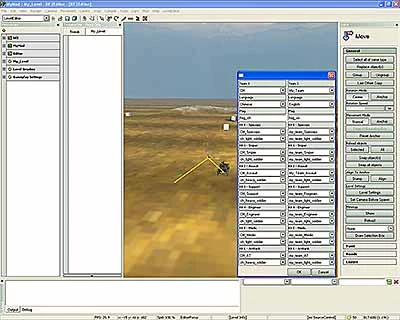
- Here you will have to manually select which kit and soldier body you want for each class.
Notice in the following screenshot that I have selected the Frogman as the Support kit. This is an example of how you can make extra specialized kits for a team and then select them for certain maps:
 |
|---|
Image File: t9image011.jpg
You are now ready to package your map and test as usual.
A final note: I've included the finished kit scene files that you can use as reference. The file is named My_ Team _Kits_final (one each for Maya and Max). You can open these up to see how everything is set up. If you want to try importing/exporting this file, you will want to rename it My_ Team _Kits.