BF42 Understanding the AI - Part 2 - Strategic Areas
StrategicAreas.con
Based on tutorial by Arc D'Wraith, updated by Dnamro
Preface: Since Arc D'Wraith wrote his AI tutorials, there have been tools developed to help the setup of BF42 and BFV with a basic level of AI support. Understanding how it all works together will help you to troubleshoot your map AI and improve it.
This is Part Two of the Ai .con Editing tutorial.
The aim of this tutorial is to further describe the Ai functions and teach you to customize your Ai to the map.
lets get going...
Ok, here we go again ... back to the sandy world of Aberdeen.
In the last episode of the Ai Cutting and Pasting Chronicles, we took an Ai out of its existing environment, without any regard for it's well being and shoved it into a world of Alien origin ... are you surprised the bots we're confused ?
|
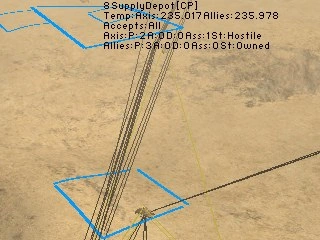
What are Strategic Areas ? In short ... these blue things. |
 |
Strategic Areas (SA for short) are used to mark locations of importance to the Ai. The most common use for a SA is to mark Control Points, but can also be used to mark locations of strategic advantage (eg:Tight spots and Bunkers) or navigational "waypoints" (eg: complex and/or alternate routes)
Try not too use more Strategic Areas then you have to, but don't hesitate to try an extra one here and there, if you are trying to achieve something, it is worth experimenting.
SAs are linked to each other with the use of Neighbours. Bots move from one SA to its Neighbour by the shortest route, as allowed by the Pathfinding maps.
Rather than jump into writing up the SAs, as with much in mapping, its good to have a plan. With as little as a pencil and piece of paper, a small sketch will be a great help in understanding what lies ahead. Paint programs are quite handy, rather then a piece of paper, as you can paste in textures and pathmaps to further see “the big picture”
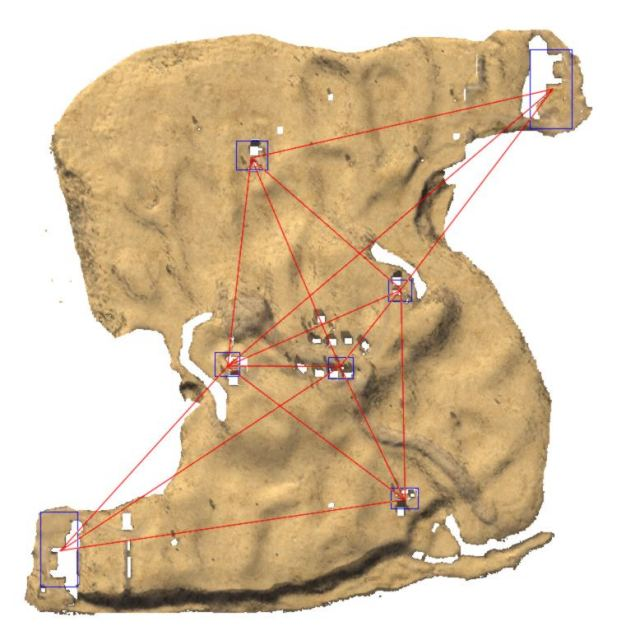
In the following image, i have overlayed a Tank pathmap, to give a general idea of the pathed area available. Blue rectangles are for Strategic Areas, and the red lines show which SAs I will "link" with a neighbour
 |
Where the red "neighbour" line crosses over the white, non-pathed area the bot will skirt around the edges till they get to their destination. The bots do not usually drive into a non-pathed area, but they can get pushed into it.
On this occasion, i'm going to plan ahead and use some SAs for waypoints, to help the Bots leave their bases
 |
Yep ... that's better.
Now we know roughly where we are going to setup the SAs, lets start working out exactly where they will be. Open the StrategicAreas.con from your Addon's folder, and also open Aberdeen in your favourite map editor. For this part i use Ed42
The first block of code in StrategicAreas.con creates the SA, by defining the position, size and value of the SA. The second block is the bulk of the code, which describes the additional attributes of each SA
First we are going to
Define our Strategic Areas. Lets have a look at the code.
aiStrategicArea.create <SA_NAME> <X1>/<Z1> <X2>/<Z2> <NUMBER>
<SA_NAME> must be a unique name, no spaces, use something descriptive (eg: CP_Radar)
< X1 / Z1 > These are the Start co-ordinates for the SA (rule of thumb: South West Corner)
< X2 / Z2 > These will be the End co-ordinates for the SA (rule of thumb: North East Corner)
< NUMBER > This will a Strategic Area a base value, value of 10 to 200 are the most commonly used
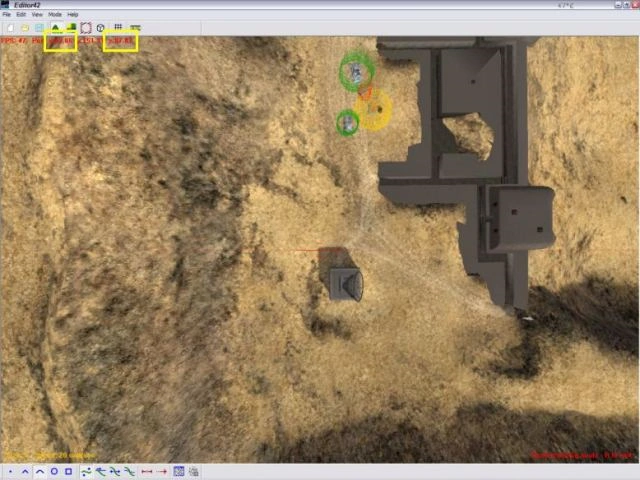
Switch to the map
editor, and locate the Axis Base in the bottom left corner, and position the Camera, near the South West corner of the base, looking straight down.
The road tool in Ed42 is handy to make sure the view is locked straight down.
 |
Get the Co-ordinates of your position, and write them down (63.86/87.07) these are your < X1 / Z1 > co-ordinates
You don't have to work to two decimal points. Unless you need to be super accurate you can round off those co-ordinates and just use 64/87, and this make things easier up ahead
Now move to the diagonally opposite corner of the base, and write down the co-ordinates of that position.
 |
Now you have your < X2 / Z2 > co-ordinates (121/219)
Easy ! I hear you say, well not quite, i have a speed bump for you ...
If you use those values, your Strategic Area would look like this.
 |
I dunno either, very strange ... the < X1 / Z1 > co-ordinates are in the right place but < X2 / Z2 > ... wtf ?
The SA is twice the size that we wanted, so you will need to do some maths to work out a better < X2 / Z2 > co-ordinate.
Find the difference between X1 and X2 ( 121 - 64 = 57 )
Than add half of it back onto X1 for you new X2 co-ordinate ( 57 / 2 = 28.5 + 64 = 92.5 )
Repeat the calculation for your Z2 co-ordinate and you'll get 153
Then your Strategic Area will look like this
 |
We are nearly ready to start editing, once last decision needs to be made.
How much is the Strategic Area of a Base worth ?
That is a good question. How valuable is the base in terms of vehicles available or defenses required ?
You don't want to make a Base too valuable or the Bots will spawn there instead of the front lines. Yet, if you don't make it valuable enough, the Bots will rarely spawn at the Base leaving important Armoured Units to sit and rust. Also, Aberdeen has capturable bases, something different from most Battlefield Maps so you will need to take that into account by leaving troops at home for Defense.
Aberdeen has a good selection of tanks laying around, and we want some defense so a nice round figure of 100 sounds good. For less well equipped bases, where you want bots to be spawning more at the frontlines, a value of 50 is usually used.
This value is only an initial value, later we will cover Modifiers that allow you adjust the value of SA according to the state of play
Ok ... we have all the
information to define our first Strategic Area, so lets type it in.
aiStrategicArea.create AX_Base 64/87 92.5/153 100
Next, move across to
front of the Axis base where we will put the waypoint, I have worked out my co-ordinates, and as the waypoint has no Strategic value, it should have a low
value. This is the code i am going to use ...
aiStrategicArea.create AX_Waypoint 215/154 227.5/166.5 10
and this is what it will
look like
 |
|---|
the South, West, East and North ControlPoints
aiStrategicArea.create CP_South 625/200 651/225 150
aiStrategicArea.create CP_West 364/414 381.5/434.5 150
aiStrategicArea.create CP_East 624/544 640/566 150
aiStrategicArea.create CP_North 391/760 405.5/772 150
 |
The Centre ControlPoint is a bit tricker. We will move the CP's flag later for the bots, but for now
this will do.
aiStrategicArea.create CP_Centre 516/455 527/462.5 200
 |
And of course, the
Allied base, complete with Waypoint.
aiStrategicArea.create AL_Waypoint 725/819 738.5/832 10
aiStrategicArea.create AL_Base 854/803 880.5/886 100
 |
When you are finished putting them together in your StrategicAreas.con, you would have something like
this:
aiStrategicArea.create AX_Base 64/87 92.5/153 100
aiStrategicArea.create AX_Waypoint 215/154 227.5/166.5 10
aiStrategicArea.create CP_South 620/205 651/225 150
aiStrategicArea.create CP_West 364/414 381.5/434.5 150
aiStrategicArea.create CP_Centre 516/455 527/467.5 200
aiStrategicArea.create CP_East 624/544 640/566 150
aiStrategicArea.create CP_North 391/760 405.5/772 150
aiStrategicArea.create AL_Waypoint 725/819 738.5/832 10
aiStrategicArea.create AL_Base 854/803 880.5/886 100
|
TIP! : Cut n' Paste shortcuts |
|---|
| How you edit files, is entirely up to you ... but I strongly
suggest you get to know the keyboards shortcuts for; Copy - CTRL + C Paste - CTRL + V Cut - CTRL + X These are your friends, and they will save you alot of time, as well as saving you grief from typos' A handy feature of even the lowly Notepad is if you double-click a word, it will select the whole word. This makes selecting a word, copying it, selecting the target word to replace and pasting over it, more efficient and again, can greatly reduce typos' |
Now we have to fill in the details by describing each Strategic Area, with a few attributes. We'll start by using just a few lines of code, just to get the areas functional, and
add extra features later. Lets look closer at the code we will be using.
aiStrategicArea.setActive <SA_Name>
<SA_Name> Must be identical to the <SA_Name> used in the aiStrategicArea.create statement
AIStrategicArea.addNeighbour <SA_Name>
This is the statement
that allows us to link one Strategic Area to another. Lets have another look at our SA planning to see which Areas should be linked
 |
Starting at the bottom left, AX_Base only has one neighbour, AX_Waypoint.
AX_Waypoint has four neighbours, follow each red line and you get AX_Base, AX_Waypoint, CP_West and CP_South. You could argue that CP_East, CP_North and even AL_Waypoint and you would be correct, but in the goal of keeping things as minimal as possible, it is better if the bots move through the closer CPs first.
Work around each SA, count the number of lines linking to another SA, then work through each
neighbour one by one as you enter them into your SA.
aiStrategicArea.addObjectTypeFlag <FLAG>
Flags are used to give
Ai further information about the SA, and they can used later to modify the value, and therefore the importance of a SA.
The most Commonly used Flags are for describing the SAs purpose, such as: Base, ControlPoint and Airfield.
Other Flags can be used as “location” references; East, West, North, South and Centre.
There are also “Tactical” flags: ChokePoint, StrongPoint, Flank, Close.
How well these flags are
used will make the difference between a “clever” or “dumb” Ai
aiStrategicArea.setSide <#>
You are probably already
familiar with this statement, the <#> value sets which Team
owns the Strategic Area at the start of a round.
1 = Axis
2 = Allies
0 = Neutral
aiStrategicArea.setTakeable
<#>
0
This is a special statement for
NON-CAPTURABLE Control Points (usually bases.) As Aberdeen's base are capturable we are not going to use it, but you will need it for other maps.
The usage is similar to .setside, the <#> value is used to set the Side that cannot take the Base. ie: If it the area belongs to Axis (1) you would set his to 2 so Allies cannot capture the point. And the 0 at the ends tags the Non-capturable attribute.
OK, lets put that all together for
the AX_Base
aiStrategicArea.setActive AX_Base
AIStrategicArea.addNeighbour AX_Waypoint
aiStrategicArea.addObjectTypeFlag Base
aiStrategicArea.setSide 1
That doesn't look too scary now does
it ? ; )
Next, AX_Waypoint. It has four Neighbours to add, and we're going to use the CLOSE flag for this area, it might come in handy later. One more thing, well give ownership of this SA to Axis rather then leaving it neutral to help prevent bots from waiting in the SA to gain ownership in the “start of the
round” frenzy.
aiStrategicArea.setActive AX_Waypoint
AIStrategicArea.addNeighbour AX_Base
AIStrategicArea.addNeighbour CP_South
AIStrategicArea.addNeighbour CP_West
AIStrategicArea.addNeighbour CP_Centre
aiStrategicArea.addObjectTypeFlag Base
aiStrategicArea.setSide 1
The next five areas are
very similar. CP_South, CP_West, CP_Centre, CP_East and CP_North are all ControlPoints and they also fit in nicely with the “location” flags, South, West, Centre, East, and North so each SA will get it's own “location” flag as well. When you are working out the neighbours for each SA, be patient and methodical. An extra minute making sure you get them right first go, could save you a heap of time in the longrun.
Lastly, these SAs will
be neutral at the beginning of a round.
aiStrategicArea.setActive CP_South
AIStrategicArea.addNeighbour AX_Waypoint
AIStrategicArea.addNeighbour CP_East
AIStrategicArea.addNeighbour CP_West
AIStrategicArea.addNeighbour CP_Centre
aiStrategicArea.addObjectTypeFlag ControlPoint
aiStrategicArea.addObjectTypeFlag South
aiStrategicArea.setSide 0
and
aiStrategicArea.setActive CP_West
AIStrategicArea.addNeighbour AX_Waypoint
AIStrategicArea.addNeighbour AL_Waypoint
AIStrategicArea.addNeighbour CP_North
AIStrategicArea.addNeighbour CP_West
AIStrategicArea.addNeighbour CP_East
AIStrategicArea.addNeighbour CP_Centre
aiStrategicArea.addObjectTypeFlag ControlPoint
aiStrategicArea.addObjectTypeFlag West
aiStrategicArea.setSide 0
now go through and
complete the rest of the Control Points, AL_Waypoint and AL_Base and we are done, or you can cheat and just read the code in the included .RFA
Last step, in this part is to repack the Ai and Test.
This time around save the addon to Aberdeen_011.rfa, this will keep our old file intact, we'll call that our pre-alpha ; )
Once you have packed the file, start the game.
|
TIP! : Quick Map Starts |
|---|
You can get Battlefield to start a Map, straight from a shortcut
without having to go through the menu. Make a copy of your normal BF shortcut (or the one for the appropriate MOD) and add to the end of the Target:One double click, and Battlefield will start a game with the last Map and Server Settings that we're used. |
When the game has started, you will see this, quite similar to the last time ..
 |
If you see your desktop ... Don't Panic
There is a good chance you have only made a small error and the log may even give you a helping hand.
END OF PART 2
Tools Used:
Battlefield 1942
Ed42
GmakeRFA
Notepad
Open Office
.
|
|
|
|
< X1 / Z1 > These are the Start co-ordinates for the SA
(rule of thumb: South West Corner)