Battlefield 1942 Pathmapping Tutorial
By Arc D' Wraith; edited by Dnamro
 |
|---|
In this Part of the Tutorial I will introduce you to Pathfinding Maps, what they are, how they work and how to work with these files that are necessary for Bot support. We will be using the original Battlefield 1942 level Kursk in this tutorial as an example of existing pathmaps. There are many things that will not be covered in this Tutorial.
Firstly, this tutorial will only cover Land based maps that only use Cars, Infantry, Tanks & Aircraft. LANDING CRAFT and BOATS (ships) will NOT be covered.
Also, on occasions you may be required to do tasks that requires other software, such as RFA Tools, Image Editors and Map Editors. If you are doing this tutorial, you should already know how to do these tasks. It is not within the scope of this tutorial to teach you other software unless it is a tool or technique specific to Pathmapping.
What are Pathmaps ?
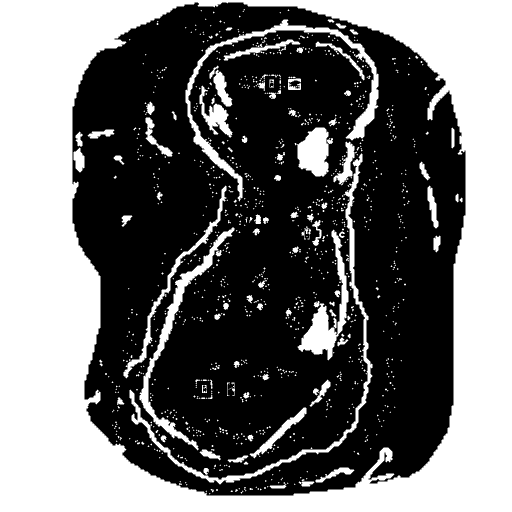
Pathmaps are images that are used to describe to the Bots the location of objects, steep slopes and anything in a level that could get the Bots in trouble or “stuck.” This is done by literally drawing the Bots a diagram of the map, using an image that is marked to show “Pathed Areas,” that are open areas where the Bots may travel, and “Non-Pathed Areas” the Bots Should avoid such as Walls or Cliffs. A simple two colour system is used, with Black (Index#0) used for “Pathed Areas” and White (Index#255) for “Non-pathed Area”
 |
|---|
Without Pathmapping Bots would continually; try to walk/drive through walls, try to walk/drive up slopes they cannot get up, walk/drive into holes/off cliffs, get stuck on buildings & other Static Objects, drown/blow up when they try to walk/drive across rivers, lakes or oceans ... phew.
In this case the picture speaks a million words, so we should have a look at an Existing Pathmap. We will also need access to the files within the level Kursk we will be working with. Open your favorite RFA tool and Extract Kursk.rfa to the Folder that you use for Editor42 map editing. To save confusion later, its not a bad idea to rename the Folder of the extracted level from Kursk to Kursk_Pathmap.
 |
|---|
Importing Pathmaps
Pathmaps are packed in Dice's own format that we are not able to view with our normal software. If you have software installed that has the RAW file type already associated, such as Photoshop™, the program will attempt to open the .RAW file when you double-click it, but as you may have already discovered, the program will not display or open the file properly.
The format is similar to the .RAW Image format, and Rexman was able to write an “Importer” that will unpack & convert Dice's .RAW Pathmaps to 8-bit Greyscale .RAW images, that we can view and edit.
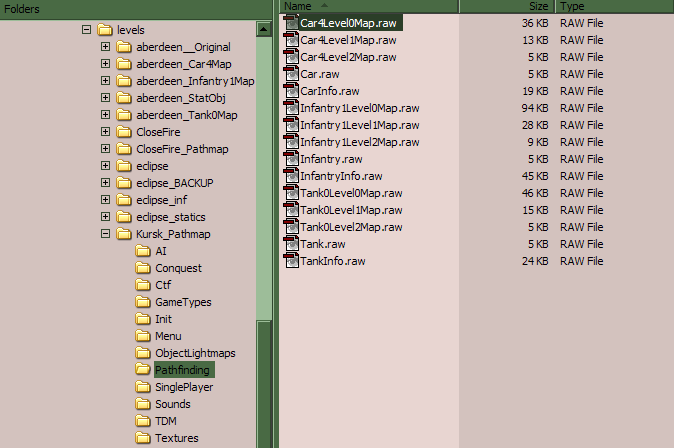
- Browse to the Folder you extracted Kursk to, and look in the Pathfinding folder.
 |
|---|
There are 15 files in all, and you should notice that there are three groups of 5 files for each unit type. Each of these file contains information that is based on the Level0Map Pathmapping files, and these are the files we will be having a closer look at.
- Browse to the Folder where you have unzipped Rexman's Ai Tools.
 |
|---|
Import_Pathfind.exe is the first Ai Tool we will be using. It is a Command Line Application that needs to be run from a Command Prompt (MS-Dos Window in Win9x/Me) or from a .BAT (batch) File.
Included with this tutorial is Import_Level0Maps.bat, make a Copy of this .BAT file in the same Folder as Import_Pathfind.exe. This batch file is setup to Import most level0 Pathmaps that are in this Folder when run. If you are curious which Pathmaps are setup for importing, or want to check that i haven't slipped Format C: /Q into the file just right-click on the .bat and select Edit.
 |
|---|
- Go back to where Kursk's Pathmaps were extracted and grab a Copy of the Car4Level0Map.raw and browse back into your Ai_Bots folder and Paste the Car4Level0Map.raw here.
 |
|---|
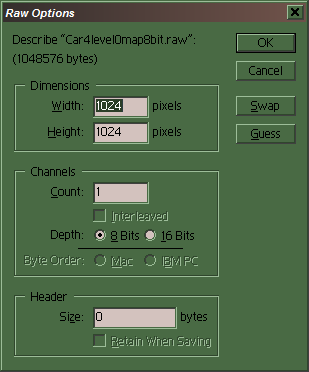
- Double-click Import_Level0Maps.bat to run the conversion process, and a new file will be created, Car4Level0Map8bit.raw.
Notice the same standard of file naming is used, with the extra 8bit added to remind us the file is 8bit greyscale .RAW
 |
|---|
Note: If your Photo Editor Software does not support 8 bit grewscal RAW format,see below for the FlyRawGUI tool to convert RAW to BMP:
Convert RAW to BMP - FlyRAWGUI
- Double-click on the new file, and if requested, make sure your settings are the same as this.
 |
|---|
The tutorial is continued here: